介绍
通常,开发人员在诸如如何在应用中嵌入映射,如何在地图上显示数据等问题等问题。在本文中,我们将学习如何使用leaflet&react-leaflet在React应用程序中的地图上显示API数据。
我们将观察如何根据用户单击地图上的任何位置,将记录坐标(纬度和经度)并以参数发送到API,然后将数据(如附近的城市)被获取并在地图上显示。
先决条件
我们需要对React的工作原理有公平的了解。
为什么传单和反应叶?
Leaflet是一个开源JS库,可使用交互式图。它使我们可以根据用户的交互添加标记,圆形,多边形,显示动态数据。
React-Leaflet是一个包装,用作反应和传单之间的桥梁。它提供了有用的组件,挂钩,例如MapComponent,TileLayer,Marker,Marker,useMap,useMap,useMapEvents等。帮助用户处理地图交互。
快速API订阅
要消费API,我们必须在Rapid API上创建一个帐户。然后,搜索预订com:
在使用此API之前,我们需要登录/注册并订阅它。订阅后,我们将在右侧找到订阅,如上图所示。最后,我们准备食用API。
在本文中,您将使用Nearby Cities端点:
我们将选择JavaScript(Axios)来获取用于测试端点的代码。
x-rapidapi-key 仅是订阅用户可访问的秘密密钥。因此,请不要与他人分享。
Latitude, longitude and locale are mandatory parameters that needs to be passed as params while testing the api endpoint.
安装
拥有上述代码段带有所需参数,请移动到下一步以创建名为 mapdata 的React应用程序。
使用以下命令,我们将在http://localhost:3000上启动并运行React应用程序。
1. npx create-react-app mapData
2. cd mapData
3. npm start
要在React应用中嵌入地图,您需要安装以下包装:
npm install leaflet react-leaflet axios
项目结构
一旦完成安装,让我们开始编写代码 -
项目结构看起来像这样:
添加传单CSS
在public文件夹下的index.html中,在<head> tag中写下以下代码以包含Leaflet CSS文件:
<link
      rel="stylesheet"
      href="https://unpkg.com/leaflet@1.9.3/dist/leaflet.css"
      integrity="sha256-kLaT2GOSpHechhsozzB+flnD+zUyjE2LlfWPgU04xyI="
      crossorigin=""
    />
- 在
src/components/map/index.css中添加以下CSS,必须具有传单 - 包机作为MAP可见性的类名称:
.leaflet-container {
    width: 100vw;
    height: 100vh;
}
消费预订com api
在src/api/index.js中写下以下代码:
import axios from "axios";

export const getNearbyCities = async(coordinates) => {
    // console.log("coordinates ", coordinates)
    const {lat, lng} = coordinates;

    const options = {
        method: 'GET',
        url: 'https://booking-com.p.rapidapi.com/v1/hotels/nearby-cities',
        params: {
          latitude: lat,
          longitude: lng,
          locale: 'en-gb'
        },
        headers: {
          'X-RapidAPI-Key': 'YOUR_SECRET_API_KEY',
          'X-RapidAPI-Host': 'booking-com.p.rapidapi.com'
        }
      };

      try {
        const response = await axios.request(options);
        console.log("cities ", response.data);
        return response.data;
    } catch (error) {
          console.error(error);
      }
}
在此代码中,
-
getNearbyCities接受坐标作为参数,坐标价值更改,每当用户单击地图上的任何地方。 -
url
options中使用/hotels/nearby-cities作为端点。 - 参数包含纬度,经度和环境
- 标题包含 x-rapidapi-key & x-rapidapi-host
在地图上显示API数据
在src/components/map/index.js中写下以下代码:
import React, { useEffect, useState } from 'react'
import { MapContainer, TileLayer, Marker, Popup, useMapEvent } from 'react-leaflet';
import './index.css'; // Very important as it loads Leaflet's CSS
import { Icon } from 'leaflet';
import { getNearbyCities } from '../../api';
// to use any marker, use following method -
const redIcon = new Icon({
iconUrl: require('../../img/redMarker.webp'), // path where red marker icon is located
iconSize: [40, 40]
})
const Map = () => {
const [marker, setMarker] = useState({lat: 51.505, lng: -0.09}) // initial coordinates of blue marker when app renders
const [citiesLocation, setCitiesLocation] = useState([]) // it contains locations of nearby-cities
// fetched by api
function SetViewOnClick() {
const map = useMapEvent('click', (e) => {
console.log("click event info => ", e)
setMarker(e.latlng); // to update the location of blue Marker
map.setView(e.latlng, map.getZoom())
})
return null;
}
useEffect(() => {
console.log("e.latlng ",marker)
getNearbyCities(marker) // passing marker as coordinates to fetch nearby-cities' locations
.then(data => setCitiesLocation(data))
.catch(err => console.log(err));
},[marker])
return (
<MapContainer
center={marker}
zoom={12}
scrollWheelZoom={true}
>
<TileLayer
attribution='© <a href="https://www.openstreetmap.org/copyright">OpenStreetMap</a> contributors'
url="https://{s}.tile.openstreetmap.org/{z}/{x}/{y}.png"
/>
<Marker position={marker}>
<Popup>
See this
</Popup>
</Marker>
{
citiesLocation?.map((item, index) => ( // at each city location, redIconed marker will be visible
<Marker key={index} icon={redIcon} position={[item.latitude, item.longitude]}>
<Popup>
{item.name}, {item.country}
</Popup>
</Marker>
))
}
<SetViewOnClick />
</MapContainer>
)
}
export default Map;
在上述代码中,
-
const [marker, setMarker] = useState({lat: 51.505, lng: -0.09})表示蓝色标记的初始坐标(输出部分检查)应用程序渲染 -
const [citiesLocation, setCitiesLocation] = useState([])将包含API 提取的附近城市的位置
-
function SetViewOnClick()基于用户的单击更新蓝色标记的位置,并通过单击地图来查看。 -
map.setView(e.latlng, map.getZoom())将地图的视图设置为单击和缩放的位置 -
useEffect(() => { ... },[marker])具有依赖性数组包含标记,这意味着更改标记的价值,使用效率将触发,getNearbyCities执行和填充citiesLocation -
<MapContainer center={marker} zoom={12} scrollWheelZoom={true}>...</MapContainer>具有中心显示地图的中心, Zoom 显示变焦级别, scrollWheelzoom 决定是否可以使用鼠标滚动轮来缩放地图。 /li> -
<TileLayer attribution='© <a href="https://www.openstreetmap.org/copyright">OpenStreetMap</a> contributors' url="https://{s}.tile.openstreetmap.org/{z}/{x}/{y}.png" />我们需要在地图中添加瓷砖层,在我们的情况下,它是OpenStreetMap Tile层,并且需要attribution。此后,地图负载。 -
<Marker position={marker}>
<Popup>
    See this
</Popup>
</Marker>
显示带有弹出窗口的标记(单击时)
src/App.js中的地图渲染
import React from 'react';
import './App.css';
import Map from './components/map';

function App() {
  return (
    <div className="App">
      <Map/> {/** Map component will contain the map shown in our React app */}
    </div>
  );
}

export default App;
,然后在src/index.js中的<App/>:
import React from 'react';
import ReactDOM from 'react-dom/client';
import './index.css';
import App from './App';

const root = ReactDOM.createRoot(document.getElementById('root'));
root.render(
  <div>
    <App />
  </div>
);
输出
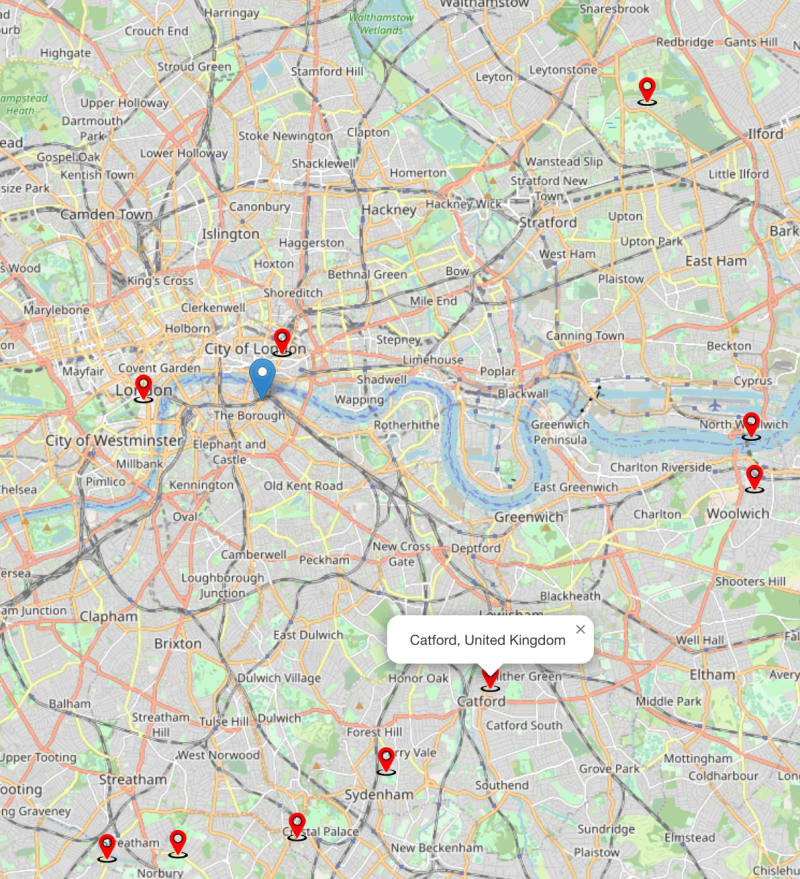
最终输出 -
在渲染中,地图显示以下数据:
- 蓝色标记显示
Southwark London England United Kingdom的坐标(lat: 51.505, lng: -0.09)。 - 红色标记显示了城市附近的
London, UK。
渲染之后,请检查开发人员控制台中的“控制台”选项卡:
单击地图上的任何地方后,蓝色标记的位置将更新,因此,城市的位置更新。
查看以下图像:
单击开发人员控制台中的“控制台”选项卡:
带有位置名称的弹出窗口
结论
在本文中,现在您可以在React应用中嵌入地图,并根据您的要求访问它。
参考
https://leafletjs.com/examples/quick-start/
https://react-leaflet.js.org/docs/start-setup/


