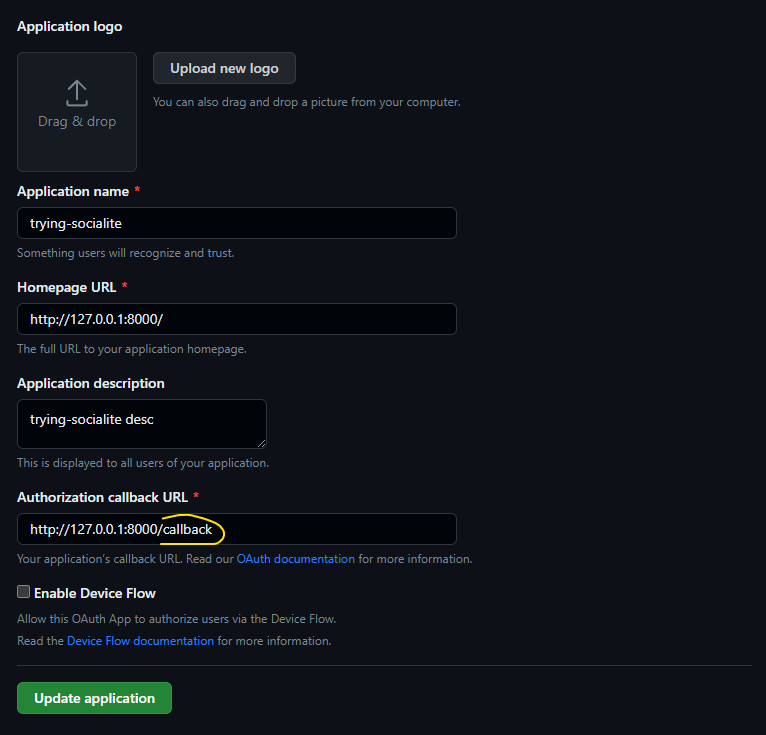
这是一个逐步的教程,不需要OAuth的先验知识,它只是假设您熟悉Laravel和Sanctum,并且可以阅读基本的JavaScript。
流解释
(todo:将在此处添加序列图)
执行
1.配置GitHub服务
在.env和/config/services.php中设置值
GITHUB_CLIENT_ID=bbb58b28cdd98636e3e2
GITHUB_CLIENT_SECRET=***************************************
GITHUB_REDIRECT=/callback
return [
    // ...
    'github' => [
        'client_id' => env('GITHUB_CLIENT_ID'),
        'client_secret' => env('GITHUB_CLIENT_SECRET'),
        'redirect' => env('GITHUB_REDIRECT'),
    ],
];
2.社交名流
安装社交名流:
composer require laravel/socialite
添加以下Web路由。
use App\Http\Controllers\AuthController;
use Illuminate\Support\Facades\Route;

Route::get('/auth/{provider}/redirect', [AuthController::class, 'redirect'])
    ->name('auth.redirect');
添加以下API路线。
use App\Http\Controllers\AuthController;
use Illuminate\Support\Facades\Route;

Route::get('/auth/{provider}/callback', [AuthController::class, 'callback'])
    ->name('auth.callback');
创建AuthController。
namespace App\Http\Controllers;

use App\Models\User;
use Illuminate\Http\Request;
use Illuminate\Support\Facades\Log;
use Laravel\Socialite\Facades\Socialite;

class AuthController
{
    public function redirect(string $provider)
    {
        return Socialite::driver($provider)->stateless()->redirect();
    }

    public function callback(string $provider)
    {
        $oAuthUser = Socialite::driver($provider)->stateless()->user();

       // More logic to handle login or registration will be added later
    }
}
3.存储
编辑2014_10_12_000000_create_users_table迁移:
- 使密码无效。
use Illuminate\Database\Migrations\Migration;
use Illuminate\Database\Schema\Blueprint;
use Illuminate\Support\Facades\Schema;

return new class extends Migration
{
    public function up(): void
    {
        Schema::create('users', function (Blueprint $table) {
            $table->id();
            $table->string('name');
            $table->string('email')->unique();
            $table->timestamp('email_verified_at')->nullable();
            $table->string('password')->nullable();
            $table->timestamps();
        });
    }
};
4.水疗中心
只需要一个刀片文件,我们将命名为app.blade.php。
<!DOCTYPE html>
<head>
    <title>Laravel</title>
</head>

<body>

    <div id="app"></div>

    <script>
        const githubCallbackPath = "{{ route('auth.callback', ['provider' => 'github']) }}";
        const githubRedirectPath = "{{ route('auth.redirect', ['provider' => 'github']) }}";
    </script>

    @vite(['resources/js/app.js'])
</body>

</html>
现在,我们将在route/web.php末尾添加后备Web路由以提供此视图。
// ...

Route::get('/{path}', fn () => view('app'))
    ->where('path', '(?!api).*');
app.js
我们将从设置当前的URL路径值开始。
let currentPath = window.location.pathname;
当当前路径为/login或/register时,我们需要一种到达GitHub的授权页面。
将通过auth.redirect路线来实现,我们将其完整URL存储在githubRedirectPath变量中。借助 Socialite ,我们将通过所需的查询参数无缝地重定向到https://github.com/login/oauth/authorize(请参阅https://docs.github.com/en/apps/oauth-apps/building-oauth-apps/authorizing-oauth-apps#1-request-a-users-github-identity)。
// ...

if (currentPath === '/login' || currentPath === '/register') {
    window.document.querySelector('#app').innerHTML = `
        <a href="${githubRedirectPath}">
            Login with GitHub
        </a>
    `;
}
实际的URL是
https://github.com/login/oauth/authorize?client_id=bbb58b28cdd98636e3e2&redirect_uri=http%3A%2F%2F127.0.0.1%3A8000%2Fcallback&scope=user%3Aemail&response_type=code
按下authorize按钮后。我们将在GitHub和/config/services.php中将其重定向到/callback。唯一的技巧是GitHub将添加一个名为code的查询参数。
code是一个一次性密码,使我们能够从github获取访问令牌(请参阅https://docs.github.com/en/apps/oauth-apps/building-oauth-apps/authorizing-oauth-apps#2-users-are-redirected-back-to-your-site-by-github)。我们必须将此任务委托给后端,因为它需要其他敏感数据,即GITHUB_CLIENT_SECRET。可以通过简单地将code作为auth.callback路线的查询参数发送到后端来实现,我们在githubCallbackPath变量中具有其值。
// ...

if (currentPath === '/callback') {
    let searchParams = new URLSearchParams(window.location.search);
    let code = searchParams.get("code");

    if (code === null) {
        throw new Error("code query param must be present when entering /callback path");
    }

    useOauthProviderCode(code);
}

async function useOauthProviderCode(code) {
    try {
        const response = await fetch(`${githubCallbackPath}?code=${code}`, {
            method: 'GET',
            headers: {
                'Accept': 'application/json'
            }
        });

        if (!response.ok) {
            throw new Error('Network response was not ok');
        }

        const data = await response.json();

        const token = data.token;
        localStorage.setItem('authToken', token);

        redirectToPath('/dashboard');
    } catch (error) {
        console.error('Error fetching data:', error);
    }
}

function redirectToPath(path) {
    window.location.href = path;
}
完成注册/登录逻辑
在这里
- 使用
code从github获取OAUTH-TOKEN。 - 使用
OAUTH-TOKEN从github获取用户数据(请参阅:https://docs.github.com/en/apps/oauth-apps/building-oauth-apps/authorizing-oauth-apps#3-use-the-access-token-to-access-the-api)
    public function callback(string $provider)
    {
        $oAuthUser = Socialite::driver($provider)->stateless()->user();

        $user = User::where('email', $oAuthUser->email)->first();

        $user ??= User::create([
            'name' => $oAuthUser->name,
            'email' => $oAuthUser->email,
        ]);

        $token = $user->createToken('token');

        return ['token' => $token->plainTextToken];
    }
在这里有更多的边缘案例和错误处理要做,但是为了简单起见,这是在理想情况下可以正常工作的最低限度。
仅获取电子邮件的方法是受Codepen
的启发恭喜。现在,您可以注册新用户,并对其进行身份验证,您的水疗中心可以使用携带者令牌。


