如果您想在NextJ中为您的用户设置简单的身份验证,那么您就在正确的位置!
在本指南中,我将向您展示设置NextJS应用程序,将Google Authentication(Sign In With Google按钮)添加所需的所有步骤,然后将应用程序部署到生产(使用Vercel)。
这是指南的第一部分,它将专注于设置您的nextjs环境。
生成样板
要设置我们的应用程序,我们将使用the official documentation的尝试和真实方法。 NextJS具有出色的CLI工具,您甚至不需要单独安装。
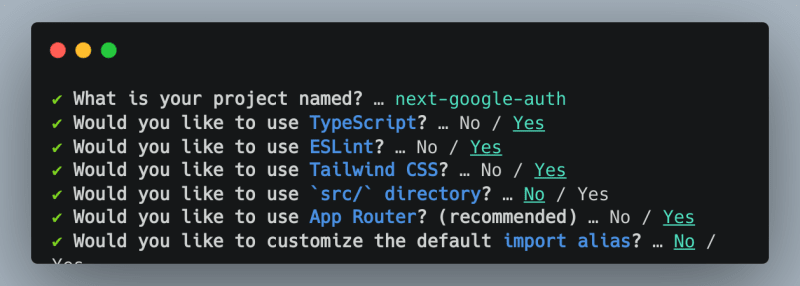
如果您已经安装了node,只需在项目目录中运行npx create-next-app@latest,然后随时回答以下问题。由于我是 tailwind 和打字稿的忠实拥护者,这是我使用的设置:
创建页面
让我们个性化我们的应用程序。我们可以从添加登录并签名按钮开始。
app/components/SignInButton.tsx
"use client"

import { useRouter } from "next/navigation"

export const SignInButton = () => {
  const { push } = useRouter();

  return (
  <button
    onClick={() => push("/")}
    type="button" className="text-white w-full bg-[#4285F4] hover:bg-[#4285F4]/90 focus:ring-4 focus:outline-none focus:ring-[#4285F4]/50 font-medium rounded-lg text-sm px-5 py-2.5 text-center inline-flex items-center justify-center dark:focus:ring-[#4285F4]/55">
    <GoogleIcon />
    Sign in with Google
  </button>
  )
}

const GoogleIcon = () => (
  <svg
    xmlns="http://www.w3.org/2000/svg"
    aria-hidden="true"
    className="mr-2 -ml-1 w-4 h-4"
    data-icon="google"
    data-prefix="fab"
    viewBox="0 0 488 512"
  >
    <path
      fill="currentColor"
      d="M488 261.8C488 403.3 391.1 504 248 504 110.8 504 0 393.2 0 256S110.8 8 248 8c66.8 0 123 24.5 166.3 64.9l-67.5 64.9C258.5 52.6 94.3 116.6 94.3 256c0 86.5 69.1 156.6 153.7 156.6 98.2 0 135-70.4 140.8-106.9H248v-85.3h236.1c2.3 12.7 3.9 24.9 3.9 41.4z"
    />
  </svg>
)
app/components/SignOutButton.tsx
"use client"

import { useRouter } from "next/navigation"

export const SignOutButton = () => {
  const { push } = useRouter();
  return (
    <button className="text-black hover:text-sky-600"
      onClick={() => push("/signin")}
    >Sign out</button>
  )
}
目前,单击这些按钮时唯一应该发生的事情是重定向到主页(/)或页面中的符号(/signin)。
“使用客户端”上的注释:这是一种针对应用程序路由器使用NextJS的新语法。它将组件标记为客户端组件,这意味着它需要在客户端加载JavaScript。
客户端组件不同于服务器组件,该组件仅在服务器上呈现。如果您想对服务器与客户端组件进行更深入的解释,则可以查看有关server components和client components的官方文档。
接下来,让我们在页面中创建符号,以便我们可以使用签名按钮!
app/signin/page.tsx
import { redirect } from "next/navigation";
import { Metadata } from "next";
import { SignInButton } from "../components/SignInButton";

export const metadata: Metadata = {
  title: 'Signin',
  description: 'Please sign in ',
}

export default async function SignInPage() {

  return (
    <>
      <div className="flex min-h-full flex-1 flex-col justify-center px-6 py-12 lg:px-8">
        <div className="sm:mx-auto sm:w-full sm:max-w-sm">
          <h2 className="mt-10 text-center text-2xl font-bold leading-9 tracking-tight text-gray-900">
            Sign in to your account
          </h2>
        </div>

        <div className="mt-10 sm:mx-auto sm:w-full sm:max-w-sm">
          <SignInButton />
        </div>
      </div>
    </>
  )
}
关于全局样式,我们可以从global.css文件中删除几乎所有内容,仅留下以下内容:
app/global.css
@tailwind base;
@tailwind components;
@tailwind utilities;
这只会应用尾风CSS重置,并可以在我们的组件中使用尾风类。
对于主页本身,让我们尽可能简单,然后留下一些文字表示我们在主页上,还可以添加我们的SignOutButton,以便我们可以导航回页面上的标志:
app/page.tsx
import { SignOutButton } from './components/SignOutButton';

export default async function Home() {

  return (
    <>
      <header className="border-b border-gray-200 bg-white">
        <div className="mx-auto max-w-7xl px-4">
          <div className="flex gap-10 items-center w-full justify-between lg:justify-end my-2 px-4">
            <SignOutButton />
          </div>
        </div>
      </header>
      <main className="flex min-h-screen flex-col items-center justify-between p-24">
        <h1>Hello from the homepage!</h1>
      </main>
    </>
  )
}
现在使用npm run dev运行我们的应用,浏览器中访问http://localhost:3000应该显示以下内容:
单击Sign Out,应该带您到/signin页面,该页面应该像这样:
这是指向github repo的链接,其中包含此Blogpost中的所有代码。
我还在available here的Vercel上部署了此代码段。
但是,所有这些签名并在没有实际身份验证逻辑的情况下签署按钮有什么好处?
我们将在下一章中扩展该主题!


