介绍
更改应用程序时,自动测试有助于确保您的新代码没有破坏任何先前开发的功能。测试有助于节省您的时间,因为在添加新功能或更改代码库时,您不必始终手动测试所有内容。随着您的应用程序的增长,这一点尤其重要。
在本文中,我将向您展示如何为HarperDB自定义功能(应用程序)项目编写一些基本功能测试,以确保API路由按计划工作。我们还将编写一个单元测试,以确保我们的一个单个功能正常工作。
如果您不熟悉,HarperDB是数据库,流媒体经纪人和应用程序开发平台。它具有灵活的,基于组件的体系结构,简单的HTTP/S接口和一个可容纳任何数据结构的高性能单模型数据存储。
Github仓库
此项目的完整代码存储库:https://github.com/DoableDanny/HarperDB-Testing-Tutorial
(别忘了给它一个星)
在本地安装HarperdB
我在Mac上,所以在install HarperDB上,我打开了一个终端并输入:
npm install -g harperdb
我的Mac上安装的HarperDB实例位于目标:/users/danadams/hdb服务器:
- 听力端口:9925
- hdb_admin的用户名:hdb_admin
- 密码:任何_you_set_this_to_during_installation
我们现在可以使用命令启动harperdb:
harperdb
现在我们可以在本地使用harperdb!
创建HarperdB自定义功能项目
现在,我们在本地安装了HarperdB,我们可以创建一个新的HarperDB custom functions项目。自定义功能(也称为应用程序)只是快速化需快速从HARPERDB数据库访问数据的API路由。要创建一个新的自定义功能项目,请在您本地HarperdB实例的自定义功能目录中打开新的终端和CD(“更改目录”):
cd hdbcd custom_functions
您可以通过输入pwd(“打印工作目录”)来检查是否在正确的目录中。目前,我在这里:/Users/danadams/hdb/custom_functions。
现在我们在正确的位置,我们需要实际创建一个新的自定义功能项目。我们可以从头开始完成所有这些操作,或者我们只需克隆Harperdb的自定义功能启动模板即可使我们快速前进:https://github.com/HarperDB/harperdb-custom-functions-template。因此,让我们克隆到我们的Custom_functions文件夹中:
git clone https://github.com/HarperDB/harperdb-custom-functions-template
如果您现在输入ls(“列表文件和目录”),则应查看列出的harperdb-custom-functions-template。
让我们将此文件夹重命名为testing-project-tutorial:
mv harperdb-custom-functions-template testing-project-tutorial
好吧,让我们用VS代码打开此项目:
code testing-project-tutorial
设置Harperdb Studio
现在,让我们设置HarperdB Studio,以便我们可以在浏览器中使用NICE UI轻松查看我们的数据库。
首先,create an account with HarperDB。
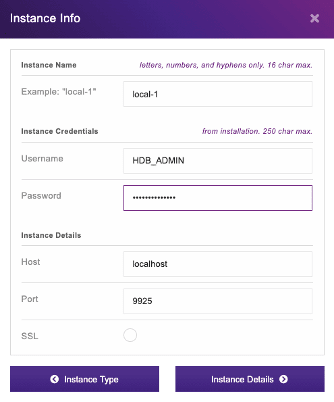
然后,我们需要通过注册用户安装的实例来连接本地安装的HarperdB实例:
选择“注册用户安装的实例”:
然后连接您在上一步中安装的本地harperdb实例:
在Harperdb Studio中创建我们的模式和桌子
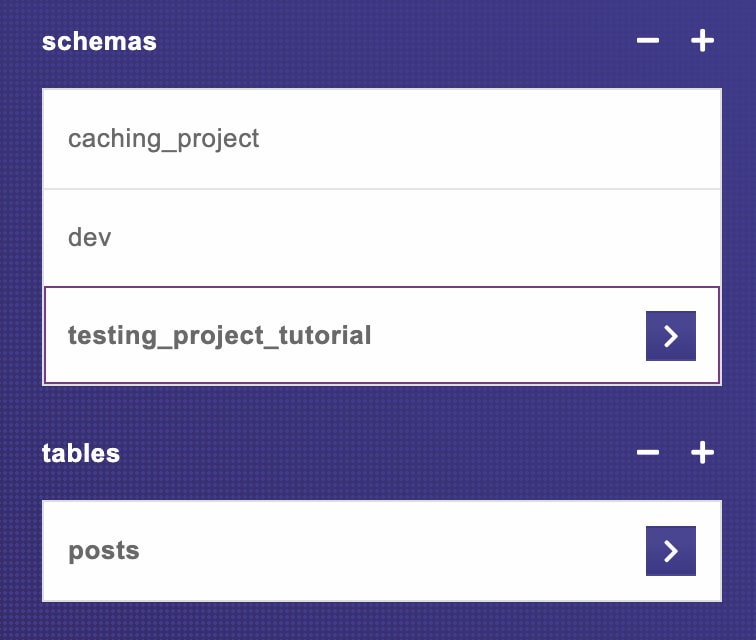
在Harperdb Studio中,单击“ NAV栏”中的“浏览”,然后创建一个名为testing_project_tutorial的新模式。在此架构中,创建一个名为posts的新表格,带有ID的hash_attr(Hash_attr就像Harperdb的主键版本)。
为我们的项目定义一些有用的常数
在项目root中创建文件config/constants.js。添加以下项目常数:
export const HDB_URL = 'http://localhost:9926/testing-project-tutorial';

export const SCHEMA = 'testing_project_tutorial';
创建我们的HarperdB自定义功能API路由
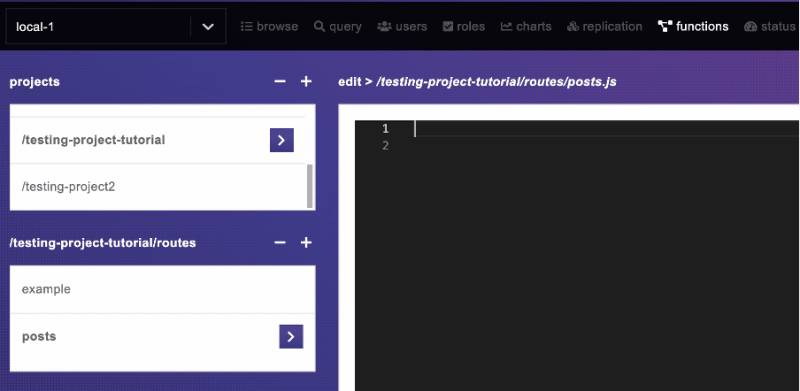
首先,让我们创建一条路由,在这里我们可以获取博客文章列表。在您的Harperdb Studio中,访问functions标签,然后转到您的testing-project-tutorial项目。在路线文件夹下,创建一个称为帖子的文件:
创建一个接受get请求的路由,然后从帖子表中获取所有帖子:
// routes/posts.js

import { SCHEMA } from '../config/constants.js';

const POSTS_TABLE = 'posts';

export default async (server, { hdbCore, logger }) => {
    // GET: get list of posts
    server.route({
        url: '/posts',
        method: 'GET',
        handler: (request, reply) => {
            request.body = {
                operation: 'sql',
                sql: `SELECT * FROM ${SCHEMA}.${POSTS_TABLE}`,
            };
            return hdbCore.requestWithoutAuthentication(request);
        },
    });
};
单击Harperdb Studio中的“保存”按钮,然后导航到此新路线:
http://localhost:9926/testing-project-tutorial/posts
我们恢复了一个空数组,因为我们目前没有帖子:
因此,让我们创建一条接收邮政请求的路由和与邮政有关的一些数据。张贴的数据应为json对象,带有fields username,title和content。
// routes/posts.js

// POST: create a new post
  server.route({
    url: '/posts',
    method: 'POST',
    handler: (request, reply) => {
      const data = request.body;
      let validatedData;
      try {
        // validate the posted data using our custom validateCreateProductInput function.
        validatedData = validateCreatePostInput(data);
      } catch (error) {
        // posted data is invalid, so return the error message
        return reply.status(400).send({ message: error.message });
      }
      // data is all good, so insert it into the posts table
      request.body = {
        operation: 'insert',
        schema: SCHEMA,
        table: POSTS_TABLE,
        records: [
          {
            ...validatedData,
          },
        ],
      };


      return hdbCore.requestWithoutAuthentication(request);
    },
  });
但是上面的路线尚不正常,因为我们需要创建validateCreateProductInput()功能。上面,我们将其包装在尝试/捕获块中,因为我们希望此验证功能如果已发布的数据无效。
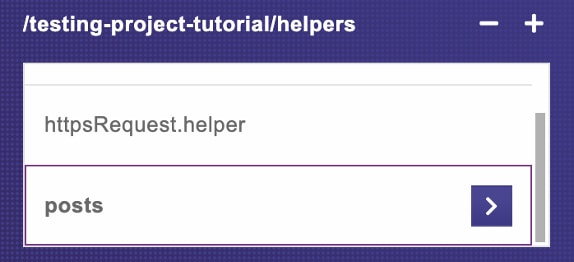
来自Harperdb Studio,创建一个名为posts的新帮助文件:
然后创建验证功能:
// helpers/posts.js

export function validateCreateProductInput(input) {
    const { username, title, content } = input;
    if (!username || !title || !content) {
        throw Error('username, title and content are required');
    }
    if (username.length > 12) {
        throw Error('username must be less than 12 characters');
    }
    return {
        username: username.toLowerCase(),
        title,
        content,
    };
}
,当然,让我们从douts/posts文件的顶部导入此功能:
// routes/posts.js

import { validateCreateProductInput } from '../helpers/posts.js';
现在,让我们使用Postman测试我们的路线。我已经导出了一个邮递员JSON Collection文件,您可以简单地将其导入到Postman中,以使您快速前进:https://github.com/DoableDanny/HarperDB-Testing-Tutorial/blob/main/HarperDB%20Testing%20Tutorial.postman_collection.json
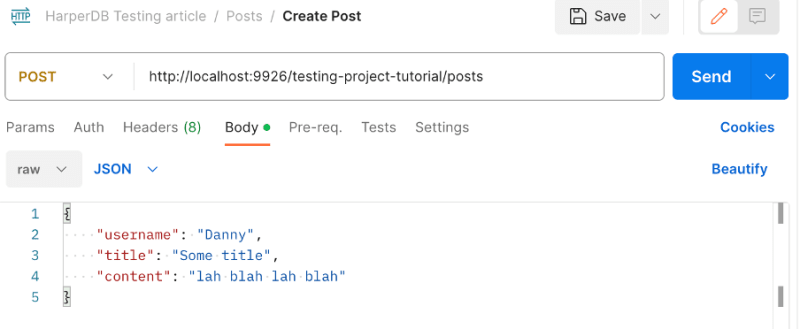
对于创建后路线,我们可以在原始JSON主体中发送我们的帖子数据:
成功创建了帖子:
让我们检查帖子表:
完美!
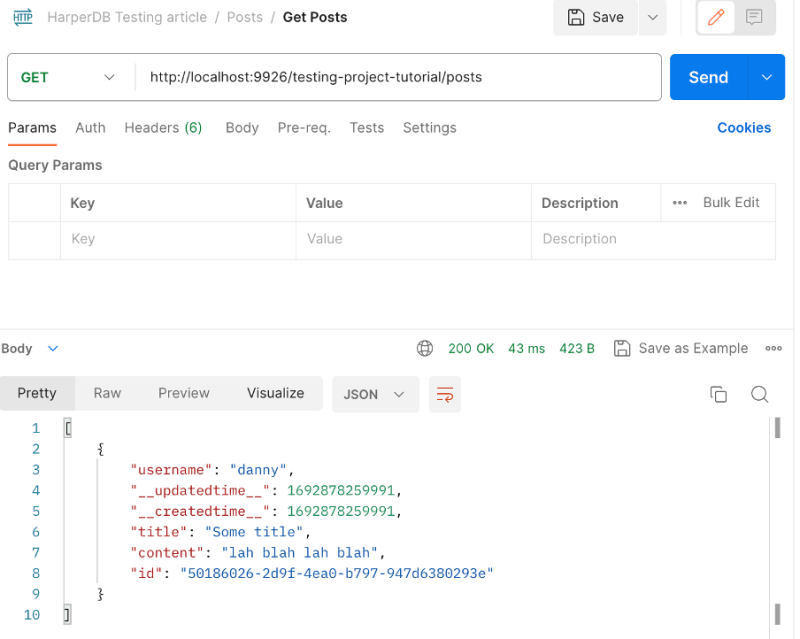
现在检查我们的获取帖子路线是否返回此新帖子:
很棒!
现在让我们编写一些测试,以确保我们的路线按计划工作!
设置我们的测试项目
在项目的这一部分中,我将开始使用VS代码,而不是直接编码Harperdb Studio,以使安装一些NPM软件包变得容易。首先,让我们将测试框架node tap作为DEV依赖关系:
npm i tap -D
让我们在package.json中创建一个脚本以运行我们的测试:
// package.json

{
  "name": "testing-project-tutorial",
  "version": "2.0.0",
  "description": "An example HarperDB Custom Function",
  "type": "module",
  "author": "Danny Adams",
  "scripts": {
    "test": "tap"
  },
  "devDependencies": {
    "tap": "^16.3.8"
  }
}
现在,我们所有的测试都可以进行:
npm run test
测试创建帖子
单位测试
首先,我们将编写单元测试,以检查我们的validateCreatePostInput()功能是否可以与不同的输入一起工作。
编写测试时,重要的是不要忘记测试悲伤的路径:如果某些形式输入无效,或者URL参数无效,该怎么办。我们是否获得正确的状态代码,错误消息,重定向,查看等
首先开始编写SAD测试通常是一种很好的方法,因为它可以让您了解可能出问题以及如何处理它。因此,让我们首先编写单元测试,以检查我们的validateCreatePostInput()功能是否通过无效的数据抛出了错误的错误。
在项目root中,创建文件tests/posts/createPost.test.js,然后添加以下代码:
// tests/posts/createPost.test.js

import { test } from 'tap';
import { validateCreatePostInput } from '../../helpers/posts.js';


test('POST `/posts`', async (t) => {
  // Unit test -- sad path
  test('Test if error is thrown from validate post data function call', async (t) => {
    t.throws(
      () => {
        const input = {
          username: 'Danny Adams',
          title: 'This is the Title',
          // content: "This is the contents of the post. Blah blah etc.", // no content provided should throw error
        };
        validateCreatePostInput(input);
      },
      {
        message: 'username, title and content are required', // error message we expect
        // name: "ExpectedErrorName", // Optional: check error name if needed
      }
    );
  });
});
上面的测试是“单元测试”,因为我们只是在测试一件代码 - 我们的验证功能。上面,我们使用节点点击来测试如果我们不通过内容字段,则该功能会带有正确消息的错误。
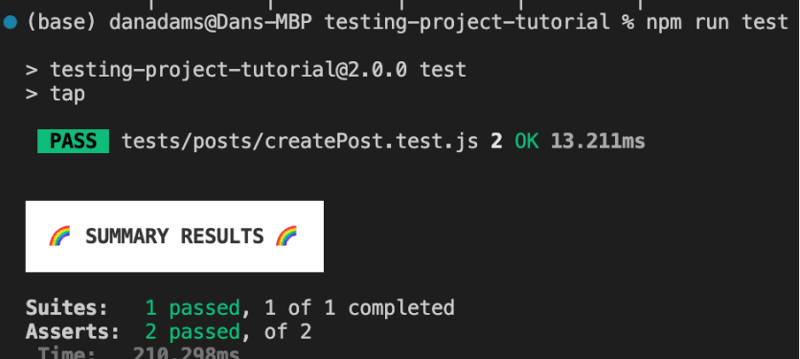
使用npm run test进行测试后:
我们的测试通过!
节点tap如何知道我们要运行的哪些文件作为测试?它只是查找以.test.js的结尾的文件。
挑战:查看您是否可以编写单元测试,以检查如果我们发布的用户名太长。
接下来,让我们写“快乐路径”,其中输入数据正确:
  // Unit test -- happy path
  test('Check post data is validated correctly', async (t) => {
    const input = {
      username: 'Danny Adams',
      title: 'This is the Title',
      content: 'This is the contents of the post. Blah blah etc.',
      naughtyKey: "This key shouldn't be here",
    };
    const validData = validateCreatePostInput(input);
    t.equal(validData.title, input.title);
    t.equal(validData.content, input.content);
    t.equal(validData.username, input.username.toLowerCase()); // username should be lowercased
    t.equal(validData.hasOwnProperty('naughtyKey'), false); // naughtyKey should not be returned from validateCreateProductInput()
  });
上面,我们只是在检查我们的验证功能是否返回了我们期望的已验证数据。现在我们已经进行了这些测试,如果我们需要在将来修改验证功能,这些测试将告诉我们该功能是否不再如它的行为。
功能测试
您的大多数测试都应该是功能测试,因为它们有助于确保整个应用程序按预期工作。让我们测试我们创建新帖子的API路线正常工作。我们首先写下不愉快的途径,让我们思考可能出了什么问题,然后我们写快乐的道路。
不成功的帖子创建
首先,在createpost.test.js文件的底部创建一个辅助功能,我们可以重复使用将邮政请求发送到我们的API:
// tests/createPost.test.js

async function postThePost(input) {
  const response = await fetch(HDB_URL + "/posts", {
    method: "POST",
    headers: {
      "Content-Type": "application/json",
    },
    body: JSON.stringify(input),
  });
  const json = await response.json();
  return { response, json };
}
现在,让我们创建两个功能测试,以检查我们的API是否发送无效数据时,我们的API是否返回预期状态代码和错误消息:
// tests/createPost.test.js

test("POST `/posts`", async (t) => {

// …

  // Feature test: sad path
  test('Trying to create a post with username that is too long', async (t) => {
    const username = 'This username is just way to long...';
    const title = 'This is the Title';
    const content = 'This is the contents of the post. Blah blah etc.';


    const { response, json } = await postThePost({ username, title, content });


    t.equal(response.status, 400);
    t.equal(json.message, 'username must be less than 12 characters');
  });


  // Feature test: sad path
  test('Trying to create a post with no title', async (t) => {
    const username = 'Test User';
    const title = '';
    const content = 'This is the contents of the post. Blah blah etc.';


    const { response, json } = await postThePost({ username, title, content });


    t.equal(response.status, 400);
    t.equal(json.message, 'username, title and content are required');
  });

// …
上面,我们声称我们获得了正确的错误状态代码(“不良请求” 400),并且返回的错误消息如预期。
成功创建帖子
现在,让我们测试成功创建的帖子应该看起来像是快乐的道路!
首先,在测试文件的底部,创建一个deletePosts()助手功能。我们将使用它来删除我们创建的测试文章。
// tests/posts/createPost.js


async function deletePosts(postIdsArray) {
  const { response: deleteResponse, json: deleteJson } = await harperDbClient({
    operation: 'delete',
    schema: 'testing_project',
    table: 'posts',
    hash_values: postIdsArray,
  });
  console.log('Delete response:');
  console.log(deleteResponse, deleteJson);
  return { deleteResponse, deleteJson };
}
我们还创建一个harperDbClient()函数,我们可以重复使用与harperdb数据进行交互:
// helpers/harperdb.js

export async function harperDbClient(body) {
  var myHeaders = new Headers();
  myHeaders.append('Content-Type', 'application/json');
  myHeaders.append('Authorization', process.env.HARPERDB_SECRET);

  var raw = JSON.stringify(body);

  var requestOptions = {
    method: 'POST',
    headers: myHeaders,
    body: raw,
    redirect: 'follow',
  };

  try {
    const response = await fetch('http://localhost:9925', requestOptions);
    const json = await response.json();
    return { response, json };
  } catch (error) {
    console.log(error);
  }
}
我们还需要安装dotenv软件包以加载我们的环境变量:
npm i dotenv
将您的harperdb秘密添加到项目root(your .env file should look like this)的.env文件中,然后将变量加载在测试文件的顶部:
// tests/posts/createPost.js

import 'dotenv/config';
这是我们成功的创建后测试的工作方式:
- 通过使用一些有效数据击中我们的帖子API端点来创建帖子。
- 从API的JSON响应中,获取“ inserted_hashes”。这是刚刚创建的帖子ID的数组。 HarperdB在插入记录时会自动创建这些ID。
- 在测试完成后,将回调发送到Node Tap的
teardown()功能,以删除这些测试文章。当节点TAP检测该测试完成时,拆卸功能将自动运行。 - 从帖子表中获取新帖子,因此我们可以通过将其与原始输入数据进行比较来正确插入。
- 运行我们的断言(例如
t.equal())来检查状态代码,消息和数据均为预期。
将其放入代码:
tests/posts/createPost.js


import { HDB_URL, SCHEMA } from '../../config/constants.js';
import { harperDbClient } from '../../helpers/harperdb.js';


// …


// Feature test: happy path
  test('Create a post successfully', async (t) => {
    // create some post data
    const username = 'Test User';
    const title = 'This is the Title';
    const content = 'This is the contents of the post. Blah blah etc.';


    // Hit our custom function api endpoint to create new post
    const { response, json } = await postThePost({ username, title, content });
    console.log('JSON R');
    console.log(json.inserted_hashes);
    const postIds = json.inserted_hashes;


    // Teardown => run callback once test is complete
    t.teardown(async () => {
      // Clean up: delete the test post from db
      const { deleteResponse } = await deletePosts(postIds);
      console.log('Deleted posts with status ', deleteResponse.status);
    });


    // Fetch this new post from the db
    const { response: dbResponse, json: dbJson } = await harperDbClient({
      operation: 'search_by_hash',
      schema: SCHEMA,
      table: 'posts',
      hash_values: postIds,
      get_attributes: ['id', 'username', 'title', 'content'],
    });
    const dbNewPost = dbJson[0];


    console.log('DB RESULT:');
    console.log(dbResponse, dbJson, dbNewPost);


    // Check status and response is correct from api
    t.equal(response.status, 200);
    t.equal(json.message, 'inserted 1 of 1 records');


    // Check the post was inserted correctly into the db
    t.equal(dbResponse.status, 200);
    t.equal(dbNewPost.username, username.toLowerCase()); // username should be lowercased
    t.equal(dbNewPost.title, title);
    t.equal(dbNewPost.content, content);
  });
});
测试获取帖子
要测试我们的API端点以获取所有帖子,我们将执行以下操作:
- 将3个测试帖子插入职位表
- 一旦测试完成后,请使用节点TAP的拆卸功能删除这些新帖子
- 通过向我们的 /帖子路线提出请求来获取所有帖子< /li>
- 检查我们回来的一篇文章之一是我们创建的新帖子之一,其中包含正确的数据
// tests/posts/createPost.js

import { HDB_URL, SCHEMA } from '../../config/constants.js';
import { harperDbClient } from '../../helpers/harperdb.js';

// …

// Feature test: happy path
  test('Create a post successfully', async (t) => {
    // create some post data
    const username = 'Test User';
    const title = 'This is the Title';
    const content = 'This is the contents of the post. Blah blah etc.';

    // Hit our custom function api endpoint to create new post
    const { response, json } = await postThePost({ username, title, content });
    console.log('JSON R');
    console.log(json.inserted_hashes);
    const postIds = json.inserted_hashes;

    // Teardown => run callback once test is complete
    t.teardown(async () => {
      // Clean up: delete the test post from db
      const { deleteResponse } = await deletePosts(postIds);
      console.log('Deleted posts with status ', deleteResponse.status);
    });

    // Fetch this new post from the db
    const { response: dbResponse, json: dbJson } = await harperDbClient({
      operation: 'search_by_hash',
      schema: SCHEMA,
      table: 'posts',
      hash_values: postIds,
      get_attributes: ['id', 'username', 'title', 'content'],
    });
    const dbNewPost = dbJson[0];

    console.log('DB RESULT:');
    console.log(dbResponse, dbJson, dbNewPost);

    // Check status and response is correct from api
    t.equal(response.status, 200);
    t.equal(json.message, 'inserted 1 of 1 records');

    // Check the post was inserted correctly into the db
    t.equal(dbResponse.status, 200);
    t.equal(dbNewPost.username, username.toLowerCase()); // username should be lowercased
    t.equal(dbNewPost.title, title);
    t.equal(dbNewPost.content, content);
  });
});
我们可以在这个项目中改进的事情
我们有它;现在,您知道如何在自定义功能项目中运行一些单元和功能测试。但是,如果这是一个严肃的项目,我们肯定想改进一些事情:
- 目前,我们的测试正在使用我们的主要数据库。这通常被认为是不良的实践,因为它可以导致我们的测试弄乱我们的开发数据并使我们一团糟。使用与真实模式相同的表格的测试模式可能会更好。
- 运行每个测试后,通常在每个表中清除所有测试数据是一个好主意,这样测试就不会彼此干扰并引起意外问题。然后,我们将完全控制每个测试开始时的每个表中的内容,因此可以准确地测试我们在每个表中的期望。
- 创建一个单独的测试环境,例如.env.testing,然后在运行测试时,我们可以在NPM脚本中指定要使用的环境。例如。
// package.json

"scripts": {

"test": "NODE_ENV=test dotenv -e .env.test tap"

},
谢谢阅读!
如果您喜欢这篇文章,那么如果您可以give me a sub on YouTube,那就太棒了。您也可以follow me on Twitter。
欢呼!


