为生产配置应用程序
恭喜!您已经成功地开发了MEVN CRUD应用程序,但是我们需要进行一些配置以在生产环境中运行。
首先,转到您的client文件夹中的vite.config.js文件,然后将以下内容添加到defineConfig方法:
build: {
    // generate manifest.json in outDir
    manifest: true,
    rollupOptions: {
      // overwrite default .html entry
      input: './src/main.js',
    },
  },
这指示Vite在构建我们的前端时生成清单文件,而src/main.js用作入口点。
我们现在必须更新我们的index.html.ejs,以使我们能够在开发和生产之间切换渲染。 ejs模板引擎使此任务易于完成;它允许我们在HTML文件中嵌入可执行的JavaScript代码。
转到您的views文件夹中的index.html.ejs文件,然后用以下内容替换内容:
<!DOCTYPE html>
<html lang="en">

<head>
  <meta charset="UTF-8" />
  <link rel="icon" href="/favicon.ico" />
  <meta name="viewport" content="width=device-width, initial-scale=1.0" />
  <title>Vite + MEVN</title>
  <% if (environment==='production' ) { %>
    <link rel="stylesheet" href="<%= manifest['src/main.css'].file %>" />
    <% } %>
</head>

<body>
  <div id="app"></div>

  <% if (environment==='production' ) { %>
    <script type="module" src="<%= manifest['src/main.js'].file %>"></script>
    <% } else { %>
      <script type="module" src="http://localhost:5173/@vite"></script>
      <script type="module" src="http://localhost:5173/src/main.js"></script>
      <% } %>
</body>

</html>
在<% %>标签之间添加了一些JavaScript条件,ejs必须执行以决定要执行哪些样式表和脚本。
前往您的server文件夹,并用以下内容替换homeRouter.jsfile的内容:
//homeRouter.js
import express from "express";
import path from "path";
import { fileURLToPath } from "url";
import fs from "fs/promises";

const router = express.Router();
const __filename = fileURLToPath(import.meta.url);

const __dirname = path.dirname(__filename);

const environment = process.env.NODE_ENV;

router.get("/*", async (_req, res) => {
  const data = {
    environment,
    manifest: await parseManifest(),
  };

  res.render(
    path.join(__dirname, "../../client/views", "index.html.ejs"),
    data
  );
});

const parseManifest = async () => {
  if (environment !== "production") return {};

  const manifestPath = path.join(
    __dirname,
    "../../client",
    "dist",
    "manifest.json"
  );
  const manifestFile = await fs.readFile(manifestPath);

  return JSON.parse(manifestFile);
};

export default router;
已经为我们的主页路由器创建了一条新路径,以便从生产环境中的清单文件渲染。
如果您在第2部分中进行了可选部分,则必须为生产资产创建文件路径,以便它们可以在生产环境中加载。
将以下内容添加到您的index.js文件:
// index.js
---
const distPath = path.join(path.resolve(), "../client/dist"); // production assets file path

---

// Create route
// Assets path based on the environment running
if (process.env.NODE_ENV === "production") {
  app.use("/", express.static(distPath));
} else {
  app.use("/", express.static(publicPath));
  app.use("/src", assetsRouter);
}
---
您的最终index.js文件应该看起来像这样:
// index.js
import express from "express";
import mongoose from "mongoose";
import cors from "cors";
import bodyParser from "body-parser";
import dotenv from "dotenv";
import path from "path";
import TodoListRoutes from "./routes/api/TodoList.js";
import homeRouter from "./routes/homeRouter.js"
import assetsRouter from "./routes/assestsRouter.js";

const app = express();
const publicPath = path.join(path.resolve(), "../client/public"); // public assets file path
const distPath = path.join(path.resolve(), "../client/dist"); // production assets file path

dotenv.config();

app.use(cors()); // to allow cross origin requests
app.use(bodyParser.json()); // to convert the request into JSON
app.use(bodyParser.urlencoded({ extended: true })); // for parsing application/xwww-

// Connect to database
mongoose
  .connect(process.env.MONGO_URI, {
    useNewUrlParser: true,
    useUnifiedTopology: true,
  })
  .then(() => console.log("MongoDB database Connected..."))
  .catch((err) => console.log(err));


// Create route
// Assets path based on the environment running
if (process.env.NODE_ENV === "production") {
  app.use("/", express.static(distPath));
} else {
  app.use("/", express.static(publicPath));
  app.use("/src", assetsRouter);
}
app.use("/api/todoList", TodoListRoutes);
app.use(homeRouter);

app.listen(process.env.PORT, () =>
  console.log(`App is running on http://localhost:${process.env.PORT}`)
);
最后,转到server文件夹中的package.json文件,添加以下脚本:
"start": "set NODE_ENV=production&& node index.js --ignore ../client/",
     "build": "npm run build --prefix ../client/"
运行npm run build,然后是npm start。您的应用将在生产模式下在http://localhost:3000/上运行。欢呼!您的应用程序已准备好部署。
奖金:如何在渲染上部署node.js应用程序
现在,它已经准备好部署,您将需要在Internet上进行现场直播。有一些平台可提供免费的node.js应用程序部署,但是渲染是最简单的设置之一。渲染是一种统一的云,可让您在提供免费的TLS证书,全局CDN,DDOS保护,专用网络和GIT自动部署时构建和托管所有应用程序和网站。
- 创建一个新的github存储库,然后将代码推向它。确保将您的
dist文件夹添加到登台区域,然后将gitignore添加到.env文件。 - 注册或登录到render dashboard
- 单击右上角的
New +,然后单击Web Service。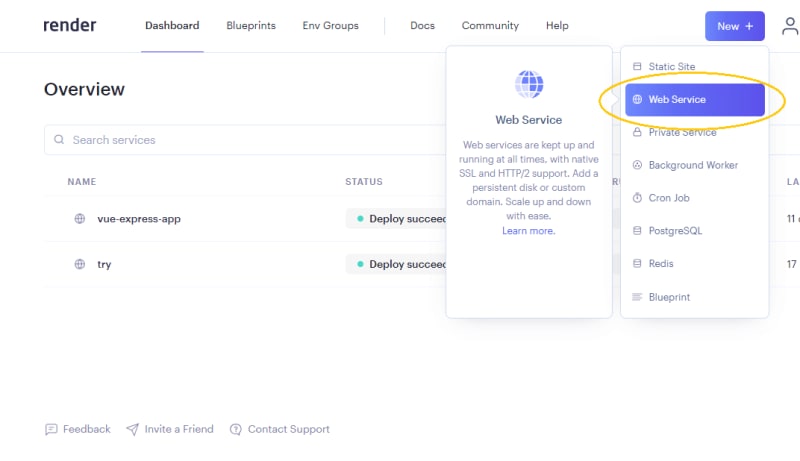
- 在
Github下,在右侧,单击Configure account。
- 在
Repository Access下,选择您的回购,然后单击Save。 - 单击存储库名称旁边的
Connect按钮。
- 配置您的部署详细信息如下图所示,然后单击
Create Web Service。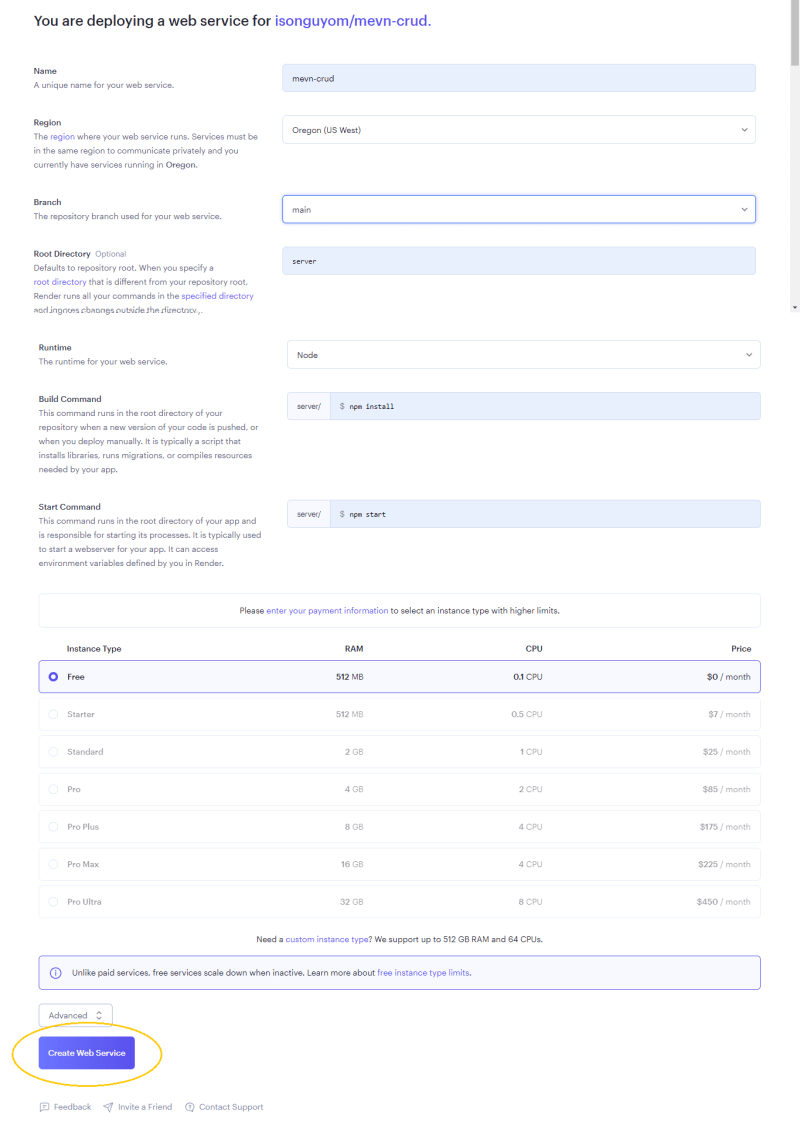
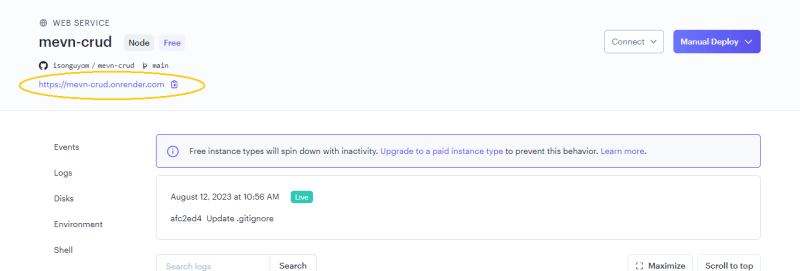
- 部署后,单击左上角的链接访问您的实时网站。
将.ENV文件添加到渲染
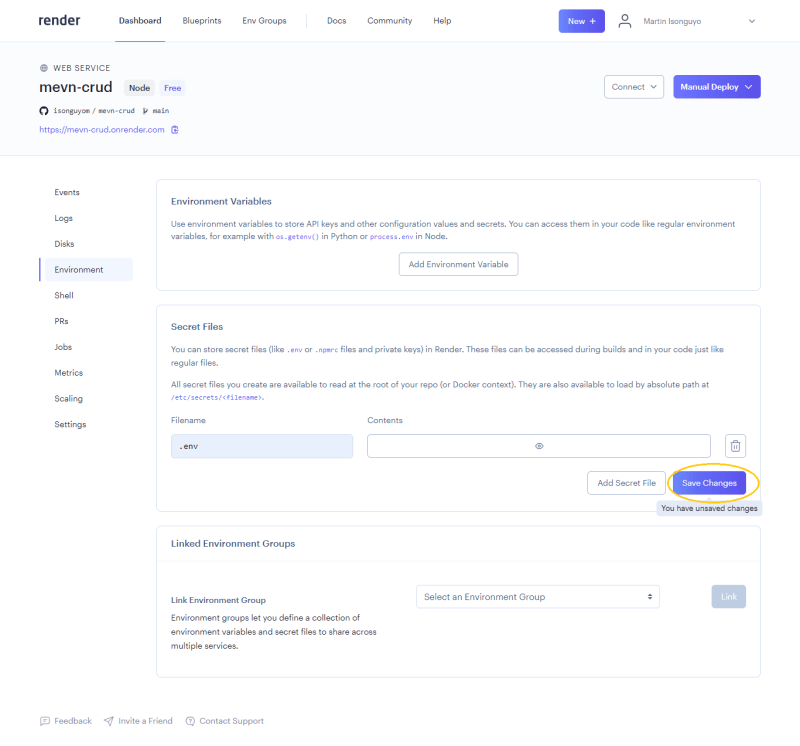
发布您的应用程序后,您的数据库数据将拒绝加载。这是因为您没有将.env文件添加到github,以免将数据库详细信息展示给公众。要添加您的.env文件以渲染,请按照以下步骤:
步骤1.导航到您的渲染仪表板,然后单击已部署的应用程序名称。
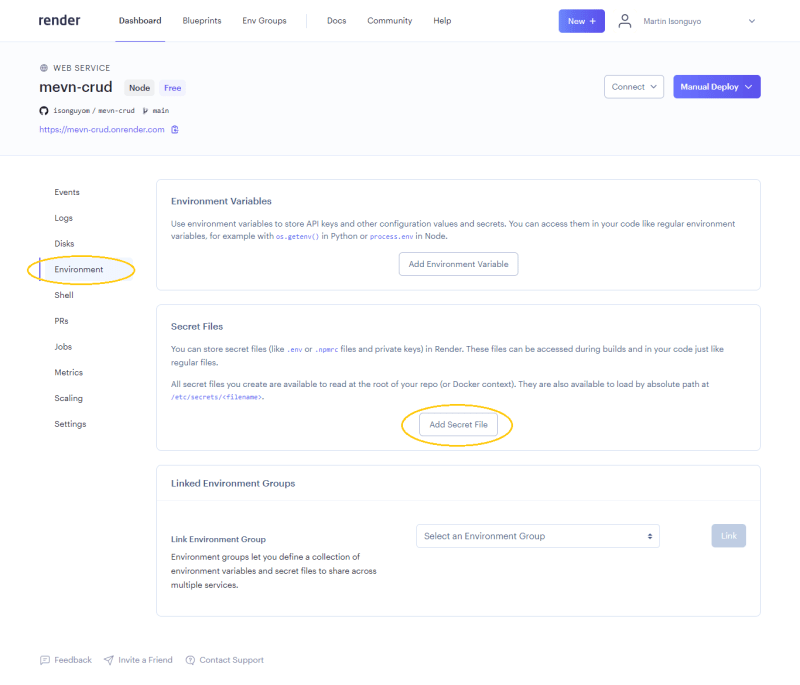
步骤2.单击左菜单上的Environment,然后滚动到Secret Files。单击Add Secret File按钮。
步骤3.在Filename下输入.env,然后单击内容输入字段。
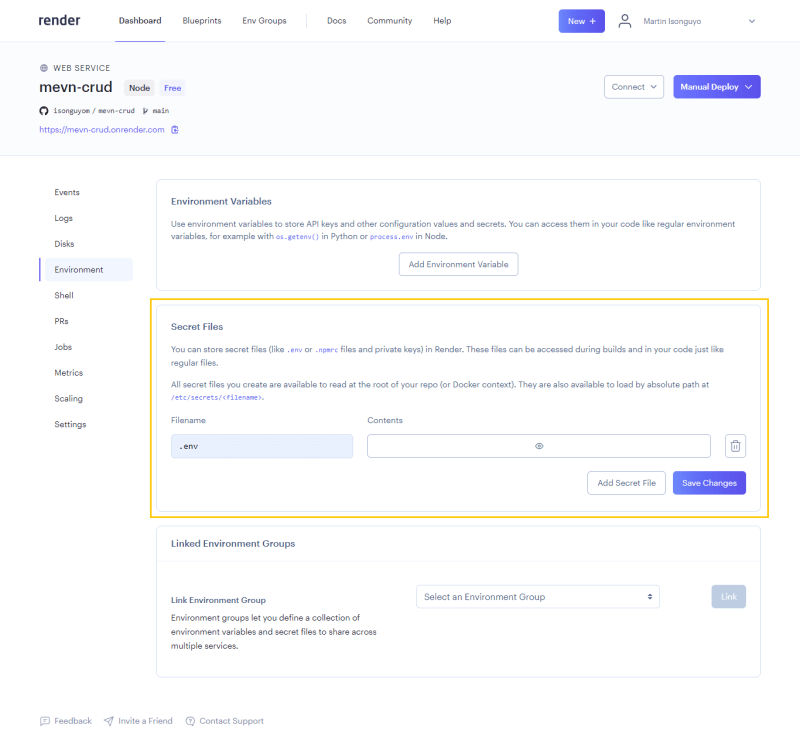
步骤4.在显示的对话框中,在文件内容中添加.env文件内容,然后单击Done按钮。

结论
全栈开发是每个开发人员的梦想。在本教程中,我们能够使用MEVN堆栈构建全堆栈Web应用程序。该教程主要适用于对MEVN堆栈感兴趣的Web开发人员,但它对任何想要了解全堆栈Web应用程序的工作人员也很有帮助。
学习任何网络开发堆栈的最佳方法是使用它构建应用程序。构建尽可能多的具有挑战性的项目。它将为您的就业市场做好准备,因为MEVN开发人员有很多机会。
如果您有任何疑问或补充,请将它们留在下面的评论部分中。
