我的婚礼在短短一周的时间内即将举行,这令人兴奋。但是你知道什么并不令人兴奋吗?获取确认的访客列表,其中包含邀请和信息中的所有变化。我将向您展示如何使用各种类型的邀请(全天/仪式)建立婚礼邀请系统,当提交RSVP并生成不断更新的嘉宾列表时,自动形式的联系信息。
在你开始之前
您将需要Node.js和计算机上安装的文本编辑器。
您还需要一个运行的Directus项目 - 使用Directus Cloud或通过自托管 - 以及用于管理员用户的API令牌。
最后,注册Vonage Developer account并记下您的API密钥和秘密。
在您的Directus项目中,创建以下集合(和字段):
- 人 - 主要钥匙字段:ID(生成的UUID)
- first_name(类型:字符串,接口:输入)
- last_name(类型:字符串,接口:输入)
- rsvp(类型:布尔值,接口:切换)
- 要求(类型:字符串,接口:输入)
- is_plus_one(类型:布尔值,接口:切换)
- 邀请 - 主键字段:slug(手动输入字符串)
- 消息(类型:字符串,接口:输入)
- 人(类型:别名,界面:一对一)
- 相关集合:People
- 外键:邀请
- 显示模板
First Name Last Name
- plus_one_lowered(类型:布尔值,接口:切换)
- care enesion_invite(类型:布尔值,接口:切换)
- 已完成(类型:DateTime,接口:DateTime)
- 电子邮件(类型:字符串,接口:输入)
- 电话(类型:字符串,接口:输入)
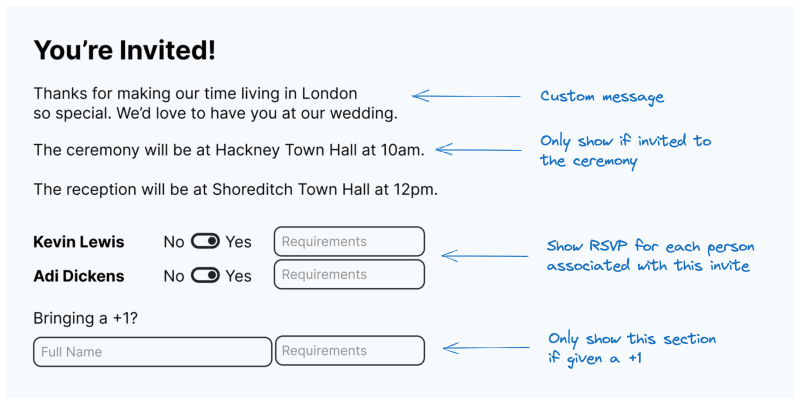
一个邀请将有多个人和可选的特征(允许+1,被邀请参加仪式)。当客人做出回应时,他们将提供要求(饮食/可访问性),并且填写的人将提供电子邮件和电话号码。最后,如果给出+1并使用了,将创建一个新人,并将is_plus_one设置为true。
这是邀请页面的说明,注释以显示Directus中的值将在哪里改变。
最小的邀请(一位客人,仅接待,no +1)看起来像这样:
为此项目创建一个新目录,然后在代码编辑器中打开它。创建一个.env文件并用键填充:
DIRECTUS_URL=your_project_url_here
DIRECTUS_TOKEN=your_admin_token_here
运行npx gitignore node为此项目创建合适的.gitignore文件。使用npm init -y创建一个package.json文件,然后安装我们的依赖项:
npm install dotenv express hbs @directus/sdk
如果您不想跟随,现在可以跳到本教程的底部以获取完整的代码。
创建一个index.js文件并在代码编辑器中打开。
设置应用程序
使用handlebars视图引擎创建并设置Express.js应用程序:
import 'dotenv/config';
import express from 'express';
import { engine } from 'express-handlebars';

const app = express();
app.use(express.static('public'));
app.use(express.urlencoded({ extended: true }));

app.engine('handlebars', engine());
app.set('view engine', 'handlebars');
app.set('views', './views');

app.get('/invite/:slug', (req, res) => {
  res.render('invite', {
    layout: false,
    name: req.params.slug
  });
});

app.listen(3000);
创建一个views目录,在其中,一个invite.handlebars文件:
<!DOCTYPE html>
<html>
<body>
   {{ name }}
</body>
</html>
在终端中使用node index.js运行您的应用程序,然后导航到Localhost:3000/邀请/Hello。您应该看到一个带有“ Hello”的页面。
设置直接SDK
导入并初始化具有REST功能的新Directus客户端。导入createItem,readItem和updateItem在以后的功能。
import 'dotenv/config';
import express from 'express';
import { engine } from 'express-handlebars';

import { createDirectus, staticToken, rest, createItem, readItem, updateItem } from '@directus/sdk'; // [!code ++]
const directus = createDirectus(process.env.DIRECTUS_URL) // [!code ++]
  .with(rest()) // [!code ++]
  .with(staticToken(process.env.DIRECTUS_TOKEN)); // [!code ++]
创建邀请页
更新邀请路由处理程序以利用Directus SDK并阅读您的Directus项目的邀请。
app.get('/invite/:slug', async (req, res) => {
  const data = await directus.request( // [!code ++]
    readItem('invites', req.params.slug, { // [!code ++]
      fields: ['*', { people: [ 'id', 'first_name', 'last_name' ] }] // [!code ++]
    }) // [!code ++]
  ); // [!code ++]

  res.render('invite', {
    layout: false,
    name: req.params.slug // [!code --]
    ...data // [!code ++]
  });
});
更新<body>标签的内容以包括邀请中的值:
<body>
  <h1>You're invited!</h1>
  <p>{{ message }}</p>
  <div>
    {{#if ceremony_invite}}
      <p>Ceremony-specific information</p>
    {{/if}}
    <p>Reception-specific information</p>
  </div>
</body>
向所有人展示个性化信息,作为他们邀请的一部分和接待细节。只有一部分客人被邀请参加仪式,而cermeony_invite表示为true。
在people系列中创建五个项目,只有一个名称,四个invites进行测试:
-
ude20 =
true,plus_one_allowed2,true,slug='= beceremony_invite=true,plus_one_allowed=false,slug='b' -
ceremony_invite=false,plus_one_allowed=true,slug='c' -
ceremony_invite=true,plus_one_allowed=true,slug='d'(将两个人分配给此邀请)
这应该给所有关键排列进行测试。重新启动您的服务器,导航到Localhost:3000/邀请/A,您只能看到接收信息。当您前往Local主机:3000/邀请/B时,您也应该看到仪式信息。
构建RSVP表单
在现有的<div>之下,添加一个条件,仅显示表格的是邀请尚未被rsvp'to:
{{#if completed}}
  <p>Thanks for responding</p>
{{else}}
  <!-- Further code goes here -->
{{/if}}
在 {{else}} 块中,创建一个表单:
<form action="/rsvp" method="POST">

  {{#each people}}
    <div style="border: 1px solid black;">
      <h2>{{ this.first_name }} {{ this.last_name }}</h2>

      <input type="radio" name="rsvp-{{ this.id }}" value="false" id="rsvp-no-{{ this.id }}" required>
      <label for="rsvp-no-{{ this.id }}">Accept</label><br>

      <input type="radio" name="rsvp-{{ this.id }}" value="true" id="rsvp-yes-{{ this.id }}" required>
      <label for="rsvp-yes-{{ this.id }}">Regrets</label><br>

      <input type="text" name="requirements-{{ this.id }}" id="requirements-{{ this.id }}" placeholder="Requirements">
    </div><br>
  {{/each}}

  <p>Only one needed per invite</p>
  <input type="email" placeholder="Email" name="email" required>
  <input type="text" placeholder="Phone" name="phone" required>
  <input type="hidden" value="{{ slug }}" name="slug">
  <input type="submit">
</form>
让我们分解一下:
- 该表格将向
/rsvp提交邮政请求。这将在以后创建。 - 对于分配给此邀请的每个人,创建了三个输入的组 - RSVP是/否的一对无线电按钮,一个可选收集任何可访问性或饮食要求。请注意,所有输入都有一个动态名称,其中包括数据库中该人的ID。例如,
name="rsvp-{{ this.id }}"将成为name="rsvp-ff028423-7111…" - 每个RSVP收集了一封电子邮件和电话号码。
- 隐藏的字段包含sl,因此也将其与其余表格一起提交。
添加+1表单字段
如果邀请将plus_one_allowed设置为true,请显示其他字段以收集其信息:
{{/each}}

{{#if plus_one_given}} // [!code ++]
  <div style="border: 1px solid black;"> // [!code ++]
    <h2>Your +1</h2> // [!code ++]
    <input type="text" name="first-name-plus-one" id="first-name-plus-one" placeholder="First Name"> // [!code ++]
    <input type="text" name="last-name-plus-one" id="last-name-plus-one" placeholder="Last Name"> // [!code ++]
    <input type="text" name="requirements-plus-one" id="requirements-plus-one" placeholder="Requirements"> // [!code ++]
  </div> // [!code ++]
{{/if}} // [!code ++]

<p>Only one needed per invite</p>
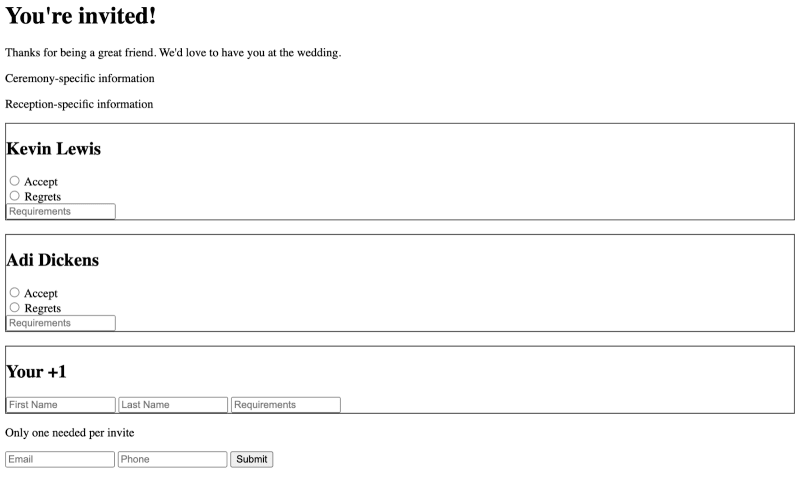
重新启动您的服务器,导航到Localhost:3000/邀请/B,您不应该看到+1字段。当您去Localhost:3000/邀请/D时,您应该。在邀请上允许A +1时,表格的样子:
它没有赢得任何设计奖,但它有效。
提交RSVP
在index.js中创建一个新的路由处理程序,用于提交帖子:
app.post('/rsvp', async (req, res) => {
  console.log(req.body);
});
重新启动服务器,填写并提交表单。终端应该看起来像这样:
使用RSVP更新人们
要获取只有人ID的列表,请将此对象过滤到以rsvp开头的属性的数组,然后从字符串开始时删除rsvp-。在console.log下:
const rsvps = Object.keys(req.body)
  .filter(k => k.includes('rsvp'))
  .map(k => k.split('rsvp-')[1]);

Then, loop through these IDs and update each person with their RSVP and requirements:

for(let rsvp of rsvps) {
  await directus.request(
    updateItem('people', rsvp, {
      rsvp: req.body[`rsvp-${rsvp}`],
      requirements: req.body[`requirements-${rsvp}`]
    })
  );
}
为+1创建人项目
如果填充了+1表单,请创建一个新人并将其ID添加到RSVPS列表中。在for循环下添加以下内容:
if(req.body['first-name-plus-one']) {
  const { id } = await directus.request(
  createItem('people', {
    first_name: req.body['first-name-plus-one'],
    last_name: req.body['last-name-plus-one'],
    requirements: req.body['requirements-plus-one'],
    is_plus_one: true,
    rsvp: true
   })
  );
  rsvps.push(id)
}
更新邀请
每个邀请包含潜在客户联系人的电话号码和电子邮件地址。在for循环下,更新邀请:
await directus.request(
  updateItem('invites', req.body.slug, {
    email: req.body.email,
    phone: req.body.phone,
    people: rsvps,
    completed: new Date()
  })
);
如果有+1,则将添加到邀请中。 completed的值也将设置为当前的日期时间。在Directus中,您可以轻松地看到制作RSVP的时间。在应用程序中,这将用消息“感谢您的响应”来代替表单。
由于completed具有值时,该表格不会出现,重定向回到同一页面,并且看起来好像已用“感谢”消息替换了表单:
res.redirect(`/invite/${req.body.slug}`);
标准化电话号码
我可以从过去的经验中告诉您 - 没有人始终填写他们的电话号码,我想构建一个批处理更新系统,以便我们可以随着一天的临近而向人们发送重要的消息。
要格式化数字,我使用了Vonage Number Insight API。在您的Directus项目设置中,创建了新的流程。
使用非阻滞事件钩触发器,使该项目添加到集合中,然后运行流程。将范围保留在Invites系列上的items.update。
添加新的请求URL操作,并将URL设置为 https://api.nexmo.com/ni/basic/json?api_key=VONAGE_API_KEY&api_secret=VONAGE_API_SECRET&number={{$trigger.payload.phone}} ,请确保更改密钥和秘密的值。
请求成功,请在邀请集合中添加更新数据操作。将有效载荷设置为以下内容:
{
    "phone": "{{$last.data.international_format_number}}"
}
保存流程并通过提交新的邀请RSVP进行测试。您可能需要手动将邀请的Completed值设置为null再次查看表单。整体流应该看起来像这样:
请参阅来宾列表
要查看运行的访客列表,请导航到内容模块中的People Collection,然后添加过滤器RSVP = true。您可以通过添加过滤器Invite -> Ceremony Invite = true看到仪式列表。
摘要和下一步
在本教程中,您创建了由Directus数据库支持的婚礼邀请和RSVP系统,然后使用Vonage Number Insight Insight API提供了标准化的数据。
既然您拥有标准化数据,则可以选择通过SMS发送批处理消息或使用Flows发送电子邮件。
如果您有任何疑问或反馈,请随时加入我们的Discord server。
完成代码
index.js
import 'dotenv/config';
import express from 'express';
import { engine } from 'express-handlebars';
import { createDirectus, staticToken, rest, createItem, readItem, updateItem } from '@directus/sdk';
const directus = createDirectus(process.env.DIRECTUS_URL)
  .with(rest())
  .with(staticToken(process.env.DIRECTUS_TOKEN));

const app = express();
app.use(express.static('public'));
app.use(express.urlencoded({ extended: true }));

app.engine('handlebars', engine());
app.set('view engine', 'handlebars');
app.set('views', './views');

app.get('/invite/:slug', async (req, res) => {
  const data = await directus.request(
    readItem('invites', req.params.slug, {
      fields: ['*', { people: [ 'id', 'first_name', 'last_name' ] }]
    })
  );
  res.render('invite', { layout: false, ...data });
});

app.post('/rsvp', async (req, res) => {
  console.log(req.body)
  // Get list of RSVP IDs
  const rsvps = Object.keys(req.body)
    .filter(k => k.includes('rsvp'))
    .map(k => k.split('rsvp-')[1]);

  // Update people with RSVPs
  for(let rsvp of rsvps) {
    await directus.request(
      updateItem('people', rsvp, {
        rsvp: req.body[`rsvp-${rsvp}`],
        requirements: req.body[`requirements-${rsvp}`]
      })
    );
  }

  // Add +1 if exists
  if(req.body['first-name-plus-one']) {
    const { id } = await directus.request(
      createItem('people', {
        first_name: req.body['first-name-plus-one'],
        last_name: req.body['last-name-plus-one'],
        requirements: req.body['requirements-plus-one'],
        is_plus_one: true,
        rsvp: true
      })
    );
    rsvps.push(id);
  }

  // Update invite
  await directus.request(
    updateItem('invites', req.body.slug, {
      email: req.body.email,
      phone: req.body.phone,
      people: rsvps,
      completed: new Date()
    })
  );

  res.redirect(`/invite/${req.body.slug}`);
});

app.listen(3000);
views/invite.handlebars
<!DOCTYPE html>
<html>
<body>
  <h1>You're invited!</h1>
  <p>{{ message }}</p>
  <div>
    {{#if ceremony_invite}}
      <p>Ceremony-specific information</p>
    {{/if}}
    <p>Reception-specific information</p>
  </div>
  {{#if completed}}
    <p>Thanks for responding</p>
  {{else}}
    <form action="/rsvp" method="POST">
      {{#each people}}
        <div style="border: 1px solid black;">
          <h2>{{ this.first_name }} {{ this.last_name }}</h2>

          <input type="radio" name="rsvp-{{ this.id }}" value="false" id="rsvp-no-{{ this.id }}" required>
          <label for="rsvp-no-{{ this.id }}">Accept</label><br>

          <input type="radio" name="rsvp-{{ this.id }}" value="true" id="rsvp-yes-{{ this.id }}" required>
          <label for="rsvp-yes-{{ this.id }}">Regrets</label><br>

          <input type="text" name="requirements-{{ this.id }}" id="requirements-{{ this.id }}" placeholder="Requirements">
        </div>
        <br>
      {{/each}}
      {{#if plus_one_allowed}}
      <div style="border: 1px solid black;">
        <h2>Your +1</h2>
        <input type="text" name="first-name-plus-one" id="first-name-plus-one" placeholder="First Name">
        <input type="text" name="last-name-plus-one" id="last-name-plus-one" placeholder="Last Name">
        <input type="text" name="requirements-plus-one" id="requirements-plus-one" placeholder="Requirements">
      </div>
      {{/if}}
      <p>Only one needed per invite</p>
      <input type="email" placeholder="Email" name="email" required>
      <input type="text" placeholder="Phone" name="phone" required>
      <input type="hidden" value="{{ slug }}" name="slug">
      <input type="submit">
    </form>
  {{/if}}
</body>
</html>
}


