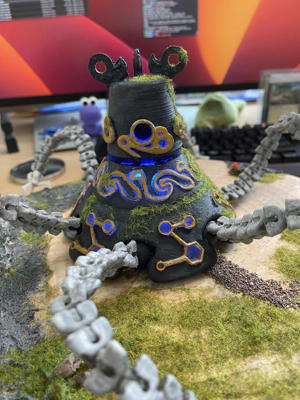
在进入新Zelda版本的过程中,我意识到您可以用伺服和相机构建一个固定的监护机器人。
添加一点machine learning,然后您可以使Guardian检测到对象或人或宠物,并通过旋转头部来跟随它们。
幸运的是,我不是第一个有建造监护人的想法的人,并且已经有一个brilliant guardian 3D model在Thingiverse上有LED和伺服的空间。
在本教程中,我将带您浏览步骤,使用servo,camera,一些LED和ML Model service和vision service。
这是一段完成的监护人检测到我的视频:
硬件要求
要构建自己的监护机器人,您需要以下硬件:
| 硬件 | 大约价格 |
|---|---|
| Raspberry Pi +电源电缆 | $ 60 |
| Raspberry Pi摄像机V1.3 + 50厘米丝带电缆:默认的15厘米丝带电缆不够长。 | $ 15 |
| 180度SG90伺服:由于摄像头,我将伺服器限制在180度。 | $ 4 |
| 3x 10mm RGB LED,带有普通阴极 | $ 4 |
| 电缆 | $ 5 |
| 4x m2螺钉连接摄像机 | $ 2 |
| 扬声器:如果您想要音乐,请进行可选。我使用了4î©2W扬声器,并使用连接的Aux In。您可以使用任何扬声器可以连接到您的pi。 | 可选 |
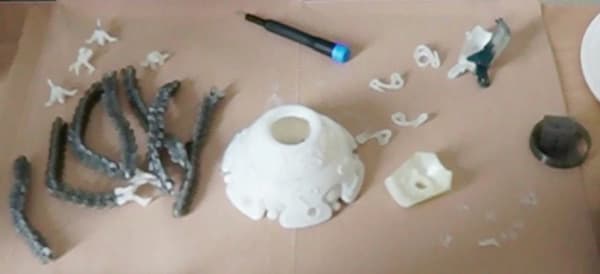
打印或订购以下打印的3D零件:
- 适合相机的this head
- this Guardian Robot model的头部装饰品
- Guardian Robot, Hackable的身体,底盖,爪和腿部段
使监护人的灯光通过其身体发光,使用灯丝,使光线闪耀并绘制不应该让光线照亮的零件。
可选,如果您想装饰监护人,我建议您使用以下材料:
- 底漆:vallego表面底漆灰色或其他品牌。
- 丙烯酸涂料:我订购了装甲造型油漆,但发现从常规丙烯酸涂料套装中混合自己的颜色最适合我。
- 对草,石头,胶水进行建模:陆军画家制作了所有这一切的战场基础。
-
守护者的基础:我使用了一个木制磁盘,中间切一个孔,下面的顶部有一个孔。
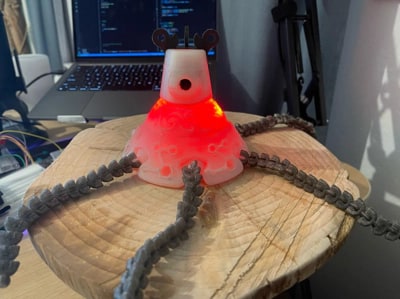
- 地面纹理:如果您希望底座看起来更自然,则可以使用Vallejo地面纹理丙烯酸或类似的东西与创建看起来像石头的补丁。
- 电线:为了让您更好地定位腿,您可以穿过它们。
软件要求
您将在本教程中使用以下软件:
- Python 3
-
koude0:按照installation instructions在Raspberry Pi上安装
viam-server。
组装机器人
您可以在此处查看机器人组件的时间段:
https://imgur.com/gallery/3sCrNh4
组装进行测试
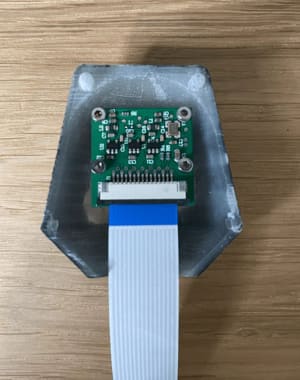
要组装监护人,从头部开始,然后使用四个M2螺钉将相机用附着的缎带电缆拧到头部的前半部分。
可选地,如果从外部可见相机的绿色,请使用标记为相机板着色。
然后将头部的两个部分放在一起。
您的伺服器可能带有安装螺丝和齿轮的塑料喇叭。
用螺钉将喇叭连接到头部的底部。
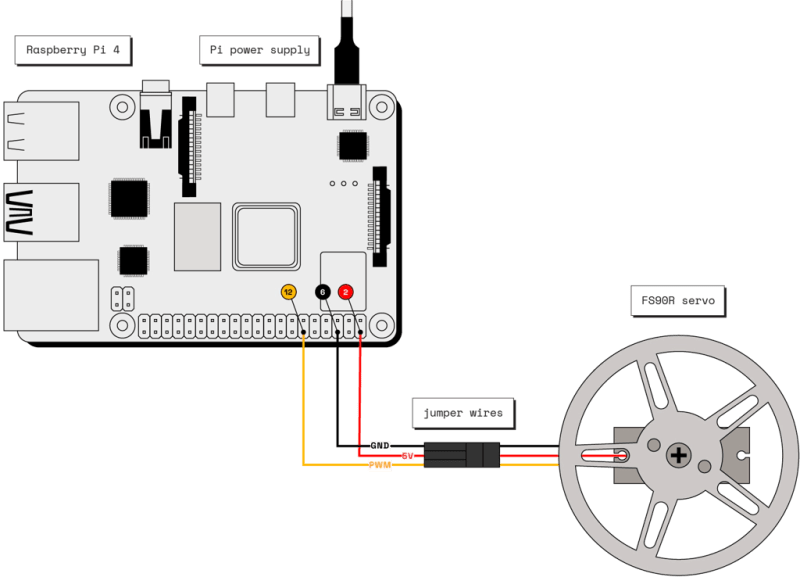
接下来,获取覆盆子Pi和伺服器,将伺服器连接到Raspberry Pi,通过将PWM线连接到引脚12,将电线连接到引脚2,然后将接地线连接到销钉8。
。使您更容易查看哪个销钉是哪个销钉,您可以打印出具有销钉标签的Abiaoqian 19 。
如果使用A4纸,请改用此this Raspberry Pi Leaf。
如果您在打孔的孔子上遇到困难,可以用笔预先打孔。
仅在拔下PI时将纸安装。
为了使纸张更容易,请使用信用卡或小螺丝刀。
然后将头连接到伺服器。
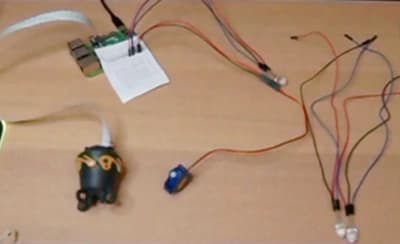
接下来,准备三个10mm RGB LED。
将每个导致的普通阴极连接到覆盆子PI上的ground pin。
将红色和蓝色LED的电线连接到GPIO pins。
在继续组装之前,您应该按预期测试组件工作。
为了能够测试组件,您需要安装viam-server并配置组件。
安装viam-server并连接到您的机器人
转到Viam app并创建一个名为guardian的新机器人。
转到新机器人页面的设置选项卡,然后按照步骤操作to install koude0 on your computer。
配置组件
导航到the Viam app中机器人页面的 config 标签。
单击组件子盘并导航到创建组件菜单。
-
添加板。
输入board component名称的
local,选择类型board,然后选择pi型号。
然后单击创建组件。 -
添加相机。
创建一个名称
cam,typecamera和modelwebcam的camera component。
单击创建组件添加相机。
在新的相机面板中,单击视频路径字段,揭示了一个带有相机路径已确定的摄像机路径的下拉式。
选择mmal service 16.1 (platform:bcm2835_v4l2-0)。 -
添加伺服器。
创建一个名称
servo,typeservo和型号pi的servo component。
单击创建组件添加伺服器。
通过添加板的名称,local和将伺服pwm电线连接到local上的销钉的销钉编号来配置属性。18:
{
    "pin": "12",
    "board": "local"
}
单击在屏幕的左下角保存config 。
测试组件
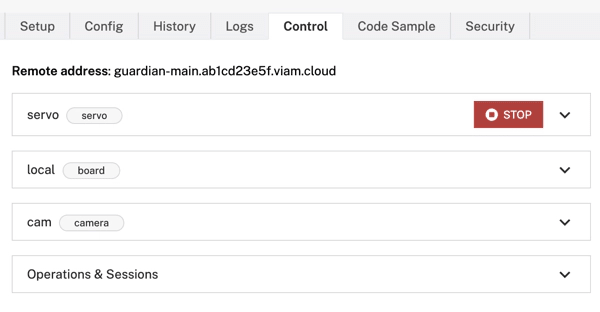
导航到您的robot's Control tab测试您的组件。
单击伺服面板,增加或减小伺服伺服移动的伺服角度。
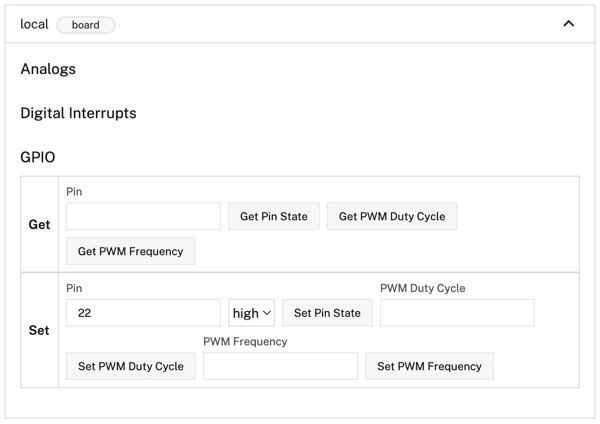
接下来,单击板面板。
董事会允许您获得并设置针状态。
设置LED连接到高高测试其点亮的引脚的销钉状态。
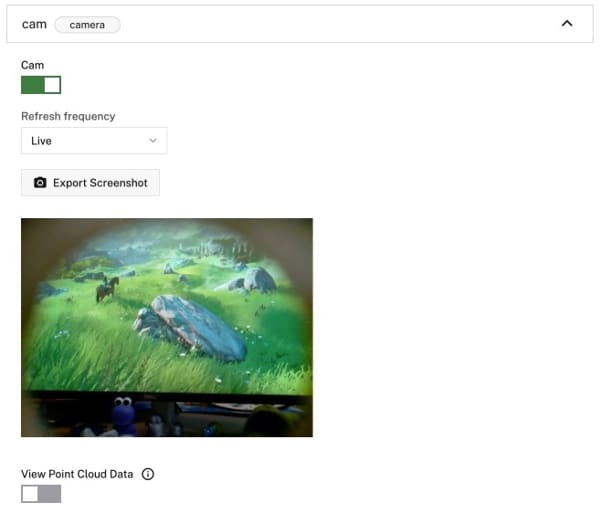
接下来,单击相机面板,然后切换相机以测试您从相机中获得视频。
组装和装饰
既然您已经测试了组件,则可以再次断开它们,绘画和装饰监护人,然后将其余的守护者放在一起。
卸下伺服喇叭,然后将一个引导在监护人头的后部,将电线悬挂在缎带摄像头后面。
然后将伺服器放在监护人的身体内,然后将角放在伺服器的齿轮上。
小心地将剩余的两个LED置于体内相反的方向。
将所有电缆穿过盖子底部的孔中的孔,并关闭盖子。
使用一个合适的底座,就像一个盒子一样,将孔切成顶部,将监护人放在顶部,并将所有电线重新连接到Raspberry Pi。
此时还将扬声器连接到覆盆子pi。
然后再次测试robot's Control tab上的组件,以确保一切仍然有效。
发现人和宠物
为了使监护人能够检测生物,您可以使用this Machine Learning model。
该模型可以检测到您可以在关联的labels.txt文件中看到的各种事物。
您也可以根据机器人的图像进行train your own custom model,但是提供的机器学习模型是一个很好的开始。
要使用提供的机器学习模型,请将effdet0.tflite文件和labels.txt复制到您的Raspberry Pi:
scp effdet0.tflite pi@guardian.local:/home/pi/effdet0.tflite
scp labels.txt pi@guardian.local:/home/pi/labels.txt
接下来,导航到the Viam app中机器人页面的 config 标签。
单击服务子盘并导航到创建服务菜单。
-
添加ML模型服务。
ML model service允许您将提供的机器学习模型部署到机器人。
使用名称mlmodel,类型mlmodel和Modeltflite_cpu创建ML模型。
然后单击创建服务。
在新的ML模型面板中,选择在机器人上的现有模型的部署。
然后将绝对模型路径指定为/home/pi/effdet0.tflite,标签路径为/home/pi/labels.txt。 -
添加视觉服务。
接下来,添加detector作为视觉服务,以便能够使用ML模型。
使用名称detector,类型vision和Modelmlmodel创建视觉服务。
然后单击创建服务。
在新的探测器面板中,选择您在上一步中配置的mlmodel。
单击在屏幕的左下角保存配置。 -
添加
transform相机。
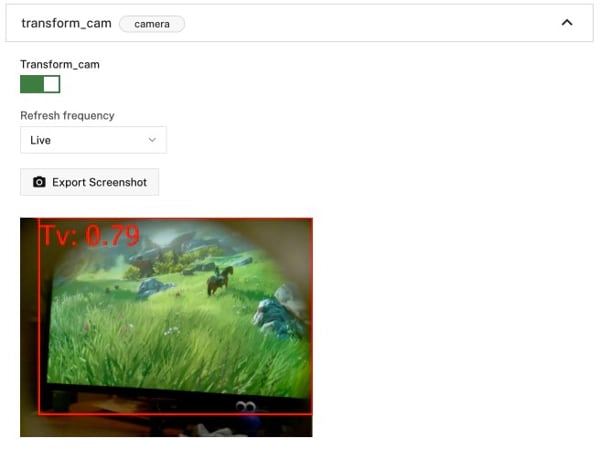
为了能够测试视觉服务是否有效,请添加一个transform摄像头,该摄像头将添加边界框并在对象周围添加标签。
单击组件 subtab,然后导航到创建组件菜单。
创建一个名称transform_cam,类型camera和Modeltransform的transform camera。
用以下对象替换属性json对象,该对象指定了transform相机将使用的摄像头源并定义添加定义的detector的管道:
   {
   "source": "cam",
   "pipeline": [
       {
       "type": "detections",
       "attributes": {
           "detector_name": "detector",
           "confidence_threshold": 0.6
       }
       }
   ]
   }
单击在屏幕的左下角保存config 。
导航到您的robot's Control tab测试转换摄像机。
单击“变换摄像头”面板并切换相机,然后将相机指向一个人或宠物以测试视觉服务是否检测到它们。
您应该看到带有不同对象的标签的边界框。
编程监护人
使用《卫报》完全配置并测试了配置,是时候通过编程人和宠物检测,灯光,音乐和动作来使机器人监护人表现得像“真实”的监护人。
完整代码可在the end of the tutorials上找到。
建立Python环境
我们将使用Virtualenv为该项目设置虚拟环境,以将该项目的依赖关系与其他项目隔离。
在命令行中运行以下命令以安装Virtualenv,设置环境venv并激活:
python3 -m pip install --user virtualenv
python3 -m venv env
source env/bin/activate
现在,安装Python Viam SDK和VLC模块:
pip3 install viam-sdk python-vlc
连接
接下来,转到机器人页面上的代码示例选项卡,然后选择 python ,然后单击复制。
。此代码段导入所有必要的软件包,并与云中的VIAM应用程序建立了连接。
接下来,创建一个名为main.py的文件,并从代码示例 tab pat粘贴到文件中。
然后,保存您的文件。
运行代码以验证VIAM SDK是否已正确安装,并且机器人上的viam-server实例是实时的。
您可以通过在终端中输入以下内容来运行代码:
python3 main.py
程序打印机器人资源列表。
在代码示例摘要导入的包装上,将random和vlc软件包添加到导入。
代码的顶部现在应该看起来像这样:
import asyncio
import random
import vlc

from viam.robot.client import RobotClient
from viam.rpc.dial import Credentials, DialOptions
from viam.components.board import Board
from viam.components.camera import Camera
from viam.components.servo import Servo
from viam.services.vision import VisionClient

async def connect():
    creds = Credentials(
        type='robot-location-secret',
        payload='LOCATION SECRET FROM THE VIAM APP')
    opts = RobotClient.Options(
        refresh_interval=0,
        dial_options=DialOptions(credentials=creds)
    )
    return await RobotClient.at_address('ADDRESS FROM THE VIAM APP', opts)
您将稍后更新main()方法。
灯光
接下来,您将编写代码来管理LED。
在connect()功能下方,添加以下类,该类允许您创建一个LED组,然后通过一个方法调用打开和关闭这些LED:
class LedGroup:
    def __init__(self, group):
        print("group")
        self.group = group

    async def led_state(self, on):
        for pin in self.group:
            await pin.set(on)
如果要测试此代码,请将您的main()方法更改为:
async def main():
    robot = await connect()
    local = Board.from_robot(robot, 'local')
    red_leds = LedGroup([
        await local.gpio_pin_by_name('22'),
        await local.gpio_pin_by_name('24'),
        await local.gpio_pin_by_name('26')
    ])
    blue_leds = LedGroup([
        await local.gpio_pin_by_name('11'),
        await local.gpio_pin_by_name('13'),
        await local.gpio_pin_by_name('15')
    ])

    await blue_leds.led_state(True)
您可以通过运行:
测试代码
python3 main.py
您的监护人点亮蓝色。
检测
现在,您将添加守护者来检测人员和宠物的代码。
如果您要为人,猫或狗建造它,则需要使用Person,Dog,Cat,并且如果您有一只特别泰迪比尔的狗Teddy bear。
您也可以根据labels.txt中的可用标签指定不同的标签。
connect()方法上方,添加以下变量,该变量定义了您要在检测中寻找的标签:
LIVING_OBJECTS = ["Person", "Dog", "Cat", "Teddy bear"]
然后,在main()方法上方添加以下功能,该功能在LIVING_OBJECTS变量中定义了生物的检测。
async def check_for_living_creatures(detections):
    for d in detections:
        if d.confidence > 0.6 and d.class_name in LIVING_OBJECTS:
            print("detected")
            return d
空转
在check_for_living_creatures()功能下方,添加以下功能,该功能从Guardian的相机中获取图像,并检查它们是否有生物,如果没有检测到,则随机移动伺服器。
如果检测到一个生物,红色的LED将点亮并播放音乐。
async def idle_and_check_for_living_creatures(cam, detector, servo, blue_leds, red_leds, music_player):
    living_creature = None
    while True:
        random_number_checks = random.randint(0, 5)
        if music_player.is_playing():
            random_number_checks = 15
        for i in range(random_number_checks):
            detections = await detector.get_detections_from_camera(cam)
            living_creature = await check_for_living_creatures(detections)
            if living_creature:
                await red_leds.led_state(True)
                await blue_leds.led_state(False)
                if not music_player.is_playing():
                    music_player.play()
                return living_creature
        print("START IDLE")
        await blue_leds.led_state(True)
        await red_leds.led_state(False)
        if music_player.is_playing():
            music_player.stop()
        await servo.move(random.randint(0, 180))
重点
您需要添加一个最后一个功能,然后才能编写完整的main()功能,这是一个专注于给定生物的函数。
该功能计算检测到的对象的中心,然后检查该中心是否靠近整个图像的中间。
如果它不在整个图像的中间,则该功能将伺服器移动到左侧或右侧,以尝试将对象中心。
在您的main()函数上方添加以下功能:
async def focus_on_creature(creature, width, servo):
    creature_midpoint = (creature.x_max + creature.x_min)/2
    image_midpoint = width/2
    center_min = image_midpoint - 0.2*image_midpoint
    center_max = image_midpoint + 0.2*image_midpoint

    movement = (image_midpoint - creature_midpoint)/image_midpoint
    angular_scale = 20
    print("MOVE BY: ")
    print(int(angular_scale*movement))

    servo_angle = await servo.get_position()
    if (creature_midpoint < center_min or creature_midpoint > center_max):
        servo_angle = servo_angle + int(angular_scale*movement)
        if servo_angle > 180:
            servo_angle = 180
        if servo_angle < 0:
            servo_angle = 0

        if servo_angle >= 0 and servo_angle <= 180:
            await servo.move(servo_angle)

    servo_return_value = await servo.get_position()
    print(f"servo get_position return value: {servo_return_value}")
主要逻辑
监护机器人的主要逻辑:
- 初始化所有变量
- 将所有LED变成蓝色
- 加载音乐文件
guardian.mp3 - 运行一个无限循环,它在其中称为
idle_and_check_for_living_creatures()函数,当找到一个生物时调用focus_on_creature()函数
将合适的音乐文件复制到代码正在运行的目录并将其命名为guardian.mp3。
用以下内容替换main()函数:
async def main():
    robot = await connect()
    local = Board.from_robot(robot, 'local')
    cam = Camera.from_robot(robot, "cam")
    img = await cam.get_image()
    servo = Servo.from_robot(robot, "servo")
    red_leds = LedGroup([
        await local.gpio_pin_by_name('22'),
        await local.gpio_pin_by_name('24'),
        await local.gpio_pin_by_name('26')
    ])
    blue_leds = LedGroup([
        await local.gpio_pin_by_name('11'),
        await local.gpio_pin_by_name('13'),
        await local.gpio_pin_by_name('15')
    ])

    await blue_leds.led_state(True)

    music_player = vlc.MediaPlayer("guardian.mp3")

    # grab Viam's vision service for the detector
    detector = VisionClient.from_robot(robot, "detector")
    while True:
        # move head periodically left and right until movement is spotted.
        living_creature = await idle_and_check_for_living_creatures(cam, detector, servo, blue_leds, red_leds, music_player)
        await focus_on_creature(living_creature, img.width, servo)
    # Don't forget to close the robot when you're done!
    await robot.close()

if __name__ == '__main__':
    asyncio.run(main())
现在,运行代码:
python3 main.py
如果一切都起作用,您的监护人现在应该开始闲置,当它发现人类,狗或猫变成红色,开始音乐并专注于检测到的是。
自动运行程序
另一件事。
现在,您必须每次让监护人工作时手动运行代码。
您还可以配置Viam以自动运行代码为process。
要能够从Raspberry Pi运行Python脚本,您需要在Raspberry Pi上安装Python SDK并将代码复制到Raspberry Pi。
koude58 into your Pi并安装pip:
sudo apt install python3-pip
在主目录中创建一个文件夹guardian:
mkdir guardian
然后将Viam Python SDK和VLC模块安装到该文件夹:
pip3 install --target=guardian viam-sdk python-vlc
退出与PI的连接,并使用scp将代码复制到新文件夹中。
您的主机名可能不同:
scp main.py pi@guardian.local:/home/pi/guardian/main.py
还将您的音乐文件复制到:
scp guardian.mp3 pi@guardian.local:/home/pi/guardian/guardian.mp3
现在导航到the Viam app中机器人页面的配置标签。
单击流程子盘并导航到创建过程菜单。
输入main作为过程名称,然后单击创建过程。
在新的进程面板中,以可执行文件为“ main.py”作为参数输入python3,以及raspberry pi的工作目录作为/home/pi/guardian。
单击添加参数。
单击在屏幕的左下角保存config 。
现在,您的监护人开始像守护者一样自动启动时的行为!
下一步
您现在拥有一个运转良好的监护机器人,您可以使用该机器人来监视宠物或人员。或者当您回到桌子时只是用来打招呼。
当然,您可以自由调整代码以使其做其他事情,添加更多LED,甚至训练自己的自定义模型。
完整代码
import asyncio
import random
import vlc

from viam.robot.client import RobotClient
from viam.rpc.dial import Credentials, DialOptions
from viam.components.board import Board
from viam.components.camera import Camera
from viam.components.servo import Servo
from viam.services.vision import VisionClient

LIVING_OBJECTS = ["Person", "Dog", "Cat", "Teddy bear"]


async def connect():
    creds = Credentials(
        type='robot-location-secret',
        payload='SECRET_FROM_VIAM_APP')
    opts = RobotClient.Options(
        refresh_interval=0,
        dial_options=DialOptions(credentials=creds)
    )
    return await RobotClient.at_address('guardian-main.vw3iu72d8n.viam.cloud', opts)


async def check_for_living_creatures(detections):
    for d in detections:
        if d.confidence > 0.6 and d.class_name in LIVING_OBJECTS:
            print("detected")
            return d


async def focus_on_creature(creature, width, servo):
    creature_midpoint = (creature.x_max + creature.x_min)/2
    image_midpoint = width/2
    center_min = image_midpoint - 0.2*image_midpoint
    center_max = image_midpoint + 0.2*image_midpoint

    movement = (image_midpoint - creature_midpoint)/image_midpoint
    angular_scale = 20
    print("MOVE BY: ")
    print(int(angular_scale*movement))

    servo_angle = await servo.get_position()
    if (creature_midpoint < center_min or creature_midpoint > center_max):
        servo_angle = servo_angle + int(angular_scale*movement)
        if servo_angle > 180:
            servo_angle = 180
        if servo_angle < 0:
            servo_angle = 0

        if servo_angle >= 0 and servo_angle <= 180:
            await servo.move(servo_angle)

    servo_return_value = await servo.get_position()
    print(f"servo get_position return value: {servo_return_value}")


class LedGroup:
    def __init__(self, group):
        print("group")
        self.group = group

    async def led_state(self, on):
        for pin in self.group:
            await pin.set(on)


async def idle_and_check_for_living_creatures(cam, detector, servo, blue_leds, red_leds, music_player):
    living_creature = None
    while True:
        random_number_checks = random.randint(0, 5)
        if music_player.is_playing():
            random_number_checks = 15
        for i in range(random_number_checks):
            detections = await detector.get_detections_from_camera(cam)
            living_creature = await check_for_living_creatures(detections)
            if living_creature:
                await red_leds.led_state(True)
                await blue_leds.led_state(False)
                if not music_player.is_playing():
                    music_player.play()
                return living_creature
        print("START IDLE")
        await blue_leds.led_state(True)
        await red_leds.led_state(False)
        if music_player.is_playing():
            music_player.stop()
        await servo.move(random.randint(0, 180))


async def main():
    robot = await connect()
    local = Board.from_robot(robot, 'local')
    cam = Camera.from_robot(robot, "cam")
    img = await cam.get_image()
    servo = Servo.from_robot(robot, "servo")
    red_leds = LedGroup([
        await local.gpio_pin_by_name('22'),
        await local.gpio_pin_by_name('24'),
        await local.gpio_pin_by_name('26')
    ])
    blue_leds = LedGroup([
        await local.gpio_pin_by_name('11'),
        await local.gpio_pin_by_name('13'),
        await local.gpio_pin_by_name('15')
    ])

    await blue_leds.led_state(True)

    music_player = vlc.MediaPlayer("guardian.mp3")

    # grab Viam's vision service for the detector
    detector = VisionClient.from_robot(robot, "detector")
    while True:
        # move head periodically left and right until movement is spotted.
        living_creature = await idle_and_check_for_living_creatures(cam, detector, servo, blue_leds, red_leds, music_player)
        await focus_on_creature(living_creature, img.width, servo)
    # Don't forget to close the robot when you're done!
    await robot.close()

if __name__ == '__main__':
    asyncio.run(main())
