忠诚度奖励计划对于促进客户参与和推动客户保留率至关重要。忠诚度奖励计划激励客户继续回来并促进参与感和满意度。
在本文中,我们将使用Next.js(一个受欢迎的React框架)构建一个强大的忠诚度奖励应用程序,以及强大的AppWrite cloud cloud Backend-as-a-Service平台和视觉上令人惊叹的Pink Design Library。
此应用程序将包含商店列表,用户将通过从这些商店购买来获得积分,这些点将添加到用户的帐户中。
先决条件
要与本文一起遵循:
- 对JavaScript和Next.js 的基本理解
- 一个appwrite云帐户(您可以创建一个here)
存储库
在GitHub中找到本文中使用的完整代码。
项目设置
Node需要在我们的计算机上安装以设置下一个.js应用程序。要安装节点,请转到Node.js website,并按照说明安装与操作系统兼容的特定软件。
我们可以通过运行以下命令来验证node.js安装:
node -v
v18.15.0 //node version installed
要创建next.js应用,请在下面运行命令。它将自动设置一个样板Next.js App。
npx代表节点软件包执行。它在不安装NPM注册表中执行任何软件包。
npx create-next-app@latest <app-name>
# or
yarn create next-app <app-name>
安装完成后,将目录更改为我们刚刚创建的应用程序:
cd <app-name>
接下来,安装以下依赖项:
npm i @appwrite.io/pink appwrite
运行npm run dev或yarn dev在http://localhost:3000上启动开发服务器。
设置AppWrite数据库
我们将在此应用中使用Appwrite Cloud数据库服务。
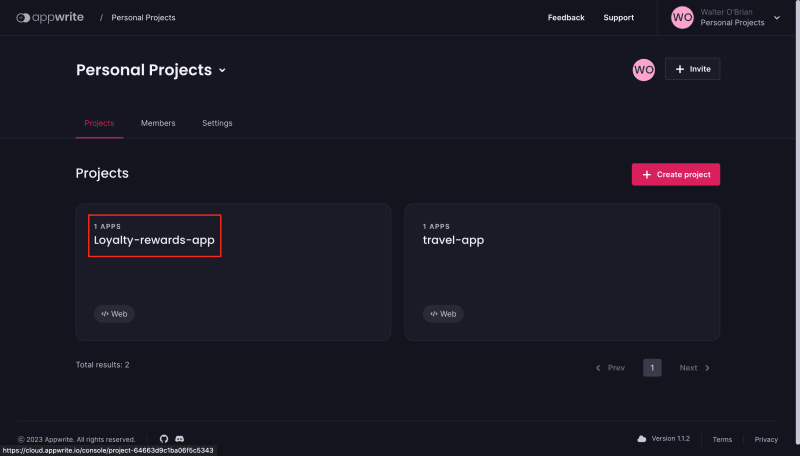
要设置AppWrite云数据库,请登录到AppWrite控制台并创建一个新项目。
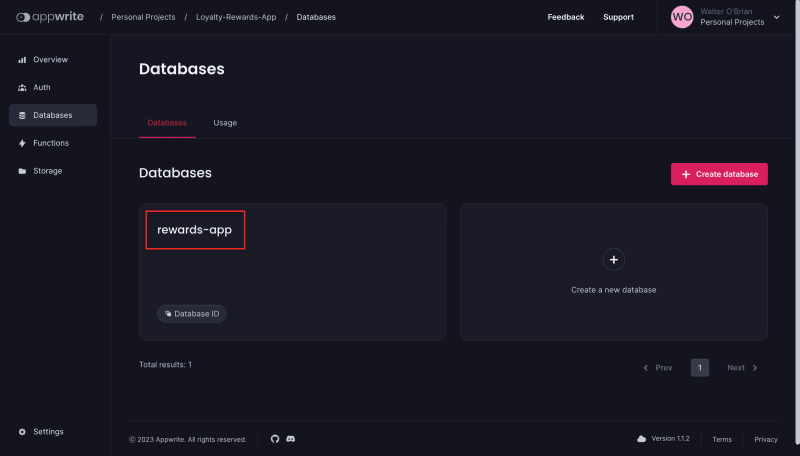
接下来,单击 Databases ,然后 Create database 。我们可以命名 rewards-app 。
在数据库中,创建一个名为用户的集合,在集合中,添加以下各自类型的属性:
-
points-integer -
userID-integer
单击Indexes选项卡,然后在userID属性上添加索引。接下来,转到“设置”选项卡,然后向下滚动到Update permissions。为Any添加新角色,然后赋予所有权限。
设置应用程序
在 pages 目录中,创建以下文件:
-
store.js:在此页面中,我们将列出可以兑换点的商店的虚构网格 -
purchase.js:此页面将模拟购买的完成,并向用户发出奖励
设置粉红色设计
打开_app.js文件,并用以下内容替换现有代码:
    import '@appwrite.io/pink';
    import '@appwrite.io/pink-icons';

    function MyApp({ Component, pageProps }) {
      return <Component {...pageProps} />;
    }

    export default MyApp;
设置组件
打开 pages/index.js 并用以下内容替换现有代码:
    import React, { useEffect, useState } from 'react';
    import { Client, Databases, ID, Query } from 'appwrite';

    const client = new Client()
      .setEndpoint('https://cloud.appwrite.io/v1')
      .setProject('[PROJECT-ID]');

    const databases = new Databases(client);

    const HomePage = () => {
      const [points, setPoints] = useState(0);
      const stores = [
        { name: 'Store 1', discount: '10% off', points: 10 },
        { name: 'Store 2', discount: '20% off', points: 20 },
        { name: 'Store 3', discount: '30% off', points: 30 },
        { name: 'Store 4', discount: '40% off', points: 40 },
      ];

      return (
        <div
          className='container'
          style={{ maxWidth: '600px', margin: '0 auto', padding: '20px' }}
        >
          <h1
            style={{
              fontSize: '32px',
              marginBottom: '20px',
              color: 'hsl(var(--color-neutral-300))',
            }}
          >
            Rewards App
          </h1>
          <div
            style={{
              display: 'flex',
              alignItems: 'center',
              justifyContent: 'space-between',
              marginBottom: '20px',
            }}
          >
            <p style={{ fontSize: '24px', color: 'hsl(var(--color-neutral-300))' }}>
              Total Points:
            </p>
            <p style={{ fontSize: '32px', fontWeight: 'bold', color: '#0070f3' }}>
              {points}
            </p>
          </div>
          <div
            style={{
              gridTemplateColumns: 'repeat(auto-fill, minmax(200px, 1fr))',
              gridGap: '20px',
            }}
            className='grid-box'
          >
            {stores.map((store, index) => (

            ))}
          </div>
        </div>
      );
    };

    export default HomePage;
让我们浏览代码并解释正在发生的事情:
-
React,useEffect和useState是从“ React”软件包中导入的。Client,Databases,ID和Query是从'appwrite'package 进口的
- 创建和配置了使用端点和项目ID package
Client类的实例 - 使用
Databases类的实例是使用Client实例创建的,该实例可访问与数据库相关的功能 - 在
HomePage组件中,使用points状态使用useState挂钩初始化,初始值为0 - 声明了一个称为
stores- 代表主页的结构和UI的JSX标记与
Pink Design的实用程序类别 - 代表主页的结构和UI的JSX标记与
打开 pages/stores.js 并添加以下代码:
    import React from 'react';
    import Link from 'next/link';

    const Store = ({ name, discount, store, points }) => {
      return (
        <div
          style={{
            border: '1px solid #ddd',
            textAlign: 'center',
            backgroundColor: '#f9f9f9',
          }}
          className='u-padding-24'
        >
          <h3 style={{ fontSize: '18px', marginBottom: '10px' }}>{name}</h3>
          <p style={{ fontSize: '16px', color: '#0070f3' }}>{discount}</p>
          <Link
            style={{
              marginTop: '20px',
              textAlign: 'center',
              textDecoration: 'none',
              backgroundColor: '#0070f3',
              fontWeight: 'bold',
              fontSize: '16px',
              color: '#fff',
              border: 'none',
              padding: '10px 20px',
              cursor: 'pointer',
              transition: 'backgroundColor 0.3s ease',
            }}
            className='u-block'
            href={`/purchase?store=${encodeURIComponent(store)}&points=${points}`}
          >
            <span>Purchase</span>
          </Link>
        </div>
      );
    };

    export default Store;
让我们浏览代码并解释正在发生的事情:
-
React是从“ React”软件包导入的,Link组件是从Next/link 导入的
-
Store组件定义为接收name,discount,store和<强>points作为道具 - 返回JSX标记,代表商店卡的结构和UI,并包含使用
Pink Design造型的元素 -
LinkNext.js的组件用于创建一个可点击的链接,用于从商店购买 -
hrefLink组件的支柱设置为动态生成的URL。store参数是使用encodeURIComponent()编码的uri
打开 pages/purchase.js 并添加以下代码:
    import React, { useState } from 'react';
    import { useRouter } from 'next/router';
    import { Client, Databases, ID, Query } from 'appwrite';
    import Link from 'next/link';

    const client = new Client()
      .setEndpoint('https://cloud.appwrite.io/v1') // Our API Endpoint
      .setProject('[PROJECT-ID]');
    const databases = new Databases(client);

    const PurchasePage = () => {
      const router = useRouter();
      const { store, points } = router.query;
      const [rewardPoints, setRewardPoints] = useState(0);
      const [purchaseComplete, setPurchaseComplete] = useState(false);

      const buttonStyle = {
        backgroundColor: purchaseComplete ? '#ccc' : '#0070f3',
        color: '#fff',
        border: 'none',
        padding: '10px 20px',
        fontSize: '16px',
        cursor: purchaseComplete ? 'not-allowed' : 'pointer',
        transition: 'background-color 0.3s ease',
      };

      const product = { name: 'Product 1', price: 50 };

      const handlePurchase = async (price) => {
        const reward = Math.floor(price * (points / 100));
        const documentInfo = JSON.parse(localStorage.getItem('documentInfo'));
        const collectionId = documentInfo.info.$collectionId;
        const documentId = documentInfo.info.$id;
        const databaseId = documentInfo.info.$databaseId;
        const currentPoints = documentInfo.info.points;

        await databases.updateDocument(databaseId, collectionId, documentId, {
          points: currentPoints + reward,
        });

        setRewardPoints(reward);
        setPurchaseComplete(true);
      };

      return (
        <div
          className='container u-padding-24'
          style={{ maxWidth: '800px', margin: '0 auto' }}
        >
          <h1
            style={{
              fontSize: '32px',
              marginBottom: '20px',
              color: 'hsl(var(--color-neutral-300))',
              textAlign: 'center',
            }}
          >
            Complete Purchase and Earn Rewards
          </h1>
          <div
            style={{
              gridTemplateColumns: 'repeat(1, 1fr)',
              gridGap: '20px',
            }}
            className='grid-box'
          >
            <div
              style={{
                border: '1px solid #ddd',
                textAlign: 'center',
                backgroundColor: '#f9f9f9',
                alignSelf: 'center',
                width: '300px',
                justifySelf: 'center',
              }}
              className='u-padding-24'
            >
              <h3>{product.name}</h3>
              <p>Price: ${product.price}</p>
              <button
                style={buttonStyle}
                className='u-margin-32'
                onClick={() => handlePurchase(product.price)}
                disabled={purchaseComplete}
              >
                {purchaseComplete ? 'Purchased' : 'Purchase'}
              </button>
            </div>
          </div>
          {purchaseComplete && (
            <p
              style={{
                marginTop: '20px',
                fontSize: '16px',
                color: 'green',
                textAlign: 'center',
              }}
            >
              Congratulations! You earned {rewardPoints} reward points for your
              purchase at {store}.{' '}
              <Link style={{ color: 'blue', textDecoration: 'underline' }} href='/'>
                Go Home
              </Link>
            </p>
          )}
        </div>
      );
    };

    export default PurchasePage;
让我们浏览代码并解释正在发生的事情:
-
React,useState,useRouternext.js的钩子是从各自的包装中导入的;Client,Databases,ID和Query是从'appwrite'软件包中进口的,Link是从Next.js 导入的
- 创建和配置了使用端点和项目ID package
Client类的实例 - 使用
Databases类的实例是使用Client实例创建的,该实例可访问与数据库相关的功能 -
useRouter挂钩用于从URL访问查询参数。store和points值是从router.query对象 中提取的
- 在组件中,使用
rewardPoints使用useState挂钩初始值为0(此状态将保持奖励点) )
-
purchaseComplete也使用useState挂钩初始化,初始值为false,其状态将跟踪购买是否已购买完成 -
buttonStyle对象是用“购买”按钮的内联样式定义的;它在OnClick Handler,handlePurchase中具有一个函数,我们将在文章稍后创建 - a
product用属性定义name和price - 代表购买页面的结构和UI的JSX标记使用
Pink Design进行了样式
构建功能
在index.js文件中,我们将创建两个函数:
- 一个是检查当前用户是否存在数据库中,如果是,我们将显示他们的点。由于我们没有构建身份验证系统,因此我们将使用用户的IP地址来确保其唯一。
- 另一个功能是将用户点存储在数据库中。
像这样修改index.js文件:
    ...
    const HomePage = () => {
      ...

      useEffect(() => {
        checkUser();
      }, []);

      const storePoints = async (uniqueID, points) => {
        await databases.createDocument(
          '646a20a583e20fd44d35',
          '646a2112a4601b39a496',
          ID.unique(),
          { userID: uniqueID, points }
        );
      };

      const checkUser = async () => {
        let userIP = await fetch('https://api.ipify.org?format=json')
          .then((response) => response.json())
          .then(async (data) => data.ip)
          .catch((error) => {
            console.error('Error fetching IP address:', error);
          });

        const user = await databases.listDocuments(
          '[DATABASE-ID]',
          '[COLLECTION-ID]',
          [Query.equal('userID', userIP)]
        );

        if (user.total < 1) {
          storePoints(userIP, 0);
        } else {
          localStorage.setItem(
            'documentInfo',
            JSON.stringify({ info: user.documents[0] })
          );
          setPoints(user.documents[0].points);
        }
      };

      return (
    ...
-
useEffect挂钩调用checkUser函数时,组件安装时;由于将一个空的依赖性数组作为第二个参数提供,因此它仅运行一次 -
storePoints函数是一种异步函数,它使用Databases实例的createDocument方法在数据库中创建文档;它存储用户的唯一ID及其具有的点 -
checkUser函数是一种异步函数,使用fetchapi获取用户的IP地址,然后检查用户是否通过与数据库中的数据库中的查询是否存在用户的IP地址。如果不存在用户,则storePoints函数将使用用户的IP和0分创建一个新文档。如果用户确实存在,则文档信息存储在本地存储中,并使用setPoints函数设置点
接下来,通过将存储组件添加到 stores array的映射中来显示虚构商店的列表:
    ...
    return (
        ...
            {stores.map((store, index) => (
              <Store
                key={index}
                name={store.name}
                discount={store.discount}
                store={store.name}
                points={store.points}
              />
            ))}
    ...
处理购买
打开purchase.js文件并添加以下功能:
    ...

    const PurchasePage = () => {

    ...
      const handlePurchase = async (price) => {
        const reward = Math.floor(price * (points / 100));
        const documentInfo = JSON.parse(localStorage.getItem('documentInfo'));
        const collectionId = documentInfo.info.$collectionId;
        const documentId = documentInfo.info.$id;
        const databaseId = documentInfo.info.$databaseId;
        const currentPoints = documentInfo.info.points;

        await databases.updateDocument(databaseId, collectionId, documentId, {
          points: currentPoints + reward,
        });

        setRewardPoints(reward);
        setPurchaseComplete(true);
      };

      return (
        ...
handlePurchase 函数上面定义的函数在单击“购买”按钮时,它根据价格和点查询参数计算奖励点。然后,它从 localStorage 中检索必要的信息,并使用 databases.updateDocument 方法更新数据库中的用户点。 rewardPoints 状态已通过计算出的奖励点进行更新, purchaseComplete 状态设置为 true 以模糊购买按钮。
最终结果
https://www.loom.com/share/87e5b4efd14e4e95aad24e49c02ebec7
结论
总而言之,我们通过集成appwrite云和粉红色设计来在Next.js中构建了一个基于云的忠诚度奖励应用程序。 AppWrite Cloud允许我们通过简单的数据库交互来无缝管理并有效地跟踪用户点。粉红色的设计为应用程序的界面增添了优雅和用户友好性,增强了整体视觉吸引力和可用性。
我们可以通过集成身份验证和结帐支付系统来扩展应用程序的功能。该应用程序可以通过实施用户身份验证来提供个性化的体验,并确保用户注册和登录过程。此外,集成结帐付款系统使用户能够兑换其赢得的忠诚度点为产品或服务。


