前几天,我在代码库上进行了一些可访问性修复。我遇到了一个没有与之关联的标签的开关,这意味着屏幕读取器用户需要做一些猜测以获取有关其切换的信息。我想解决这个问题并开始研究。
有一次,我正在浏览可组合组件的修饰符列表,并注意到许多人可以帮助使应用程序更易于访问。我很兴奋!我想与您分享一些这些修饰符,所以我们在这里。我将通过这些修饰符:
toggleableselectableclickablemagnifier
,但首先,让我们谈谈通常的修饰符及其是什么。
什么是修饰符?
随着Android开发人员网站定义修饰符:
修饰符允许您装饰或增强组合。修饰符让您做这些事情:
- 更改组合的大小,布局,行为和外观
- 添加信息,例如可访问性标签
- 处理用户输入
- 添加高级交互,例如使元素可单击, 可滚动,可拖动或缩放
(surce:Android Developers: Compose modifiers)
因此,它们是修改复合物的外观,行为和语义的一种方式。它们在现代的Android开发中使用JetPack Compose使用了很多东西,因此,如果您曾经尝试过作曲,那么您可能会遇到它们。
由于修饰符可以做很多事情,因此我们也可以使用它们来改善可访问性。让我们在下一部分中谈论更多。
用于可访问性的修饰符
不同的修饰符有很多用例,可以改善应用程序的可访问性。例如,使用修饰符,我们可以减少使用开关设备,硬件键盘或屏幕读取器的用户的选项卡停止量,或者我们可以为辅助技术用户添加更多语义信息。
我们可以添加视觉提示,例如焦点指标或改善触摸交互的可见性和反馈。一个很好的例子是我们在本文稍后将通过增加触摸目标大小来做的事情。我们还增加了连锁效果的大小,以更好地向使用该应用程序的任何人提供有关动作的反馈。
在讨论可访问性时,我一直想强调的一件事是,在构建应用程序时,请记住使用不同的辅助技术对其进行测试。您可能会发现某些事情无法正常工作 - 这正是我编写此博客文章的代码时发生的事情。
哦,谈到代码,如果您想查看,可以找到the repository for Modifiers Example App here.
在本节中,我们将更仔细地查看我在博客文章开头列出的修饰符。让我们从clickable.
可单击
顾名思义,可单击的模型使元素可单击。当创建需要单击的项目列表或需要单击一些较大区域时,该实用程序可能很有用。
但是,如果您要创建一个普通的按钮,我建议使用Button-Component,因为它已经具有内置的语义和行为,并且默认情况下是可以访问的。
让我们考虑一个列表的示例,用户需要能够在列表中为项目添加书签。这张照片显示了我们正在构建的内容:
如图所示,有一排带有文本(“书签此项目”)和一个书签图标。一种选择是用IconButton组件包装图标:
Row(
    modifier = Modifier
        .fillMaxWidth()
        .clip(MaterialTheme.shapes.large)
        .background(MaterialTheme.colorScheme.primaryContainer)
        .padding(ClickableScreen.padding),
    horizontalArrangement = Arrangement.SpaceBetween,
    verticalAlignment = Alignment.CenterVertically,
) {
    Text(
        text = "Bookmark this item",
        style = MaterialTheme.typography.titleMedium,
        color = MaterialTheme.colorScheme.onPrimaryContainer
      )
      IconButton(onClick = { onClick() }) {
          FavouriteIcon(
              icon = icon,
              contentDescription = "Bookmark this item"
          )
      }
}
此代码片段将起作用,当用户点击图标按钮时,该项目将获得书签。但是,用户可以点击的区域很小。点击整个行会更容易。
让我们进行几个更改:
Row(
    modifier = Modifier
        .fillMaxWidth()
        .clip(MaterialTheme.shapes.large)
        .background(MaterialTheme.colorScheme.primaryContainer)
        // Add clickable-modifier with the role of Button
        .clickable(
              role = Role.Button,
          ) {
                onClick()
          }
        .padding(ClickableScreen.padding),
    horizontalArrangement = Arrangement.SpaceBetween,
    verticalAlignment = Alignment.CenterVertically,
) {
    Text(
        text = "Bookmark this item",
        style = MaterialTheme.typography.titleMedium,
        color = MaterialTheme.colorScheme.onPrimaryContainer
    )
  // Remove IconButton.
  // The content description is not needed anymore
  // as the whole element is merged and text serves as a label
   FavouriteIcon(icon = icon, modifier = Modifier.padding(12.dp))
}
此更改大大提高了修饰符的可访问性。它增加了触摸目标大小,并添加了按钮的角色,以便辅助技术用户知道这是一个按钮。
如果您需要单击一次,此修饰符效果很好。但是,如果您需要双击和/或单击一键单击,则combinedClickable是您的朋友。
可选
我们可以用来改善可访问性的另一个修饰符,可用性是selectable.,它通常用作互斥组的一部分 - 例如单选按钮组。
使用此修饰符包裹整个行有几个好处(例如,使用按钮或clickable-Modifier):用户可以点击并选择该项目更大的区域,您可以添加正确该元素的语义,以便辅助技术用户获得相关信息,并且可以轻松将项目分组。
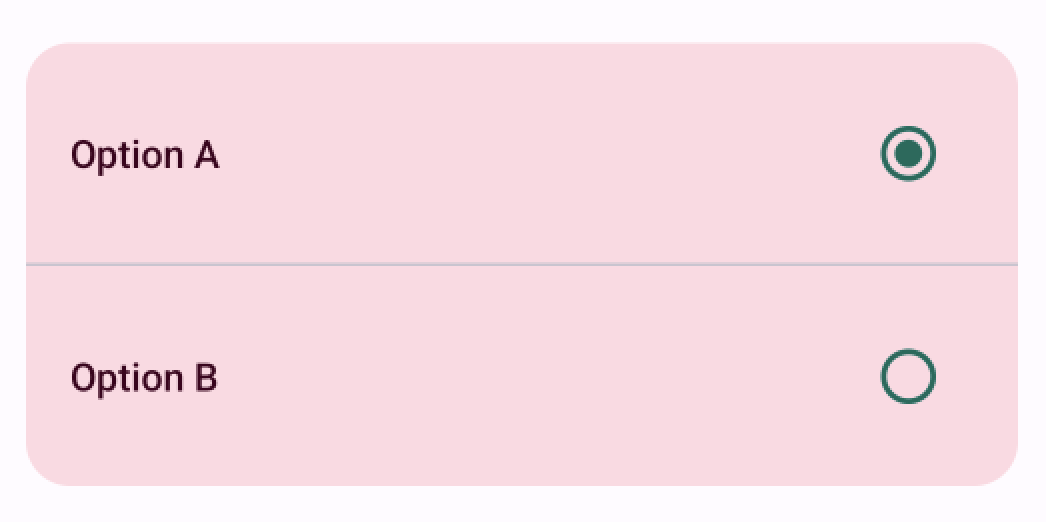
让我们谈谈如何改善我在几个地方见过的示例。图片显示了我们正在构建的内容:
这是简化的代码(未从上面提到的任何代码库复制):
@Composable
fun RadioInputRow(text: String, checked: Boolean, onChange: (String) -> Unit) {
    Row(
        modifier = Modifier
            .fillMaxWidth()
            .padding(16.dp),
        horizontalArrangement = Arrangement.SpaceBetween,
        verticalAlignment = Alignment.CenterVertically,
    ) {
        Text(
            text = text,
            style = MaterialTheme.typography.labelLarge,
            color = MaterialTheme.colorScheme.onPrimaryContainer
        )
        RadioButton(
            selected = checked,
            onClick = { onChange(text) },
            colors = RadioButtonDefaults.colors(
                selectedColor = MaterialTheme.colorScheme.tertiary,
                unselectedColor = MaterialTheme.colorScheme.tertiary,
            ),
        )
    }
}
此代码片段有效,但是用户需要能够点击“无线电”按钮,该按钮的触摸目标大小较小。让我们进行一些修改以使代码更易于访问:
@Composable
fun RadioInputRow(
    text: String,
    checked: Boolean,
    onChange: (String) -> Unit
) {
    Row(
        modifier = Modifier
            .fillMaxWidth()
        // We add a selectable modifier with state and role to the row
           .selectable(
               selected = checked,
               enabled = true,
               role = Role.RadioButton,
               onClick = { onChange(text) },
            )
            .padding(16.dp),
        horizontalArrangement = Arrangement.SpaceBetween,
        verticalAlignment = Alignment.CenterVertically,
    ) {
        Text(
            text = text,
            style = MaterialTheme.typography.labelLarge,
            color = MaterialTheme.colorScheme.onPrimaryContainer
        )
        RadioButton(
        // We clear the semantics from
        // the RadioButton, so that the user,
        // who is using assistive technology,
        // doesn't have an extra tab stop on the way.
            modifier = Modifier.clearAndSetSemantics {},
            selected = checked,
            onClick = { onChange(text) },
            colors = RadioButtonDefaults.colors(
                selectedColor = MaterialTheme.colorScheme.tertiary,
                unselectedColor = MaterialTheme.colorScheme.tertiary,
            ),
        )
    }
}
以此方式,单击区域更为广泛,并且更容易击中和选择目标。在此示例中,我决定保留材料主题的RadioButton-component,但我们也可以将其切换为两个图标(选择和未选择),与clickable-example中的方式相同。
关于此示例的语义,有几件事要注意。首先,整个行获得了selectable-Modifier,然后我们将状态(启用,选定)传递给它,我们还将开关的角色传递给了它。这样,我们可以确保辅助技术获得有关元素的正确信息,用户将知道如何与之互动。
与语义相关的另一个方面是从原始的RadioButton元素中清除所有语义。如果我们不这样做,则用户将两次遇到具有相同信息的相同组件 - 首先在容器(Row)上,然后使用“无线电”按钮。这也意味着对于使用Focus Order用辅助技术导航的任何人的额外标签停止。
我们要进行一次更改,并将selectableGroup-Modifier添加到包裹所有无线电输入行的父组件:
Column(
    modifier = Modifier
        ...
    // Adding the selectableGroup here:
        .selectableGroup(),
    verticalArrangement = Arrangement.SpaceBetween,
) {
    inputs.map { input ->
        RadioInputRow(
            text = input,
            checked = selected == input,
            onChange = { selected = it }
        )
        ...
    }
}
这样,用户使用的用户,例如屏幕读取器,获取列表中有x个项目数量的信息作为选择。
可切换
像selectable,一样,toggleable-修饰符有助于使组件更容易访问。当有两个值的状态时,可以使用toggleable - 例如选择具有打开或关闭选项的设置。
在此示例中,我们有一排带有文本和一个切换在末尾:
和我们最初看起来像这样的代码:
fun SwitchRow(
    text: String,
    checked: Boolean,
    onChange: (Boolean) -> Unit
) {
    Row(
        modifier = Modifier
            .fillMaxWidth()
            .padding(16.dp),
        horizontalArrangement = Arrangement.SpaceBetween,
        verticalAlignment = Alignment.CenterVertically,
    ) {
        Text(
            text = text,
            style = MaterialTheme.typography.labelLarge,
            color = MaterialTheme.colorScheme.onPrimaryContainer
        )
        Switch(
            checked = checked,
        onCheckedChange = { onChange(it) }
        )
    }
}
在此代码段中,触摸目标仅是材料主题的Switch-compent的区域,就像selectable-modifier的示例一样。另外,存在其他类似的问题(如selectable部分中所述)。因此,我们将进行几个更改以使该组件更易于访问:
@Composable
fun SwitchRow(
    text: String,
    checked: Boolean,
    onChange: (Boolean) -> Unit
) {
    Row(
        modifier = Modifier
            .fillMaxWidth()
        // We add the toggleable modifier
        // with the state (value) and role
            .toggleable(
                 value = checked,
                 role = Role.Switch,
                 onValueChange = { onChange(it) },
            )
            .padding(16.dp),
        horizontalArrangement = Arrangement.SpaceBetween,
        verticalAlignment = Alignment.CenterVertically,
    ) {
        Text(
            text = text,
            style = MaterialTheme.typography.labelLarge,
            color = MaterialTheme.colorScheme.onPrimaryContainer
        )
        Switch(
              checked = checked,
              onCheckedChange = { onChange(it) },
              // We clear the semantics
              modifier = Modifier.clearAndSetSemantics {}
        )
    }
}
它具有作为状态的一部分的值属性。对于toggleable,,该角色通常为Switch-与selectable的RadioButton.
放大
此博客文章中的最终修饰符与其他修饰符不同。您可以在应用中使用此修饰符进行放大。但是,重要的是要注意,在许多情况下,操作系统的放大倍率就足够了,需要它的人知道如何使用它(并使用它)。但这在某些情况下可能很有用,不仅对于那些使用操作系统放大倍数的人,而且对于需要放大UI的任何人。
要使magnifier修饰符正确工作,the Android's Magnifier widget需要在设备上得到支持。在继续之前,我们要检查一下:
if (!MagnifierStyle.Default.isSupported) {
    Text("Magnifier is not supported on this platform.")
} else {
    // TODO
}
magnifier-Modifier需要了解放大区域的中心。我们可以从pointerInput-Modifier的dragDetectedGestures函数中获取这些信息。我们想将中心的值存储到一个变量:
var magnifierCenter by remember {
    mutableStateOf(Offset.Unspecified)
}
然后,我们将包装我们希望用户能够使用Box元素放大的区域并设置修饰符:
Box(
    Modifier
        // Set the source center and styles for the magnifier
        .magnifier(
            sourceCenter = { magnifierCenter },
            zoom = 3f,
            style = MagnifierStyle(
                size = DpSize(height = 200.dp, width = 300.dp),
            ),
        )
        .pointerInput(Unit) {
            detectDragGestures(
                // Show the magnifier in the initial position
                onDragStart = { magnifierCenter = it },
                // Magnifier follows the pointer during a drag event
                onDrag = { _, delta ->
                    magnifierCenter = magnifierCenter.plus(delta)
                },
                // Hide the magnifier when a user ends the drag movement.
                onDragEnd = { magnifierCenter = Offset.Unspecified },
                onDragCancel = { magnifierCenter = Offset.Unspecified },
            )
        },
) {
    Text(
        "Try magnifying this text by dragging a pointer (finger, mouse, other) over the text.",
    )
}
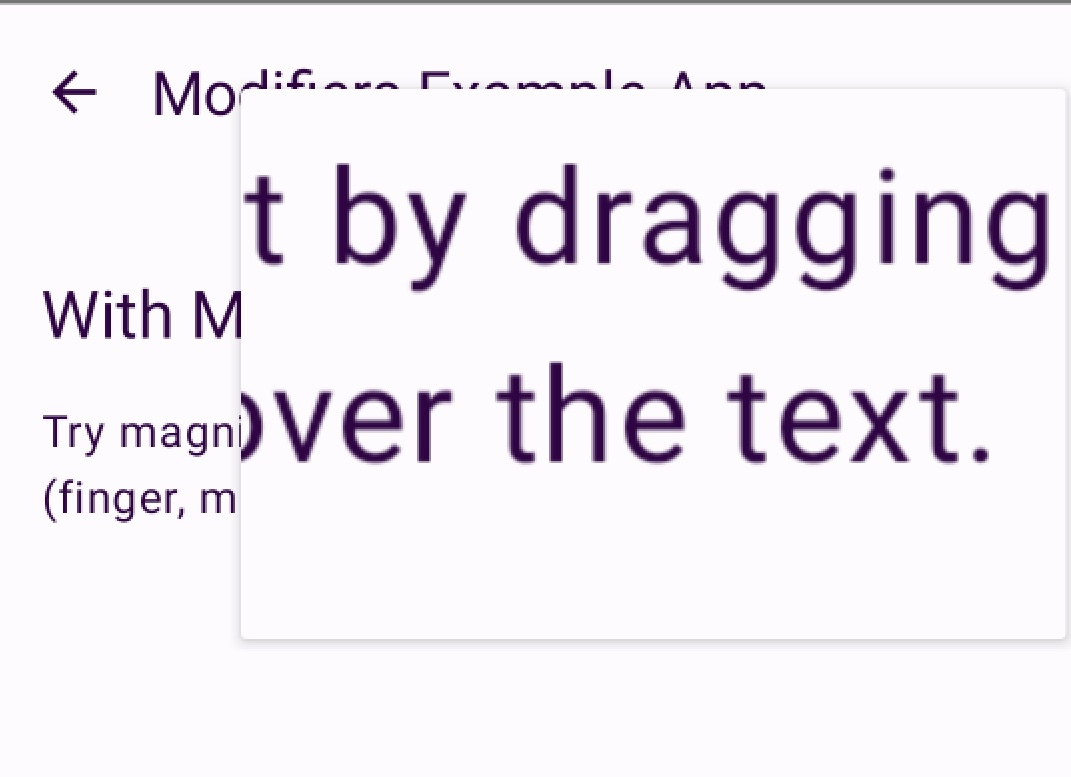
所以,使用此代码段,这就是我们得到的:
包起来
在这篇博客文章中,我们一般讨论了修饰符和可访问性,并且我们对四个修饰符进行了更仔细的研究:clickable, selectable, toggleable,和magnifier.这篇文章并不是一篇有关可访问性和修饰符的全面的,我已经是一篇有关故意省略了一些主题,例如焦点管理和硬件键盘。我打算在以后写有关这些主题的博客文章。
您有任何想法,想法或问题吗?让我知道!


