Svelte是前端开发人员的闪亮新框架。它的作用似乎与三大框架有很大不同。我们将在本文中深入研究。
目录
先决条件
- 对JavaScript及其生态系统的适当掌握
- 节点V14或更高>
- 节点软件包manaager(npm或yarn)
介绍
Svelte是由Rich Harris创建的新的JavaScript框架(实际上是编译器)。它在如何编辑DOM(文档对象模块)上带来了根本性的变化。
Svelte在构建时间运行,并吐出更新DOM的命令代码。这消除了对其他框架中使用的虚拟DOM的需求。它还具有诸如“范围型样式”和“反应性分配”之类的功能。此外,Svelte还拥有“商店”来帮助存储状态。
设置firebase
创建项目
-
如果您没有Google帐户,则可以继续创建一个并登录。
-
前往firebase homepage,单击“转到控制台”按钮
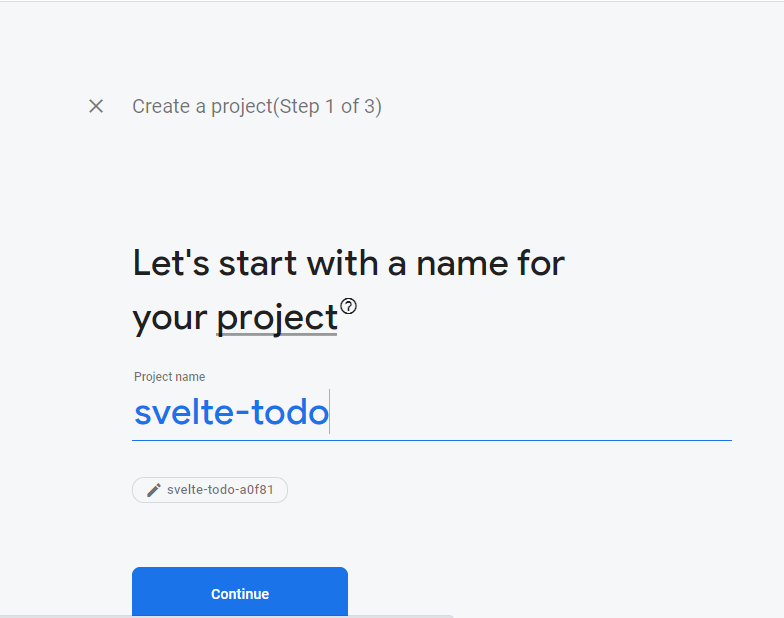
在控制台上,通过单击“+”图标来创建一个新项目,并给它提供任何您想要的名称。
我将称其为“ svelte-todo”,并取消选中Google Analytics(我们不需要它)。
设置Google Oauth
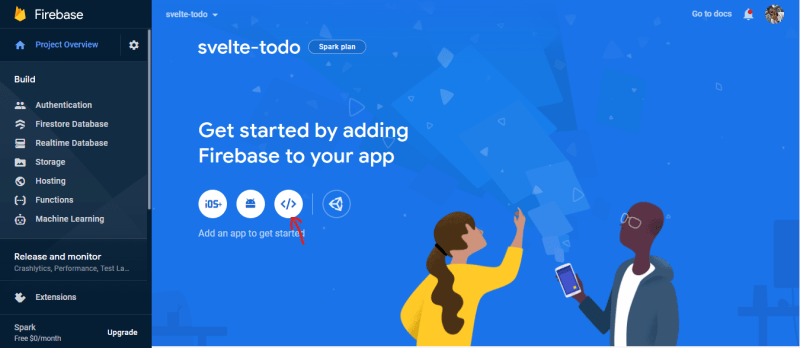
我们必须为我们构建的平台创建一个应用程序。单击网络图标。
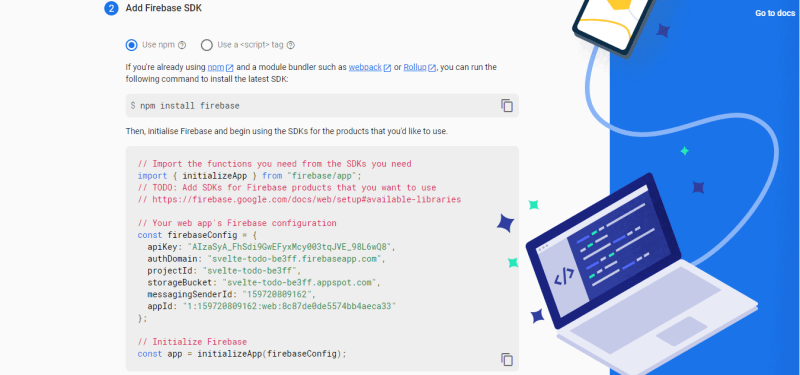
使用您选择的昵称注册该应用后,您会看到以下内容:
复制firebaseconfig对象,因为我们稍后会使用它。请勿尝试使用图片中的变量,因为它们将被删除。
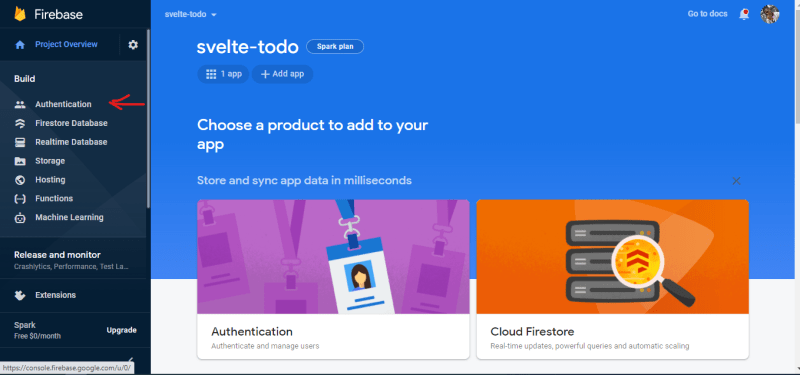
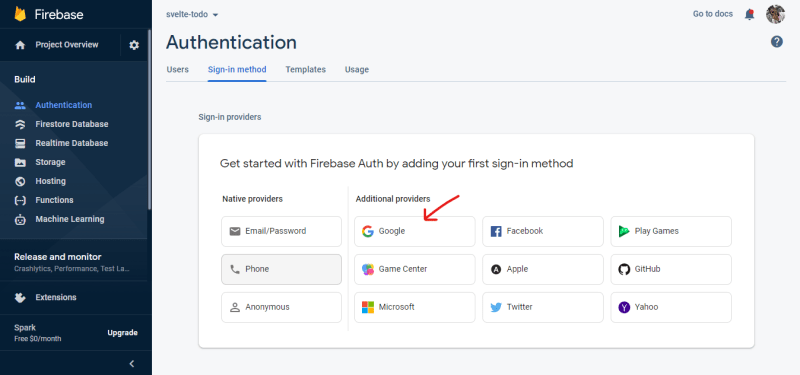
回到控制台上,单击侧边栏中的身份验证
单击“启动”,然后选择Google作为您的身份提供者。
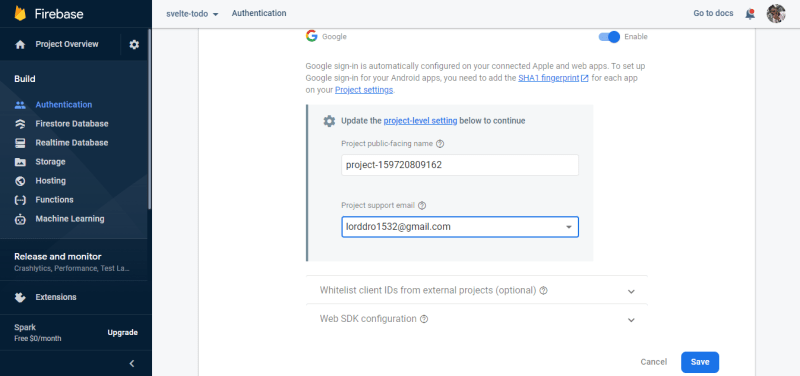
启用提供商,选择您的支持电子邮件,然后单击“保存”。
设置Firestore
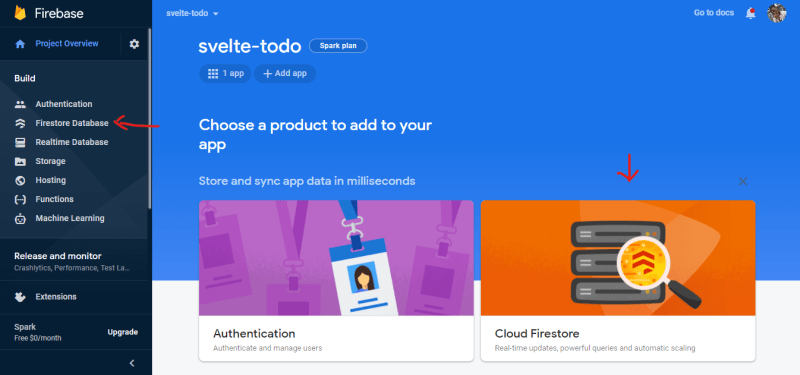
要设置Firestore,请返回控制台主页,然后单击“云Firestore”
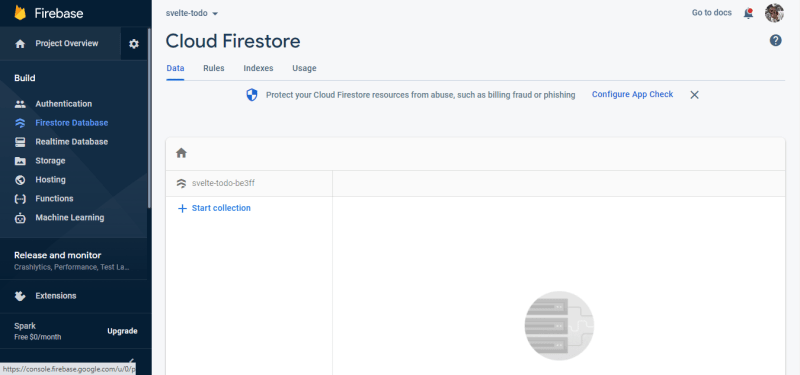
单击“创建数据库”,将其设置为“测试模式”,然后保持位置。
此时,应该已经为您的项目启用了Firestore。您可以在此处添加收藏或文档来进行播放。
用苗条构建前端
要创建一个Svelte项目,运行
npx degit sveltejs/template [PROJECT-NAME]
然后运行
cd [PROJECT-NAME]
进入该目录。
这为我们从这个template创建了一个基本的Svelte项目。不过,我们仍然必须安装模板随附的软件包。我们可以使用纱线或npm为此,但我将使用纱线。
运行
yarn
安装软件包,然后运行
yarn dev
启动服务器。
前往“本地”上指定的URL,您会看到运行的Svelte应用程序。
在项目中启用SCSS
为此,我们必须安装一些新软件包来帮助我们解析SCSS。运行
yarn add -D node-sass svelte-preprocess
在目录的根部编辑rollup.config.js文件,使其看起来像:
import svelte from "rollup-plugin-svelte";
import commonjs from "@rollup/plugin-commonjs";
import resolve from "@rollup/plugin-node-resolve";
import livereload from "rollup-plugin-livereload";
import { terser } from "rollup-plugin-terser";
import css from "rollup-plugin-css-only";

//NEW LINE HERE
import preprocess from "svelte-preprocess";

const production = !process.env.ROLLUP_WATCH;

//CODE OMITTED FOR BREVITY

export default {
  input: "src/main.js",
  output: {
    sourcemap: true,
    format: "iife",
    name: "app",
    file: "public/build/bundle.js",
  },
  plugins: [
    svelte({
      //NEW LINE HERE
      preprocess: preprocess(),
      compilerOptions: {
        dev: !production,
      },
    }),
    css({ output: "bundle.css" }),

    //CODE OMITTED FOR BREVITY
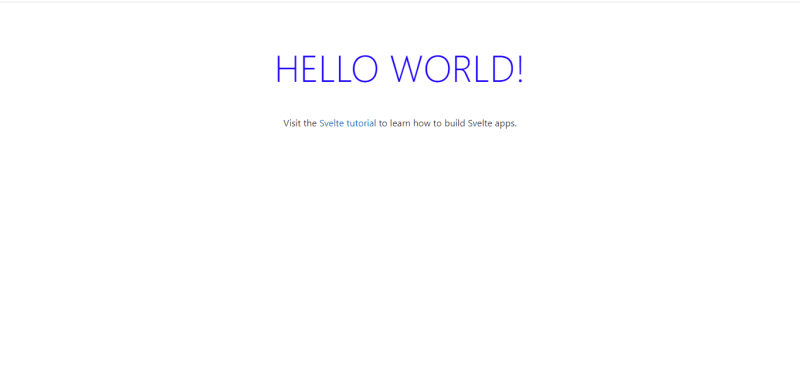
要测试SCSS是否有效,请进入App.svelte文件并粘贴以下内容:
<script>
  export let name;
</script>

<main>
  <h1>Hello {name}!</h1>
  <p>
    Visit the <a href="https://svelte.dev/tutorial">Svelte tutorial</a> to learn
    how to build Svelte apps.
  </p>
</main>

<style lang="scss">
  main {
    text-align: center;
    padding: 1em;
    max-width: 240px;
    margin: 0 auto;
    h1 {
      color: #1900ff;
      text-transform: uppercase;
      font-size: 4em;
      font-weight: 100;
    }
  }

  @media (min-width: 640px) {
    main {
      max-width: none;
    }
  }
</style>
我确定您已经想知道该文件的工作原理。好吧,Svelte希望每个组件都有三个部分:
- 脚本:它由
<script></script>标签表示,并包含大多数JavaScript相关功能。 - 组件主体:这是我们组件的主要部分。它包括HTML并决定要显示的内容。
- 组件样式:它由
<style></style>标签表示,并包含我们的样式代码,该代码仅用于该组件。在我们的情况下,我们正在使用SCSS,因此我们将lang属性设置为样式标签上的scss。
我们的组成部分是从其父母接受称为name的道具。 export let name为我们实现了这种功能。我们可以接受我们想要的尽可能多的道具。
在组件主体中,我们可以通过将它们包裹在卷曲括号中来显示脚本中的任何变量。
现在我们了解了组件,您可以通过运行
再次启动服务器
yarn dev
,您应该看到这个:
启用与page.js的路由
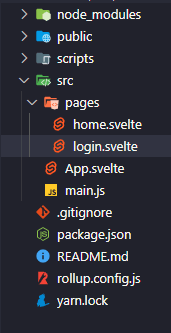
由于我们正在构建一个具有用户的应用程序,因此我们需要一个可以登录的页面,而另一个可以添加/查看您的Todos。在src文件夹中,创建一个文件夹pages,然后将home.svelte和login.svelte添加到其中。
文件夹结构应该看起来像这样:
我们将使用称为page的软件包。运行
yarn add page
在安装完成后,安装它并打开package.json。将start脚本更改为
"start": "sirv public --single"
最后,进入App.svelte文件并粘贴以下。
<script>
  import router from "page";
  import Home from "./pages/home.svelte";
  import Login from "./pages/login.svelte";

  let page;

  router("/", () => page = Home);

  router("/login", () => page = Login);

  router.start();
</script>

<svelte:component this={page} />
我们正在导入路由器,添加不同的路由并启动路由器。我们的页面是空的,但是在添加其内容之前,我们需要设置我们的商店。在src文件夹中,创建一个stores.jsfile并将以下内容粘贴到其中:
import { writable } from "svelte/store";

export const TodoStore = writable([]);

export const UserStore = writable(null);
writable帮助我们创建一个可以在生产线上编辑的商店。然后,我们创建了2家新商店,一个TodoStore和一个UserStore,以分别保存Todos和用户的详细信息。所有writable商店都有2种主要方法:
- set:设置商店的值。
- 更新:基于回调函数更新商店的值。
打开login.svelte文件并粘贴:
<script>
  import { UserStore } from "./../stores";
  import page from "page";

  $: if ($UserStore) page.redirect("/");
</script>

<div class="login container">
  <button>Log In</button>;
</div>

<style lang="scss">
  div.login.container {
    background: hsla(238, 100%, 71%, 1);

    background: linear-gradient(
      135deg,
      hsla(238, 100%, 71%, 1) 0%,
      hsla(295, 100%, 84%, 1) 100%
    );

    background: -moz-linear-gradient(
      135deg,
      hsla(238, 100%, 71%, 1) 0%,
      hsla(295, 100%, 84%, 1) 100%
    );

    background: -webkit-linear-gradient(
      135deg,
      hsla(238, 100%, 71%, 1) 0%,
      hsla(295, 100%, 84%, 1) 100%
    );
    min-height: 100vh;
    display: flex;
    justify-content: center;
    align-items: center;
    position: relative;
    button {
      background-color: hsla(350, 100%, 69%, 1);
      height: 200px;
      width: 200px;
      box-shadow: -10px -10px 15px rgb(255, 119, 142),
        10px 10px 15px rgb(231, 88, 112);
      border: none;
      border-radius: 50%;
      border: 8px solid hsla(350, 100%, 69%, 1);
      font-weight: bold;
      color: white;
      font-size: 2rem;
      &:focus {
        box-shadow: -10px -10px 15px rgb(255, 119, 142),
          10px 10px 15px rgb(231, 88, 112),
          inset -10px -10px 15px rgb(255, 119, 142),
          inset 10px 10px 15px rgb(231, 88, 112);
      }
    }
  }
</style>
在这里,我们正在显示一个大型中心按钮,该按钮将在单击时登录用户。 $UserStore用于访问商店内部的值。
在Svelte中,像$:一样在$:之后编写的语句称为Reactive Statements。如果它们依赖的值已更改,则它们是在组件更新之前运行的。 $UserStore和Reactive Statements中的$没有相同的功能。
我们组件中的反应性语句检查$UserStore是否具有值
将其粘贴到home.svelte文件中:
<script>
  import EditTodo from "../components/edit-todo.svelte";
  import ViewTodos from "../components/view-todos.svelte";
  import Header from "./../components/header.svelte";
  import { UserStore } from "./../stores";
  import page from "page";

  $: if (!$UserStore) page.redirect("/login");
</script>

<section class="home">
  <div class="wrapper">
    <Header />
    <EditTodo />
    <ViewTodos />
  </div>
</section>

<style>
  section.home {
    display: flex;
    justify-content: center;
    align-items: center;
  }
  div.wrapper {
    width: 100%;
    max-width: 800px;
  }
</style>
此组件的目的很短,因为它是容纳我们所有其他组件。它还具有一个反应性语句,其工作方式类似于login组件中的一个。我们只需检查当前是否没有用户登录,并将其重定向到login页面。
尚未构建在home页面中导入的组件,所以让我们继续构建它们。在src文件夹中创建一个components文件夹,然后将edit-todo.svelte,header.svelte和view-todos.svelte添加到其中。
打开edit-todo.svelte文件并粘贴它:
<script>
    let name = "";
    let priority = "1";

    const submitTodo = () => {
      const newTodo = {
        priority,
        name,
        completed: false,
      };
      console.log('Submit Todo', newTodo)
    };
  </script>

  <form>
    <header>Add New Todo</header>

    <label for="name">
      Todo Name
      <input bind:value={name} id="name" type="text" />
    </label>

    <label for="priority">
      Todo Priority
      <input
        bind:value={priority}
        id="priority"
        min="1"
        step="1"
        max="5"
        type="range"
      />
    </label>

    <button on:click|preventDefault={submitTodo}>Add Todo</button>
  </form>

  <style lang="scss">
    form {
      background: #fff;
      border-bottom-left-radius: 2rem;
      border-bottom-right-radius: 2rem;
      padding: 2rem 4rem;
      header {
        font-size: 2rem;
        text-align: center;
        font-weight: bold;
        margin-bottom: 1rem;
      }
      label {
        font-size: 1.4rem;
        margin-bottom: 1rem;
        display: block;
        input {
          display: block;
          width: 100%;
          margin-top: 0.5rem;
          border-radius: 1rem;
        }
        &:nth-child(2) {
          input {
            padding: 0.5rem;
          }
        }
      }
      button {
        padding: 1rem;
        border: none;
        background: #f2f9ff;
        font-size: 1.4rem;
        border-radius: 5px;
        margin-top: 1rem;
        border: solid 1px #ccc;
        position: relative;
        left: 50%;
        transform: translateX(-50%);
      }
    }
  </style>
在此组件中,我们显示了一种表单,使用户可以通过输入TODO的名称及其优先级来创建播放器。您会注意到两个输入中的bind:value。它称为directive,并将该输入的当前值附加到指定的变量。
表格中的按钮具有属性on:click|preventDefault。这也是directive,但也有一个modifier。修饰符只是自定义我们当前使用的指令。 on:click是一项指令,可帮助我们将点击事件处理程序附加到按钮上。 |用于添加修饰符,而preventDefault修饰符在调用事件处理程序之前为我们调用event.preventDefault()方法。
submitTodo函数当前记录了我们创建的待办事项。我们将很快将其连接到Firestore。
打开header.svelte文件并粘贴:
<script>
  import { UserStore } from "./../stores";
</script>

<header>
  {#if $UserStore}
    <img src={$UserStore.photoURL} alt="User" />
    <p>Welcome, {$UserStore.displayName.split(" ")[0]}</p>
  {/if}
  <button> Log Out </button>
</header>

<style lang="scss">
  header {
    width: 100%;
    background-color: lightsteelblue;
    display: flex;
    justify-content: space-between;
    align-items: center;
    padding: 1rem;
    & > img {
      height: 6rem;
      width: 6rem;
      border-radius: 50%;
    }
    & > p {
      font-size: 2rem;
      text-align: center;
    }
    & > button {
      font-size: 1.5rem;
      border: none;
      padding: 1rem;
      background-color: rgba(255, 0, 0, 0.5);
      color: white;
      border-radius: 0.5rem;
    }
  }
</style>
header组件仅显示当前用户的名称和图像以及登录按钮。
最后,我们拥有显示所有毒品的view-todos组件。打开文件并粘贴以下内容:
<script>
  import TodoItem from "./todo-item.svelte";
  import { TodoStore } from "./../stores";
  let activeTab = "incomplete";

  $: incompleteTodos = $TodoStore
    .filter((todo) => !todo.completed)
    .sort((todoA, todoB) => todoB.priority - todoA.priority);
  $: completeTodos = $TodoStore.filter((todo) => todo.completed);
</script>

<main>
  <header>
    <button
      on:click={() => (activeTab = "incomplete")}
      class:active={activeTab === "incomplete"}
      >Current Todos ({incompleteTodos.length})</button
    >
    <button
      on:click={() => (activeTab = "complete")}
      class:active={activeTab === "complete"}
      >Completed Todos ({completeTodos.length})</button
    >
  </header>
  <div class="todos">
    {#if activeTab === "incomplete"}
      {#each incompleteTodos as todo (todo.id)}
        <TodoItem {todo} />
      {/each}
    {:else}
      {#each completeTodos as todo (todo.id)}
        <TodoItem {todo} />
      {/each}
    {/if}
  </div>
</main>

<style lang="scss">
  main {
    header {
      display: flex;
      justify-content: space-between;
      padding: 2rem;
      button {
        background: none;
        border: none;
        font-size: 1.4rem;
        padding-bottom: 0.5rem;
        &.active {
          border-bottom: solid 1px #333;
        }
      }
    }
    .todos {
      padding: 1rem 2rem;
    }
  }
</style>
此组件中的两个反应性语句可帮助我们生成“已完成”和“未完成”的戒酒的数组。我们根据优先级对“未完成”的招待员进行排序,但要保持“完成”。然后,我们跟踪我们使用的当前标签,并根据此显示正确的todos。
我们使用{#if CONDITION}执行此操作,该{#if CONDITION}根据条件显示组件。我们还使用{#each ARRAY as ARRAY_ITEM (ITEM_ID)}来帮助我们在数组中显示每个项目的组件。尽管{/if}和{/each}分别匹配,但他们俩都必须关闭。我们遇到了另一个指令class:active,该指令根据条件将类添加到该元素中。
我们进口了一个组件,TodoItem。
在称为todo-item.svelte的components文件夹中创建一个新文件,然后将以下文件粘贴到文件中:
<script>
  export let todo = null;
  import TickIcon from "./../assets/tick.svg";
  import CancelIcon from "./../assets/cancel.svg";
  import StarIcon from "./../assets/star.svg";

  $: ratings = new Array(todo.priority);
</script>

<div class="todo">
  <button>
    {#if todo.completed}
      <CancelIcon width="100%" fill="#fff" />
    {:else}
      <TickIcon width="100%" fill="#fff" />
    {/if}
  </button>
  <div class="info">
    <p class:cancel={todo.completed}>{todo.name}</p>
    <div class="stars">
      {#each ratings as _}
        <StarIcon width="20px" />
      {/each}
    </div>
  </div>
</div>

<style lang="scss">
  .todo {
    display: flex;
    align-items: center;
    width: 100%;
    &:not(:last-child) {
      margin-bottom: 10px;
    }
    button {
      width: 40px;
      height: 40px;
      display: flex;
      justify-content: center;
      align-items: center;
      border-radius: 50%;
      padding: 1rem;
      border: none;
      background: #1890ff;
      margin-right: 1rem;
    }
    .info {
      p {
        font-size: 1.4rem;
        margin-bottom: 0.5rem;
        &.cancel {
          text-decoration: line-through;
        }
      }
    }
  }
</style>
此组件将todo作为道具,并呈现其名称以及星星以代表其优先级。它还具有标记其complete或incomplete状态的按钮。
只有一个问题,Svelte无法单独导入.svg文件。我们需要添加软件包来帮助我们做到这一点。运行
yarn add -D rollup-plugin-svelte-svg
并用以下方式替换rollup.config.js文件:
//CODE OMITTED FOR BREVITY
import css from "rollup-plugin-css-only";

//NEW LINE HERE
import { svelteSVG } from "rollup-plugin-svelte-svg";


//CODE OMITTED FOR BREVITY
  plugins: [
    //NEW LINE HERE
    svelteSVG({
      svgo: {},
    }),
    svelte({
      preprocess: preprocess(),
      compilerOptions: {
        dev: !production,
      },
    }),
//CODE OMITTED FOR BREVITY
运行
yarn dev
我们目前仍未有资产导入,因此仍然会丢失错误。
在src目录中创建一个名为assets的文件夹并粘贴这三个文件:
- cancel.svg
<?xml version="1.0" ?><svg viewBox="0 0 32 32" xmlns="http://www.w3.org/2000/svg"><defs><style>.cls-1{fill:none;}</style></defs><title/><g data-name="Layer 2" id="Layer_2"><path d="M4,29a1,1,0,0,1-.71-.29,1,1,0,0,1,0-1.42l24-24a1,1,0,1,1,1.42,1.42l-24,24A1,1,0,0,1,4,29Z"/><path d="M28,29a1,1,0,0,1-.71-.29l-24-24A1,1,0,0,1,4.71,3.29l24,24a1,1,0,0,1,0,1.42A1,1,0,0,1,28,29Z"/></g><g id="frame"><rect class="cls-1" height="32" width="32"/></g></svg>
- star.svg
<?xml version="1.0" encoding="UTF-8"?><svg enable-background="new 0 0 47.94 47.94" version="1.1" viewBox="0 0 47.94 47.94" xml:space="preserve" xmlns="http://www.w3.org/2000/svg"><path d="m26.285 2.486 5.407 10.956c0.376 0.762 1.103 1.29 1.944 1.412l12.091 1.757c2.118 0.308 2.963 2.91 1.431 4.403l-8.749 8.528c-0.608 0.593-0.886 1.448-0.742 2.285l2.065 12.042c0.362 2.109-1.852 3.717-3.746 2.722l-10.814-5.685c-0.752-0.395-1.651-0.395-2.403 0l-10.814 5.685c-1.894 0.996-4.108-0.613-3.746-2.722l2.065-12.042c0.144-0.837-0.134-1.692-0.742-2.285l-8.749-8.528c-1.532-1.494-0.687-4.096 1.431-4.403l12.091-1.757c0.841-0.122 1.568-0.65 1.944-1.412l5.407-10.956c0.946-1.919 3.682-1.919 4.629 0z" fill="#ED8A19"/></svg>
- tick.svg
<?xml version="1.0" ?><svg id="Layer_1" style="enable-background:new 0 0 50 50;" version="1.1" viewBox="0 0 50 50" xml:space="preserve" fill='#fff' xmlns="http://www.w3.org/2000/svg" xmlns:xlink="http://www.w3.org/1999/xlink"><g id="Layer_1_1_"><polygon points="47.293,6.94 14,40.232 2.707,28.94 1.293,30.353 14,43.06 48.707,8.353 "/></g></svg>
我们现在应该无错误,但是在运行它时,样式可能会有些偏离。用:
替换public/build目录中的global.css文件
html,
body {
  position: relative;
  width: 100%;
  height: 100%;
  font-size: 10px;
}

* {
  margin: 0;
  padding: 0;
  box-sizing: border-box;
}

body {
  color: #333;
  margin: 0;
  box-sizing: border-box;
  font-family: Verdana, -apple-system, BlinkMacSystemFont, "Segoe UI", Roboto,
    Oxygen-Sans, Ubuntu, Cantarell, "Helvetica Neue", sans-serif;
}

a,
button {
  cursor: pointer;
}

input,
button,
select,
textarea {
  font-family: inherit;
  font-size: inherit;
  border: 1px solid #ccc;
}
让我们在连接Firebase之前测试当前的设置。返回到stores.js文件,以便我们添加一些初始数据。
import { writable } from "svelte/store";

export const TodoStore = writable([
  {
    completed: false,
    id: 0,
    name: "Read my books",
    priority: 3,
    user: "IBle5KaZruTFAobDKLIqpOksKZ23",
  },
  {
    completed: false,
    id: 1,
    name: "Cut my hair",
    priority: 2,
    user: "IBle5KaZruTFAobDKLIqpOksKZ23",
  },
  {
    completed: true,
    id: 2,
    name: "Write the article",
    priority: 3,
    user: "IBle5KaZruTFAobDKLIqpOksKZ23",
  },
]);

export const UserStore = writable({
  displayName: "Seun Taiwo",
  email: "lorddro1532@gmail.com",
  phoneNumber: null,
  photoURL:
    "https://lh3.googleusercontent.com/a-/AOh14GjhCUWFu5BpCrEK3t2TWml7mvmhTGBM5ROPf7NTWA=s96-c",
  uid: "IBle5KaZruTFAobDKLIqpOksKZ23",
});
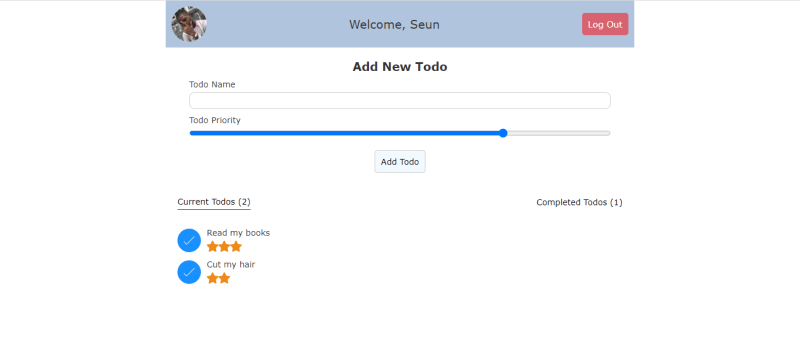
现在,我们应该得到这样的东西:
将前端与火箱联系起来
我们需要将firebase配置变量添加到项目中。回想一下,我们从火箱控制台提早获得了它们。我们不能将变量添加到项目中,因为它们要保密。我们使用环境变量来保留它们。在项目的根部创建一个文件,将其命名为.env并将其添加到您的.gitignore文件中。
将您的配置变量放入此文件中:
FIREBASE_API_KEY="YOUR_API_KEY"
FIREBASE_AUTH_DOMAIN='YOUR_AUTH_DOMAIN'
PROJECT_ID='YOUR_PROJECT_ID'
STORAGE_BUCKET='YOUR_STORAGE_BUCKET'
MESSAGING_SENDER_ID='YOUR_MESSAGING_SENDER_ID'
APP_ID='YOUR_APP_ID'
在src文件夹中,添加一个名为services的文件夹,然后在其中添加一个名为firebase.js的文件。将其粘贴到文件中。
import { initializeApp } from "firebase/app";
import {
  getAuth,
  signInWithPopup,
  GoogleAuthProvider,
  signOut,
} from "firebase/auth";
import {
  getFirestore,
  collection,
  addDoc,
  getDocs,
  doc,
  updateDoc,
  query,
  where,
} from "firebase/firestore";
import { TodoStore } from "./../stores";

let env = env_var;
env = env.env;

const firebaseConfig = {
  apiKey: env.FIREBASE_API_KEY,
  authDomain: env.FIREBASE_AUTH_DOMAIN,
  projectId: env.PROJECT_ID,
  storageBucket: env.STORAGE_BUCKET,
  messagingSenderId: env.MESSAGING_SENDER_ID,
  appId: env.APP_ID,
};

initializeApp(firebaseConfig);

export const provider = new GoogleAuthProvider();
provider.setCustomParameters({ prompt: "select_account" });

const auth = getAuth();
export const signInWithGoogle = () => signInWithPopup(auth, provider);
export const logOut = () => signOut(auth);

export const db = getFirestore();

export const addTodo = async (todo, uid) => {
  try {
    let newTodo = {
      ...todo,
      user: uid,
    };
    const { id } = await addDoc(collection(db, "todos"), newTodo);
    newTodo.id = id;
    TodoStore.update((current) => [newTodo, ...current]);
  } catch (e) {
    console.error("Error adding document: ", e);
  }
};

export const getTodos = async (uid) => {
  if (!uid) return;
  const q = query(collection(db, "todos"), where("user", "==", uid));
  const querySnapshot = await getDocs(q);
  const docs = [];
  querySnapshot.forEach((doc) =>
    docs.push({
      id: doc.id,
      ...doc.data(),
    })
  );
  TodoStore.set(docs);
};

export const markTodo = async (completed, id) => {
  await updateDoc(doc(db, "todos", id), {
    completed,
  });
  TodoStore.update((current) => {
    let todoIdx = current.findIndex((todo) => todo.id === id);
    current[todoIdx].completed = completed;
    return [...current];
  });
};
我们在此文件中做2件重要的事情:
- 我们使用配置变量初始化firebase。
- 我们导出我们将在组件中使用的所有实用程序功能。
-
signInWithGoogle和logOut函数正是他们的名字所暗示的。 -
addTodo函数存储了todo,它作为firestore的参数并将其添加到我们当地的商店中。 -
markTodo函数在本地和firestore上更新completed的状态。 -
getTodos函数被要求从firestore获取所有戒酒并将其保存在我们的TodoStore中
我们必须将环境变量添加到项目中,以便我们可以访问它。安装通过运行
来实现我们这样做的软件包
yarn add -D @rollup/plugin-replace & yarn add dotenv
我们还需要访问Firebase SDK。通过运行
安装
yarn add firebase
然后将您的rollup.config.js更新为:
//CODE OMITTED FOR BREVITY
import { svelteSVG } from "rollup-plugin-svelte-svg";
//NEW LINE HERE
import replace from "@rollup/plugin-replace";
import { config } from "dotenv";

//CODE OMITTED FOR BREVITY

  plugins: [
    //NEW LINE HERE
    replace({
      env_var: JSON.stringify({
        env: {
          isProd: production,
          ...config().parsed,
        },
      }),
    }),
    svelteSVG({
      svgo: {},
    }),

//CODE OMITTED FOR BREVITY
现在应正确设置燃料。我们只需要在组件中添加firebase功能。
-
login.svelte
  <script>
    import { signInWithGoogle } from "./../services/firebase";
    import { UserStore } from "./../stores";
    import page from "page";

    $: if ($UserStore) page.redirect("/");
  </script>

  <div class="login container">
    <button on:click={signInWithGoogle}>Log In</button>;
  </div>
这样,我们现在可以使用我们的Google帐户登录应用程序。
-
todo-item.svelte
    <script>
      export let todo = null;
      import TickIcon from "./../assets/tick.svg";
      import CancelIcon from "./../assets/cancel.svg";
      import StarIcon from "./../assets/star.svg";
      import { markTodo } from "./../services/firebase";

      $: ratings = new Array(todo.priority);
    </script>

    <div class="todo">
      <button on:click={() => markTodo(!todo.completed, todo.id)}>
        {#if todo.completed}
          <CancelIcon width="100%" fill="#fff" />
        {:else}
          <TickIcon width="100%" fill="#fff" />
        {/if}
      </button>
      <div class="info">
        <p class:cancel={todo.completed}>{todo.name}</p>
        <div class="stars">
          {#each ratings as _}
            <StarIcon width="20px" />
          {/each}
        </div>
      </div>
    </div>
我们已经更新了按钮以调用Marktodo函数并传递正确的参数。
-
header.svelte
  <script>
    import { logOut } from "./../services/firebase";
    import { UserStore } from "./../stores";
  </script>

  <header>
    {#if $UserStore}
      <img src={$UserStore.photoURL} alt="User" />
      <p>Welcome, {$UserStore.displayName.split(" ")[0]}</p>
    {/if}
    <button on:click={logOut}> Log Out </button>
  </header>
“登录”按钮现在可以登录用户。
-
edit-todo.svelte
    <script>
      import { UserStore } from "./../stores";
      import { addTodo } from "./../services/firebase";

      let name = "";
      let priority = "1";

      const submitTodo = () => {
        const newTodo = {
          priority,
          name,
          completed: false,
        };
        name = ''
        priority = '1'
        addTodo(newTodo, $UserStore.uid);
      };

    </script>

    <form>
      <header>Add New Todo</header>

      <label for="name">
        Todo Name
        <input bind:value={name} id="name" type="text" />
      </label>

      <label for="priority">
        Todo Priority
        <input
          bind:value={priority}
          id="priority"
          min="1"
          step="1"
          max="5"
          type="range"
        />
      </label>

      <button on:click|preventDefault={submitTodo}>Add Todo</button>
    </form>
这会更新按钮,以便立即调用addtodo函数。
-
App.svelte
    <script>
      import router from "page";
      import Home from "./pages/home.svelte";
      import Login from "./pages/login.svelte";
      import { getAuth, onAuthStateChanged } from "firebase/auth";
      import { UserStore } from "./stores";
      import { onMount } from "svelte";
      import { getTodos } from "./services/firebase";

      const auth = getAuth();
      onMount(async () => {
        onAuthStateChanged(auth, async (user) => {
          if (user) {
            UserStore.set(user);
            getTodos(user.uid);
          } else {
            UserStore.set(user);
            getTodos(user.uid);
            console.log("User signed out");
          }
        });
      });

      let page;

      router("/", (ctx, next) => (page = Home));

      router("/login", (ctx, next) => (page = Login));

      router.start();
    </script>

    <svelte:component this={page} />
我们调用onMount函数,以帮助我们在安装组件后运行功能。每当用户状态更改时,onAuthStateChanged函数都会调用其回调。然后,我们根据收到的值更新UserStore。
清除stores.js文件中的商店,以便Firebase可以接管并!瞧!我们完成了。
结论
在本文中,我们使用Svelte和Firebase创建了一个待办事项列表。我们浏览了Svelte的一些基础知识,以及如何将其与Firebase集成。您可以查看完成的项目here和代码here。为了确保您已经完全掌握了本教程中涵盖的概念,请尝试在应用程序中添加自己的功能,例如使todos可编辑或删除。
感谢您阅读这篇文章。直到我们再次见面,我一直保持@the_dro
_。
