想要快速开发Kintone自定义?
如果是这样,让我们设置您的Visual Studio Code (VS Code),这样您的代码与您的Kintone应用程序无缝同步。
每次无需手动将自定义文件上传到Kintone应用! ð
大纲
- Setup Overview
- Prep
- 5 Steps to Setup the Development Environment
- Step 1. Generate a Certificate and Private Key Using the mkcert Tool
- Step 2. Enable HTTPS on the Live Server Extension
- Step 3. Launch a Local Development Server Using the Live Server Extension
- Step 4. Set the localhost URLs with HTTPS in the Kintone App's Settings
- Step 5. Refresh the Kintone App to Reflect the Changes
- Conclusion
设置概述
- 在VS代码中打开Kintone自定义项目
- 实时服务器扩展程序将托管本地文件
- MKCERT命令行工具在本地开发服务器上启用HTTP
- 在Kintone App的设置中使用HTTPS设置Local主机URL
- kintone从Local主机上积极获取JavaScript和CSS文件
准备
我们将使用的工具:
- Visual Studio Code (VS Code)
- Live Server扩展
- mkcert命令行工具生成本地信任的开发证书
在笔记本电脑上安装VS代码和实时服务器扩展名。
设置开发环境的5个步骤
- 使用MKCERT工具生成证书和私钥
- 在实时服务器扩展程序上启用HTTP
- 使用实时服务器扩展程序启动本地开发服务器
- 在Kintone App的设置中使用HTTPS设置Local主机URL
- 刷新Kintone应用程序以反映更改
步骤1.使用MKCERT工具生成证书和私钥
安装mkcert:
- 对于Macos,请使用Homebrew
brew install mkcert - For Windows, use Chocolatey â
choco install mkcert
初始化mkcert以安装本地certificate authority (CA)。
mkcert -install- 提示密码时,输入设备密码。
- 单击是出现安全性警告时。
生成Localhost的证书和私钥。
mkcert localhost 127.0.0.1 ::1
当您看到The certificate is at "./localhost+2.pem" and the key at "./localhost+2-key.pem" ✅时,一切都很好!
-
localhost+2-key.pem是私钥 -
localhost+2.pem是证书
有关更多信息,请参阅mkcert's Installation文档。
不与他人共享证书和私钥。
步骤2.在实时服务器扩展程序上启用HTTPS
以VS Code Workspace的vs代码打开您的Kintone自定义项目。
- 创建VS代码工作区:打开VS代码中的文件夹,然后转到
File并单击Save Workspace As选项。
将名为.vscode/settings.json的VS Code Workspace设置文件添加到项目文件夹中。
最后,将以下代码添加到.vscode/settings.json文件。
{
  "settings": {
    "liveServer.settings.https": {
      "enable": true,
      "cert": "/INSERT_PATH_TO_CERT/localhost+2.pem",
      "key": "/INSERT_PATH_TO_CERT/localhost+2-key.pem",
      "passphrase": ""
    }
  }
}
ââ€一定要将INSERT_PATH_TO_CERT与上一步中生成的证书和私钥的路径交换。
â€您还可以通过VS Code设置UI配置实时服务器扩展设置。
- 打开VS Code Command Palette
- 类型并选择
Preferences: Open Settings (UI) - 在设置搜索栏中,键入
liveServer.settings.https - 设置
enable,cert,key和passphrase值,如下所示
步骤3.使用实时服务器扩展程序启动本地开发服务器
- 打开VS Code Command Palette
- 类型并选择
Live Server: Open With Live Server - 在Web浏览器上导航到
https://localhost:5500访问服务器
导航到JavaScript和CSS文件。
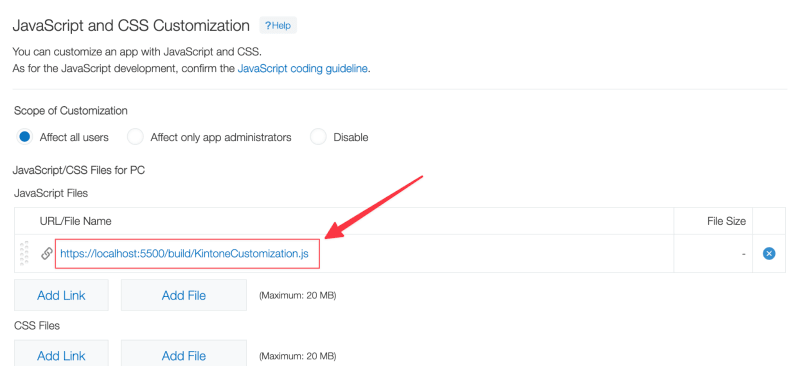
步骤4.在Kintone App的设置中使用HTTPS设置Local主机URL
用https获取localhost URL的文件:
- 通过浏览器导航到本地开发服务器上托管的文件
- 从浏览器的地址栏复制URL
- 导航到Kintone App的JavaScript and CSS Customization settings
- 将带有HTTPS的Local主机URL设置为所需的选项
- 单击保存,然后更新应用按钮
Kintone应用程序将访问和使用JavaScript和CSS文件。
现已完成优化的Kintone自定义开发环境的设置。
步骤5.刷新Kintone应用程序以反映更改
修改Kintone自定义文件并刷新Kintone应用程序。
更改应立即反映在Kintone应用中。 ð
这只是一个开发环境设置。
•仅在将代码上传到Kintone App。
结论
使用此设置,您可以每次都在不将自定义文件上传到Kintone应用程序的情况下验证更改! ð
有问题吗? ðä
将它们发布在Kintone Developer Forum。


