介绍
监视在确保FastAPI应用程序的性能,可用性和稳定性方面起着至关重要的作用。通过密切跟踪关键指标并确定潜在问题,开发人员可以主动解决这些问题并提供更好的用户体验。在本指南中,我们将使用两个强大的工具来探讨如何为Fastapi应用程序设置监视:Grafana和Prometheus。
什么是普罗米修斯?
Prometheus是一个开源监视系统,可从您的应用程序收集指标,并将其存储在时间序列数据库中。它可用于监视应用程序的性能并在出现问题时提醒您。
什么是Grafana?
Grafana是一种开源可视化工具,可用于为您的应用程序创建仪表板。它可用于创建显示您应用程序状态的仪表板。
监视fastapi应用程序的概述
监视是任何应用程序的重要组成部分。它可以帮助您了解应用程序的性能以及如何使用。它还可以帮助您在问题成为问题之前识别和解决问题。
有许多可用于监视应用程序的工具,但它们都有自己的利弊。在本指南中,我们将使用Prometheus和Grafana监视我们的Fastapi应用程序。
Grafana和Prometheus在监测中的重要性
Grafana是可视化数据的工具。它可用于创建显示您应用程序状态的仪表板。 Prometheus是从您的应用程序中收集指标的工具。它可用于收集CPU使用,内存使用和网络流量等指标。
先决条件
- docker
- docker compose
- python 3.8+和pip
- 终端或命令提示
- 文本编辑器或IDE(VS代码,Pycharm等)
- Fastapi,Docker和Python的基本知识
- Prometheus和Grafana的基本知识
- Docker&Docker Compose的基本知识
项目设置
保留订单,我们将使用现有的FastAPI应用程序进行本指南。您可以克隆回购here。但是,如果您想创建/使用自己的fastapi应用程序,请随时这样做。
git clone https://github.com/KenMwaura1/Fast-Api-example.git
克隆了存储库后,您可以运行以下命令来创建Virtualenv并安装依赖项。
cd Fast-Api-example
python3 -m venv venv
source venv/bin/activate
cd src
pip install -r requirements.txt
运行应用程序的订单,您可以运行以下命令。
uvicorn app.main:app --reload --workers 1 --host 0.0.0.0 --port 8002
上面的命令将在端口 8002 上启动应用程序。您可以通过在浏览器中访问http://localhost:8002/docs访问该应用程序。随时更改命令以满足您的需求。默认端口通常为8000。
设置Prometheus
a。使用Docker的Prometheus的安装和配置
如果尚未安装在系统上。
使用命令从官方存储库中取出Prometheus Docker映像:
docker pull prom/prometheus
创建一个文件夹prometheus_data,在内部创建一个配置文件,名为:prometheus.yml来定义Prometheus设置和目标。示例配置:
global:
  scrape_interval: 15s
scrape_configs:
  - job_name: 'fastapi-app'
    static_configs:
      - targets: ['web:8000']
此配置指定了刮擦间隔并设置了FastApi应用程序要监视的目标。
使用以下命令启动Prometheus容器:
docker run -p 9090:9090 -v /path/to/prometheus.yml:/etc/prometheus/prometheus.yml prom/prometheus
替换/path/to/prometheus.yml 带有Prometheus.yml配置文件的实际途径。
通过在Web浏览器中导航到http://localhost:9090访问Prometheus。您应该看到Prometheus Web界面。
b。 Prometheus指标的仪器Fastapi应用
ceate fastapi应用程序的虚拟环境并激活它,然后安装所需的python库,以使该应用程序运行以进行Prometheus集成:
python3 -m venv venv
source venv/bin/activate
cd src
pip install -r requirements.txt
pip install prometheus-fastapi-instrumentator
在您的fastapi应用程序的主文件中(在这种情况下在src/app/main.py中找到),请从 prometheus_fastapi_instrumentator 中导入仪表仪类:
from prometheus_fastapi_instrumentator import Instrumentator
使用仪表器初始化并仪器仪器:
Instrumentator().instrument(app).expose(app)
此步骤会自动将Prometheus指标仪器添加到您的fastapi应用程序中并公开指标端点。
重新启动您的FastApi应用程序以应用仪器更改。如果一切都成功,则应在 http://localhost:8002/metrics 上有一个新的终点,以返回Prometheus指标。
连接Prometheus和Grafana
为了连接Prometheus和Grafana,我们将为Grafana使用Prometheus数据源插件。此插件使您可以将Grafana连接到Prometheus并创建显示您应用程序状态的仪表板。
安装Grafana的Prometheus数据源插件
为了安装Grafana的Prometheus数据源插件,您需要从Grafana网站下载插件。您可以从here下载插件。但是在Docker中,插件已经安装。
下载插件后,您可以通过运行以下命令来安装它:
grafana-cli plugins install grafana-prometheus-datasource
使用Docker组成的应用程序运行该应用程序
现在,我们已经运行了应用程序,我们可以使用Docker组合与Prometheus和Grafana一起运行。我们将使用Docker Hub的官方Prometheus和Grafana图像。
Docker撰写文件
我们将使用docker撰写文件与Prometheus和Grafana一起运行我们的应用程序。 Docker组成的文件将包含以下服务:
- fastapi应用程序为Web服务
- 普罗米修斯作为普罗米修斯服务
- Grafana作为Grafana服务
- Postgres作为数据库服务
Docker组成的文件还将包含以下卷:
- Prometheus数据量
- Grafana数据卷
Docker组成的文件还将包含以下网络:
- hello_fastapi_network
现在在项目的根目录中创建一个名为docker-compose.yml的文件,并添加以下代码:
version: "3.8"

services:
  web:
    build: ./src
    command: uvicorn app.main:app --reload --workers 1 --host 0.0.0.0 --port 8000
    volumes:
      - ./src/:/usr/src/app/
    ports:
      - "8002:8000"
    environment:
      - DATABASE_URL=postgresql://hello_fastapi:hello_f
---> Verify that Prometheus is scraping the metrics from your FastAPI app by visiting <http://localhost:9090/targets> in your web browser. The FastAPI app target should be listed with a "UP" state.
With Prometheus now installed and configured in a Docker container, and your FastAPI app instrumented with Prometheus metrics, you are ready to move on to the next steps of integrating Grafana for visualization and analysis.astapi@db/hello_fastapi_dev
    depends_on:
      - db
  db:
    image: postgres:13.1-alpine
    volumes:
      - postgres_data:/var/lib/postgresql/data/
    environment:
      - POSTGRES_USER=hello_fastapi
      - POSTGRES_PASSWORD=hello_fastapi
      - POSTGRES_DB=hello_fastapi_dev

    ports:
      - "5432:5432"

  prometheus:
    image: prom/prometheus
    container_name: prometheus
    ports:
      - 9090:9090
    volumes:
      - ./prometheus_data/prometheus.yml:/etc/prometheus/prometheus.yml
    command:
      - '--config.file=/etc/prometheus/prometheus.yml'


  grafana:
    image: grafana/grafana
    container_name: grafana
    ports:
      - 3000:3000
    volumes:
      - grafana_data:/var/lib/grafana

volumes:
  prometheus_data:
    driver: local
    driver_opts:
      o: bind
      type: none
      device: ./prometheus_data
  grafana_data:
    driver: local
    driver_opts:
      o: bind
      type: none
      device: ./grafana_data
  postgres_data:

networks:
  default:
    name: hello_fastapi
让我们浏览上面的代码,看看每个部分的作用:
-
version: '3.8'-这是我们正在使用的Docker组成文件格式的版本。您可以找到有关Docker组成文件格式here的更多信息。 -
services:-这是Docker组成文件的服务部分的开始。本节包含我们想要与Docker Compose一起运行的所有服务。每个服务都将在自己的容器中运行。有关Docker Compose Services的更多信息,您可以阅读Docker Compose documentation。 -
prometheus:-这是普罗米修斯服务的开始。该服务将从Docker Hub运行Prometheus图像。 -
image: prom/prometheus-这是我们想要使用Prometheus服务运行的图像。此图像是Docker Hub的官方Prometheus图像。 -
container_name: prometheus-这是我们想要使用Prometheus服务运行的容器的名称。此名称将用于引用Docker组成文件其他部分中的容器。 -
ports:-这是普罗米修斯服务端口部分的开始。本节包含我们要在Prometheus服务中公开的所有端口。 -
9090:9090-这是我们要在Prometheus服务中公开的端口。该端口将用于访问Prometheus Web界面。 -
volumes:-这是Prometheus服务卷部分的开始。本节包含我们要在Prometheus服务中安装的所有卷。 -
./prometheus_data/prometheus.yml:/etc/prometheus/prometheus.yml-这是我们想要在Prometheus服务中安装的卷。该卷将用于存储Prometheus配置文件。 -
command:-这是Prometheus Service的指挥部分的开始。本节包含我们要使用Prometheus服务运行的所有命令。 -
--config.file=/etc/prometheus/prometheus.yml-这是我们想要使用Prometheus服务运行的命令。此命令将用于指定Prometheus配置文件的位置。 -
networks:-在这里,我们指定了要用于普罗米修斯服务的网络。该网络将用于将Prometheus服务连接到其他服务。 -
grafana:-这是Grafana服务的开始。该服务将从Docker Hub运行Grafana图像。 -
image: grafana/grafana-这是我们想要使用Grafana服务运行的图像。此图像是Docker Hub的官方Grafana图像。 -
container_name: grafana-这是我们想要使用Grafana服务运行的容器的名称。此名称将用于引用Docker组成文件其他部分中的容器。 -
ports:-这是Grafana服务端口部分的开始。本节包含我们要在Grafana服务中公开的所有端口。 -
3000:3000-这是我们要在Grafana服务中公开的端口。此端口将用于访问Grafana Web界面。 -
volumes:-这是Grafana服务卷部分的开始。本节包含我们想要使用Grafana服务安装的所有卷。 -
grafana_data:/var/lib/grafana-这是我们想要使用Grafana服务安装的卷。该卷将用于存储Grafana数据。 -
networks:-在这里,我们指定了要用于Grafana服务的网络。该网络将用于将Grafana服务连接到其他服务。 -
volumes:-这是Docker组成文件的卷部分的开始。本节包含我们要使用Docker组成文件安装的所有卷。 -
prometheus_data:-这是我们要使用Docker组合文件安装的卷。该卷将用于存储Prometheus数据。
Prometheus配置文件
如前所述,Prometheus需要一个配置文件来知道要监视什么。我们将使用Prometheus随附的默认配置文件。但是,我们需要对配置文件进行一些更改,以使其与我们的应用程序一起使用。
现在使用以下代码更新prometheus_data/prometheus.yml文件:
# config file for prometheus

# global config
global:
  scrape_interval: 15s
  scrape_timeout: 10s
  evaluation_interval: 15s
alerting:
  alertmanagers:
  - follow_redirects: true
    enable_http2: true
    scheme: http
    timeout: 10s
    api_version: v2
    static_configs:
    - targets: []
scrape_configs:
- job_name: prometheus
  honor_timestamps: true
  scrape_interval: 15s
  scrape_timeout: 10s
  metrics_path: /metrics
  scheme: http
  follow_redirects: true
  enable_http2: true
  static_configs:
  - targets:
    - localhost:9090
- job_name: 'fastapi'
  scrape_interval: 10s
  metrics_path: /metrics
  static_configs:
    - targets: ['web:8000']
让我们浏览上面的代码,看看每个部分的作用:
-
global:-这是Prometheus配置文件的全局部分的开始。本节包含Prometheus的所有全球设置。 -
scrape_interval: 15s-这是普罗米修斯的刮擦间隔。此设置告诉Prometheus刮擦目标的频率。 -
scrape_timeout: 10s-这是普罗米修斯的刮擦超时。此设置告诉Prometheus,要等待刮擦才能完成多长时间。 -
evaluation_interval: 15s-这是普罗米修斯的评估间隔。此设置告诉Prometheus评估规则的频率。 -
alerting:-这是Prometheus配置文件的警报部分的开始。本节包含Prometheus的所有警报设置。 -
alertmanagers:-这是Prometheus配置文件的AlertManagers部分的开始。本节包含Prometheus的所有AlertManagers设置。 -
follow_redirects: true-此设置告诉Prometheus在将警报发送到AlertManager时遵循重定向。 -
enable_http2: true-此设置告诉Prometheus在向AlertManager发送警报时启用HTTP/2。 -
scheme: http-此设置告诉Prometheus在向AlertManager发送警报时使用HTTP。 -
timeout: 10s-此设置告诉Prometheus,请在计时之前等待Alertmanager的响应多长时间。 -
api_version: v2-此设置告诉Prometheus在向AlertManager发送警报时使用V2 API。 -
static_configs:-这是Prometheus配置文件的static_configs部分的开始。本节包含Prometheus的所有static_configs设置。 -
targets: []-此设置告诉Prometheus使用默认的AlertManager。 -
scrape_configs:-这是Prometheus配置文件的Scrape_Configs部分的开始。本节包含Prometheus的所有Scrape_configs设置。 -
job_name: prometheus-这是我们想与Prometheus刮擦的工作的名称。此名称将用于参考Prometheus配置文件其他部分中的作业。 -
honor_timestamps: true-此设置告诉Prometheus在刮擦工作时尊重时间戳。 -
scrape_interval: 15s-这是工作的刮擦间隔。此设置告诉Prometheus多久刮擦多久。 -
scrape_timeout: 10s-这是工作的刮擦超时。此设置告诉Prometheus,要等待刮擦才能完成多长时间。 -
metrics_path: /metrics-这是工作的指标路径。此设置告诉Prometheus在哪里可以找到工作的指标。 -
scheme: http-此设置告诉Prometheus刮擦作业时使用HTTP。 -
follow_redirects: true-此设置告诉Prometheus刮擦工作时遵循重定向。 -
enable_http2: true-此设置告诉Prometheus刮擦作业时启用HTTP/2。 -
static_configs:-这是Prometheus配置文件的static_configs部分的开始。本节包含Prometheus的所有static_configs设置。 -
targets:-这是Prometheus配置文件的目标部分的开始。本节包含Prometheus的所有目标设置。 -
localhost:9090-这是我们要与Prometheus刮擦的目标。该目标将用于参考Prometheus配置文件其他部分中的目标。 -
job_name: 'fastapi'-这是我们想与Prometheus刮擦的工作的名称。此名称将用于参考Prometheus配置文件其他部分中的作业。 -
scrape_interval: 10s-这是工作的刮擦间隔。此设置告诉Prometheus多久刮擦多久。 -
metrics_path: /metrics-这是工作的指标路径。此设置告诉Prometheus在哪里可以找到工作的指标。 -
static_configs:-这是Prometheus配置文件的static_configs部分的开始。本节包含Prometheus的所有static_configs设置。 -
targets:-这是Prometheus配置文件的目标部分的开始。本节包含Prometheus的所有目标设置。 -
web:8000-这是我们要与Prometheus刮擦的目标。该目标将用于参考Prometheus配置文件其他部分中的目标。
我们使用web:8000作为Prometheus的目标,因为这是我们在Docker撰写文件中定义的服务的名称。
如果您想了解有关Prometheus配置文件的更多信息,则可以阅读Prometheus documentation。
运行该应用程序
现在,我们拥有Docker组成的文件和Prometheus配置文件,我们可以运行该应用程序。要运行应用程序,我们需要运行以下命令:
docker-compose up -d
验证Prometheus是否正在通过在Web浏览器中访问http://localhost:9090/targets来刮除您的FastApi应用程序的指标。 FastAPI应用程序目标应使用“ UP”状态列出。示例屏幕截图:
Grafana仪表板
现在,我们已经运行了Prometheus,我们可以创建一个Grafana仪表板来可视化FastApi应用程序的指标。要创建一个Grafana仪表板,我们需要执行以下操作:
- 创建一个新的Grafana仪表板。
- 添加一个新的Prometheus数据源。
- 添加一个新的图形面板。
- 向图面板添加新查询。
- 将更改应用于图形面板。
- 保存仪表板。
- 查看仪表板。
- 您要可视化的每个度量标准重复步骤3-7。
- 为要创建的每个仪表板重复步骤2-8。
- 为要监视的每个应用程序重复步骤1-9。
创建一个新的Grafana仪表板
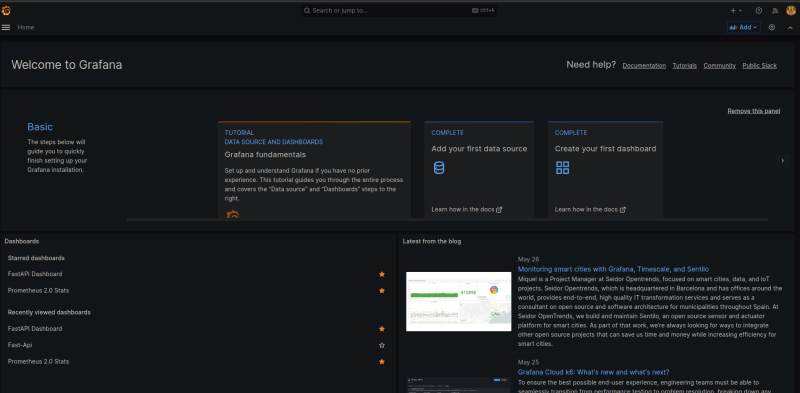
跑步后,请转到:Localhost:3000。您应该看到以下屏幕:
输入默认用户名和密码(admin/admin),然后单击“登录”。应该提示您更改密码。输入新密码,然后单击“保存”。您应该看到以下屏幕:
单击“创建您的第一个数据源”按钮。您应该看到以下屏幕:
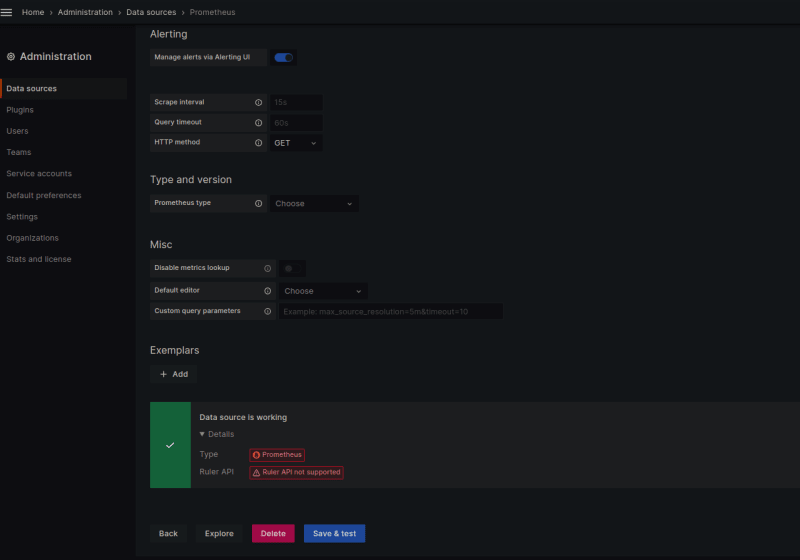
单击“ Prometheus”按钮。您应该看到以下屏幕:
输入以下信息:
- 名称:Prometheus
- URL: http://prometheus:9090
- 访问:服务器(默认)
- 刮擦间隔:15s
- http方法:获取
- http auth:无
- 基本auth:无
- 带有凭据:否
- TLS客户端auth:无
- TLS CA证书:无
单击“保存和测试”按钮。您应该看到以下屏幕:
单击“仪表板”按钮。您应该看到以下屏幕:
单击““新仪表板”按钮。您应该查看以下屏幕:
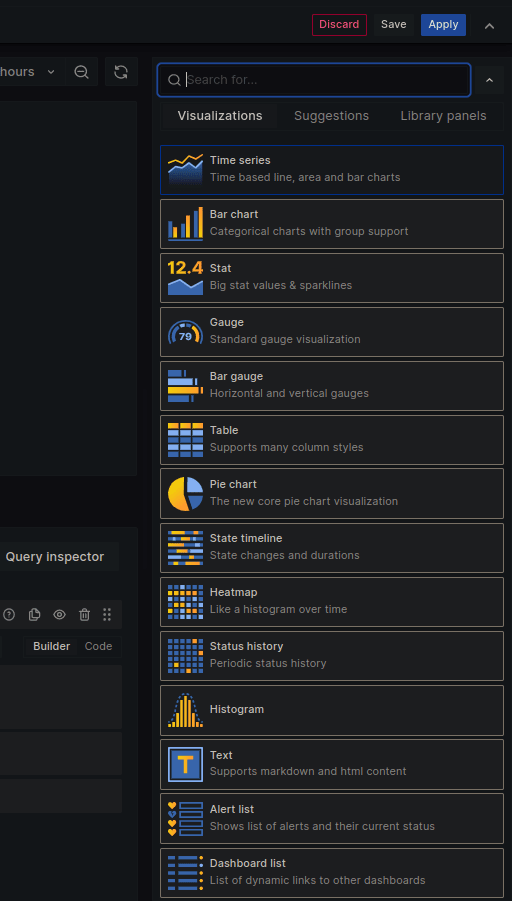
单击“添加可视化”按钮。您应该看到以下屏幕:
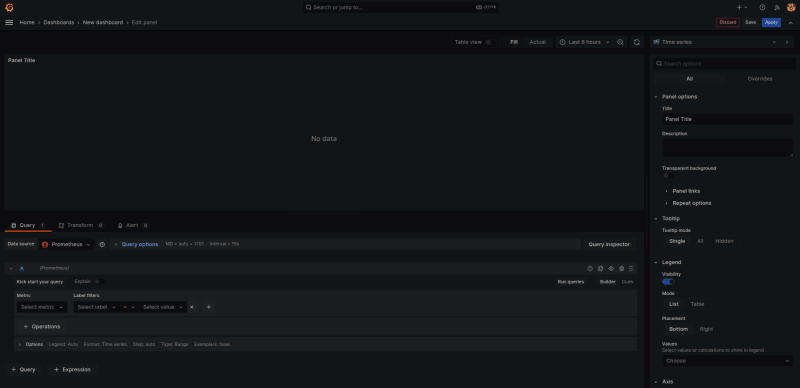
在这里,您可以选择要添加到仪表板的可视化类型。对于此示例,我们将选择“时间序列”可视化。您应该看到以下屏幕:
现在让我们向图添加查询。单击“查询”按钮。您应该看到以下屏幕:
![grafana添加查询]]](https://dev-to-uploads.s3.amazonaws.com/uploads/articles/8y8z07btrwrtgw1yriu4.png)
Grafana提供了一个查询构建器,我们可以用来选择要可视化的指标。
- 单击“指标”按钮。
- 我们将使用
api_request_duration_seconds_count作为我们要可视化的度量。 - 单击“ label_filters”按钮。从那里选择“端点”选择
/notes/{id}。 - 单击 +添加过滤器。从那里选择“ http_status”,选择
200。 - 现在单击“运行查询”。您应该看到
api_request_duration_seconds_count指标的Tome系列图: - 输入面板标题:
api_request_duration_seconds_count,然后单击“应用”。 - 单击“保存”按钮。您应该看到以下屏幕:
rince然后重复,为要可视化的每个度量标准修改。您也可以在同一仪表板上添加多个图。
随意使用我的Grafana dashboard作为起点。在GitHub repo中找到JSON文件。
样本仪表板:
结论
在本文中,我们学会了如何使用Prometheus和Grafana监视Fastapi应用程序。我们学会了如何创建一个Docker组成的文件来运行Prometheus和Grafana。我们还学会了如何创建Prometheus配置文件,以从我们的FastApi应用程序中刮擦指标。最终,我们学会了如何创建一个Grafana仪表板来可视化Fastapi应用程序的指标。
感谢您的阅读!如果您有任何疑问或建议,可以免费免费发表评论。您也可以在Twitter上与我联系。如果您发现这篇文章有助于随时与他人分享。


