Microsoft Power Automate是一项强大的服务,旨在自动化各种应用程序和服务之间的工作流程。它的桌面版本提供了自动化桌面以中心操作的附加功能,无论有没有用户界面交互。在本文中,我们将探讨如何将Dynamsoft Barcode Reader,Dynamsoft Document Normalizer和Dynamsoft Label Recognizer集成到使用Blask的Web服务中。通过利用此Web API,我们可以在台式机的Power Automate中无缝调用这些DynamSoft工具。这使您能够将创建的流程转换为方便的桌面应用程序,从而大大提高您的日常工作效率。
安装Python软件包
pip install dbr mrz-scanner-sdk document-scanner-sdk opencv-python flask
- dbr:Dynamsoft条形码读取器
- mrz-scanner-sdk:Dynamsoft标签识别器
- document-scanner-sdk:Dynamsoft文档归一幅器
- opencv-python:Python的OpenCV
- flask:烧瓶网络框架
要使用DynamSoft SDK,您需要申请trial license。
电源自动化支持外部Python库吗?
如果您尝试在台式机的Power Automate中使用Python脚本,则可能已经注意到它不支持通过PIP安装的外部库。这是因为Power Automate Desktop使用Ironpython,这是Python的.NET实现。 Ironpython是Python语言的子集,它不支持外部库。为了解决此问题,我们可以使用烧瓶创建Web服务,然后使用Power Automate HTTP Action调用Web API。
使用烧瓶设置HTTP Web服务
-
导入因软件包:
from flask import Flask, request, jsonify import dbr import base64 version = dbr.__version__ import urllib.parse import mrzscanner import docscanner import numpy as np import cv2 import time from dbr import * -
设置DynamSoft许可证密钥并初始化三个SDK。您需要用自己的许可证密钥替换。
license_key = "DLS2eyJoYW5kc2hha2VDb2RlIjoiMjAwMDAxLTE2NDk4Mjk3OTI2MzUiLCJvcmdhbml6YXRpb25JRCI6IjIwMDAwMSIsInNlc3Npb25QYXNzd29yZCI6IndTcGR6Vm05WDJrcEQ5YUoifQ==" BarcodeReader.init_license(license_key) reader = BarcodeReader() mrzscanner.initLicense(license_key) mrz_scanner = mrzscanner.createInstance() mrz_scanner.loadModel(mrzscanner.load_settings()) docscanner.initLicense(license_key) doc_scanner = docscanner.createInstance() doc_scanner.setParameters(docscanner.Templates.color) -
创建一个烧瓶应用并定义Web API端点:
app = Flask(__name__) @app.route('/api/dbr/decode', methods=['POST']) def dbr_decode(): return handle_request(request, 'dbr') @app.route('/api/mrz/scan', methods=['POST']) def mrz_scan(): return handle_request(request, 'mrz') @app.route('/api/document/rectify', methods=['POST']) def document_rectify(): return handle_request(request, 'document') if __name__ == '__main__': app.run() -
处理HTTP请求,以获取
request.files或请求主体的图像数据。来自请求主体的图像数据以base64格式编码,因此我们需要先解码。
def handle_request(request, sdk): output = [] request_body = request.data.decode('utf-8') if request_body != '': try: base64_content = urllib.parse.unquote(request_body) file_content = base64.b64decode(base64_content) except: return 'Invalid base64 string', 400 output = process_file(file_content, sdk) else: if 'file' not in request.files: return 'No file uploaded', 400 file = request.files['file'] if file.filename == '': return 'Empty file', 400 file_content = file.read() output = process_file(file_content, sdk) return jsonify(results=output) -
分别调用相应的SDK方法来处理条形码检测,文档纠正和MRZ识别的图像数据。
def decode_file_stream(file_content): output = [] try: results = reader.decode_file_stream(file_content) for result in results: output.append({'format': result.barcode_format_string, 'text': result.barcode_text}) except BarcodeReaderError as error: output = error return output def mrz_decode_file_stream(file_content): output = [] results = mrz_scanner.decodeMat(file_content) for result in results: output.append(result.text) return output def document_rectify_file_stream(file_content): output = [] results = doc_scanner.detectMat(file_content) for result in results: x1 = result.x1 y1 = result.y1 x2 = result.x2 y2 = result.y2 x3 = result.x3 y3 = result.y3 x4 = result.x4 y4 = result.y4 normalized_image = doc_scanner.normalizeBuffer(file_content, x1, y1, x2, y2, x3, y3, x4, y4) image_path = os.path.join(os.getcwd(), str(time.time()) + '.png') normalized_image.save(image_path) output.append(image_path) break return output def process_file(file_content, sdk): output = [] if sdk == 'dbr': output = decode_file_stream(file_content) elif sdk == 'mrz': output = mrz_decode_file_stream(cv2.imdecode(np.frombuffer(file_content, np.uint8), cv2.IMREAD_COLOR)) elif sdk == 'document': output = document_rectify_file_stream(cv2.imdecode(np.frombuffer(file_content, np.uint8), cv2.IMREAD_COLOR)) return output -
启动烧瓶服务器并使用卷曲命令测试Web API:
python app.py

# barcode
curl -X POST -F 'file=@./barcode.jpg' 127.0.0.1:5000/api/dbr/decode

# mrz
curl -X POST -F 'file=@./mrz.png' http://127.0.0.1:5000/api/mrz/scan

# document
curl -X POST -F 'file=@./document.png' http://127.0.0.1:5000/api/document/rectify
在Power Automate中调用Web服务的桌面
在下一节中,我们将向您展示如何逐步创建流程。
-
启动台式机的电源自动化并创建一个新的流程。
-
创建一个循环。由于我们希望将流程作为工具运行,因此我们可以为循环计数设置一个大数字。
-
在循环中,添加
Display custom form动作。打开Custom form designer添加Choice set input和Submit。Choice set input的ID是Options,将在下一步中使用。自定义表格看起来像这样:
-
创建一个
Switch操作,以使用%CustomFormData2['Options']%检查选项值。 -
创建四个案例:
Barcode,MRZ,Document和Quit。-
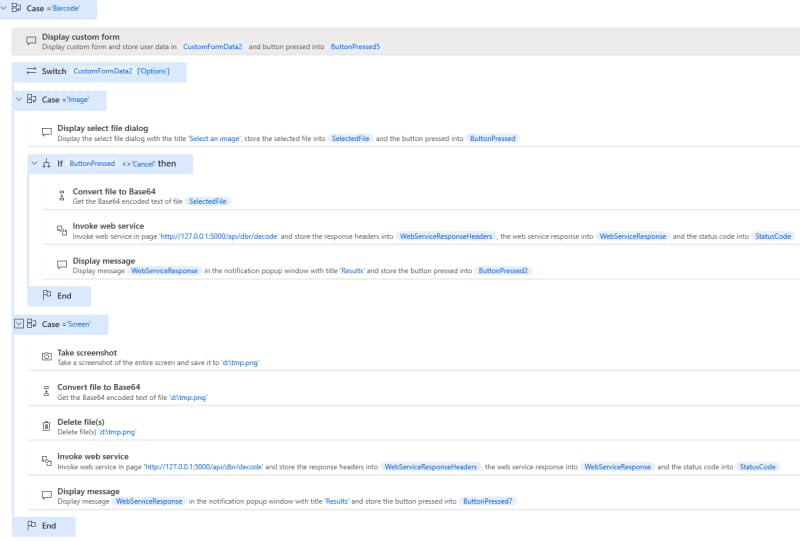
Barcode案例用于从图像文件或屏幕截图中解码1D/2D条形码。
-
MRZ案例用于从图像文件中扫描MRZ。
-
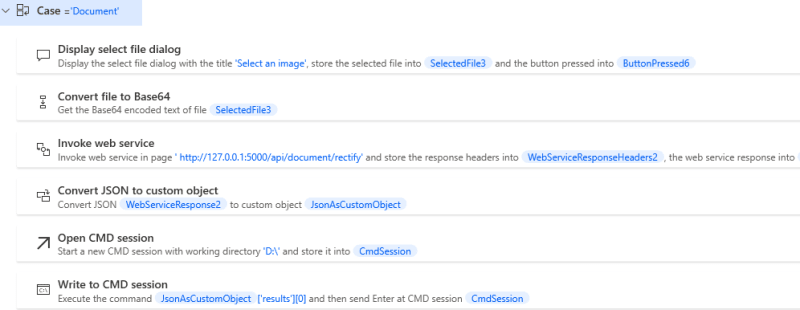
Document案例用于纠正文档图像。
- 当所选选项为
Quit时,默认情况用于退出循环。
-
从图像文件或屏幕截图解码条形码
图像
-
添加
Display select file dialog操作以让用户选择一个图像文件。 -
添加
Convert file to Base64操作将图像文件转换为base64格式。 -
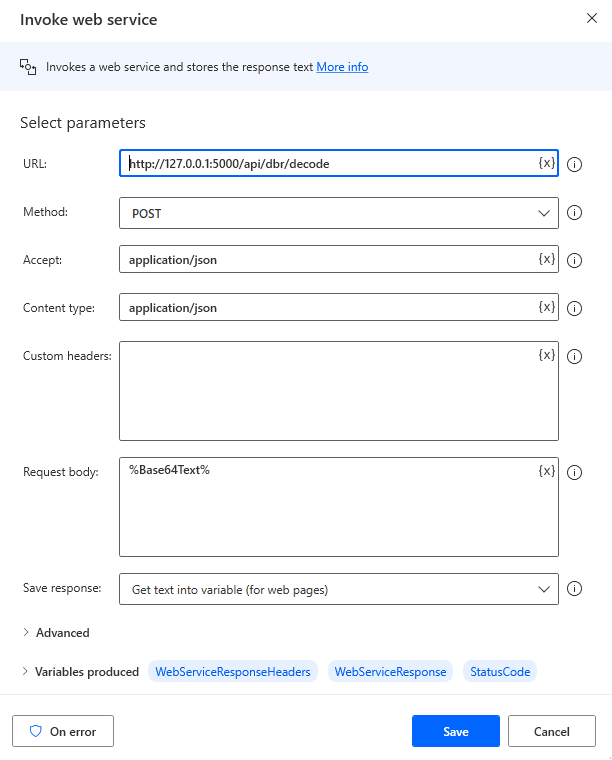
添加
。Invoke web service动作。将URL设置为http://127.0.0.1:5000/api/dbr/decode,Method至POST,Accept至application/json,Content type至application/json和Request body和Request body至%Base64Text%。 -
添加一个
Display message动作以显示解码结果。
屏幕截图
-
添加
Take screenshot操作以进行屏幕截图。将Capture设置为All screens,Save screenshot to至File,Image file到您想要的任何路径,而Image format则将Image formattoPNG。 -
在我们刚才提到的图像示例中以相同的步骤2到4。
从图像文件扫描MRZ
MRZ情况类似于条形码案例。唯一的区别是我们将URL更改为http://127.0.0.1:5000/api/mrz/scan而不是http://127.0.0.1:5000/api/dbr/decode。
纠正文档图像
就像MRZ场景一样,我们将URL修改为http://127.0.0.1:5000/api/document/rectify。调用Web API后,我们通过使用Convert JSON to custom object操作获得了整流图像的路径。随后,我们使用Write to CMD session操作显示整流的图像。


