大多数网站都有一个专门针对产品或服务的客户反馈的部分,该部分建立信任并鼓励其他人尝试。推荐页面是关于在Twitter,LinkedIn等社交媒体平台上的快乐客户评论对公司工具验证和满意的陈述。
。appwrite是一个开源后端平台替代品,例如firebase,它提供了所有必要的API功能,例如身份验证,数据库,存储,功能,安全性和隐私等等,以用于开发Web,移动和颤动应用程序。
本教程将向您展示如何使用AppWrite和NUXT构建复制品。
请参阅official Appwrite页面上的推荐。
让我们开始。
Github和演示
您可以参考完整的源代码in this repo,并且要查看行动中的证明页面,请查看项目示范here。
先决条件
对于本教程,您需要以下内容:
- 在您的机器上安装了Node >= 16
- CSS的知识
- 对vue.js的理解
- 有一个appwrite云帐户
请求AppWrite Cloud,here。
设置appwrite云
AppWrite Cloud用于创建一个新项目。在仪表板上,单击“+创建项目”按钮并给它一个名称。
创建数据库
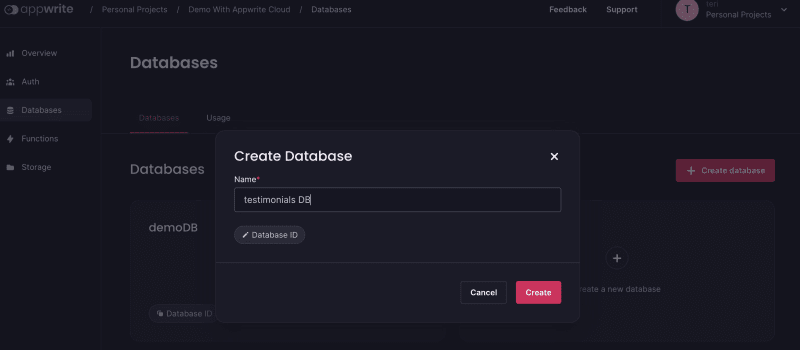
导航到新创建的tementimonials项目,在仪表板窗口的左窗格上,单击数据库并创建具有名称的数据库。
创建收藏
通过单击创建的数据库,您可以使用+创建Collection 按钮创建一个集合。给这个系列****一个名字。
添加属性
本节旨在创建字段参数,以保存显示客户端信息所需的所有数据。在创建的集合中, sentimonial-Collection ,单击属性选项卡以制作此应用程序的属性。
| 属性键 | 属性类型 | 格式 | 大小 | 默认值 | 必需 |
|---|---|---|---|---|---|
| 评论 | 字符串 | 1500 | - | 是 | |
| imgurl | 字符串 | url | - | 是 | |
| 名称 | 字符串 | 255 | - | 是 | |
| 角色 | 字符串 | 255 | - | 是 |
ps :文档ID 自动生成。
创建文档
通过在 Collections 中创建的所有属性,让我们通过单击“文档”选项卡和'+创建文档按钮来包含一些默认数据。现在填写输入字段中的数据。
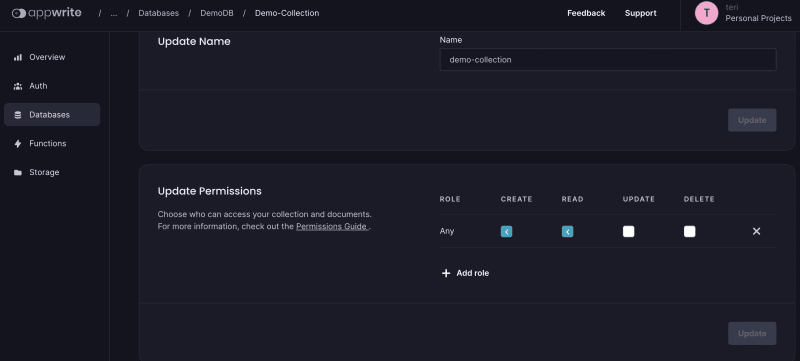
接下来,在集合中选择设置选项卡,然后更新管理用户访问和权利的权限。
另外,您需要注册您的Web应用程序。在仪表板的左窗格上,单击概述,然后+添加平台 。从下拉菜单中选择 Web应用程序选项。
字段的输入字段中的星号()**主机名*确保在开发过程中可以访问Web。如果未设置,则交叉原始资源共享(CORS)错误阻止访问Web应用程序。
创建NUXT应用程序
nuxt是建立在vue.js上的开源框架,它使Web开发功能强大。要踩新的NUXT项目,请在终端中运行此命令:
npx nuxi init testimonials
按照以下命令提供的屏幕上说明:
npm install
上面命令负责安装所有所需的依赖项。接下来,导航到项目目录并启动开发服务器,该服务器应在localhost:3000上运行:
cd testimonials && npm run dev
添加尾风CSS
tailwind CSS是一种实用第一的CSS框架,它直接在标记中使用类。
在终端中,运行此命令安装@nuxtjs/tailwindcss软件包:
npm install -D @nuxtjs/tailwindcss
配置尾风CSS
在看到尾风CSS的动作之前,请在根目录中打开文件nuxt.config.ts,然后在defineNuxtConfig对象中包含模块选项:
    export default defineNuxtConfig({
      modules: ["@nuxtjs/tailwindcss"],
    });
创建环境变量
环境变量存储了.env文件中未经授权访问的秘密密钥凭证。此步骤对于避免将您的秘密推向Github至关重要。
查看有关在NUXT应用程序中创建环境变量的this resource。
构建UI
推荐页面的用户界面是一个单个页面应用程序(SPA),显示了来自满意客户或产品用户的语句集合。
在根目录中创建一个名为组件的目录,并包括此文件名为Testimonials.vue。
更新的项目树目录应该看起来像:
    .
    ├── components
    │   ├── Testimonials.vue
    ├── pages
    │   └── index.vue
    ├── public
    ├── package.json
    ├── tsconfig.json
    ├── package-lock.json
    ├── README.md
    ├── nuxt.config.js
    └── app.vue
将以下代码复制到其各自的文件中:
components/Testimonials.vue
    <template>
      <section class="mx-auto max-w-6xl w-4/5 mt-10">
        <div>
          <h1 class="text-3xl font-serif mb-3 md:text-5xl lg:text-6xl">
            Testimonials
          </h1>
          <p class="mb-10 text-slate-700">
            Learn from experts what they love about Appwrite Cloud
          </p>
        </div>
        <div class="grid gap-6 md:grid-cols-2 xl:grid-cols-3">
          <div
            class="border-2 rounded-lg p-4 flex flex-col justify-between transition-all ease-out">
            <p class="text-sm md:text-lg">
              Appwrite provides web and mobile developers with a set of easy-to-use
              and integrate REST APIs to manage their core backend needs
            </p>
            <div class="flex items-center mt-7">
              <img
                src="https://res.cloudinary.com/terieyenike/image/upload/v1635347142/ypz0tuyz60hirt1obdba.jpg"
                class="shrink-0 w-12 h-12 rounded-full border-slate-200 shadow mr-4 bg-black object-cover"
                loading="lazy"
                alt="william smiling" />
              <div>
                <p>
                  <span class="font-bold">Willian Imoh</span>
                </p>
                <p class="text-xs md:text-sm font-light text-slate-700">
                  Product Manager
                </p>
              </div>
            </div>
          </div>
        </div>
      </section>
    </template>
上面的代码将使用尾风CSS对页面的内容进行样式,并将每个元素中的类组合起来。之后,将此组件导入页面中的index.vue文件文件夹:
pages/index.vue
    <template>
      <testimonials />
    </template>

    <script setup>
    useHead({
      title: "Read customers' feedback",
    });
    </script>
useHead是一个内置组件,有助于将元数据绑定到页面的头部,类似于html中的<title>。
现在,让我们确保通过将组件NuxtWelcome替换为该项目的输入点中的NuxtPage,以确保此页面出现在浏览器中,app.vue:
app.vue
    <template>
      <NuxtPage />
    </template>
前往浏览器,您应该有类似的东西:
显示所有用户的语句
让我们从使用AppWrite数据库API的服务器的客户或产品的用户显示所有反馈。
。让我们使用此代码更新组件Testimonials.vue:
components/Testimonials.vue
    <template>
      <section class="mx-auto max-w-6xl w-4/5 mt-10">
        <div>
          <h1 class="text-3xl font-serif mb-3 md:text-5xl lg:text-6xl">
            Testimonials
          </h1>
          <p class="mb-10 text-slate-700">
            Learn from experts what they love about Appwrite Cloud
          </p>
        </div>
        <div class="grid gap-6 md:grid-cols-2 xl:grid-cols-3">
          <div
            class="border-2 rounded-lg p-4 flex flex-col justify-between transition-all ease-out"
            v-for="item in items"
            :key="item.$id">
            <p class="text-sm md:text-lg">
              {{ item.comment }}
            </p>
            <div class="flex items-center mt-7">
              <img
                :src="item.imgUrl"
                class="shrink-0 w-12 h-12 rounded-full border-slate-200 shadow mr-4 bg-black object-cover"
                loading="lazy"
                :alt="item.role" />
              <div>
                <p>
                  <span class="font-bold">{{ item.name }}</span>
                </p>
                <p class="text-xs md:text-sm font-light text-slate-700">
                  {{ item.role }}
                </p>
              </div>
            </div>
          </div>
        </div>
      </section>
    </template>

    <script setup>
    import { Client, Databases } from "appwrite";

    const runtimeConfig = useRuntimeConfig();

    const client = new Client();
    const databases = new Databases(client);

    client
      .setEndpoint(runtimeConfig.public.API_ENDPOINT)
      .setProject(runtimeConfig.public.PROJECT_ID);

    const getComment = databases.listDocuments(
      runtimeConfig.public.DATABASE_ID,
      runtimeConfig.public.COLLECTION_ID
    );

    const items = ref(null);

    onMounted(() => {
      getComment.then(
        function (response) {
          items.value = response.documents;
        },
        function (error) {
          console.log(error);
        }
      );
    });
    </script>
上面的代码执行此操作:
- 使用Web软件开发套件(SDK)导入AppWrite软件包并初始化新实例
-
useRuntimeConfig()函数用于访问nuxt.config.ts文件中定义的环境变量 - 使用
onMounted生命周期钩和getComment功能的组件安装在服务器中的 collections 中获取所有项目
- 使用
v-for指令循环浏览项目,以获取网格中列出的个人证明
此时,该应用应该看起来像这样:
结论
在您的网站上进行证明是每个品牌都应该采用的东西,因为它会使您在任何人尝试该产品之前在外部看起来不错。
要扩展此应用程序,您可以在网站上创建表单以允许用户向服务器提交反馈。


