介绍
欢迎进入三部分技术教程系列的第二部分,我们将在其中构建一个Django项目,使用户能够管理其加密货币投资组合。为了实现功能和其他功能,我们将利用Coingecko或任何其他加密货币API的API调用。
在上一部分中,我们设置了项目并创建了模型。现在,我们将继续从那时继续添加模板,视图和URL,并编码整个项目。这将是本系列中最复杂,最详细的部分。
可以在此处找到整个项目的代码 - > Github Repo for Django Crypto App
设置URL
在Django中,在每个应用程序的urls.py文件中定义了URL。 URL模式与将处理请求/响应的视图函数匹配。
在给定的代码段中,我们可以看到path和views模块的导入语句。我们还导入auth_views,这是用于处理身份验证视图的Django模块。此外,我们正在从Django的contrib软件包中导入admin模块。
urlpatterns列表包含我们应用程序的所有URL模式。每个URL模式都是使用path()函数定义的,该函数采用以下参数:
-
route:一个包含URL模式的字符串。 -
view:匹配URL模式时应调用的视图函数。 -
name:URL模式的唯一名称。
对于我们的项目,我们为几个视图定义了URL:
-
home_view:我们应用的默认视图,可在根网址访问。 -
login_view,logout_view:用户身份验证的视图。 -
signup_view,signup_with_referrer_view:用户注册的视图。 -
portfolio_view:显示显示用户投资组合的查看。 -
search_view:查看搜索和添加新的加密货币到用户的投资组合。 -
add_to_portfolio_view,delete_from_portfolio_view:从用户的投资组合中添加/删除加密货币的视图。 -
password_reset:查看用于重置用户密码的查看。 -
password_reset_done:发送密码重置电子邮件后显示的视图。 -
password_reset_confirm:查看以确认密码重置。 -
password_reset_complete:重置密码后显示的视图。
from django.contrib import admin
from django.contrib.auth import views as auth_views
from django.urls import path

from . import views

urlpatterns = [
    path("", views.home_view, name="home"),

    # user authentication
    path("login/", views.login_view, name="login"),
    path("logout/", views.logout_view, name="logout"),

    path("signup/", views.signup_view, name="signup"),
    path('signup/<str:referral_code>/', views.signup_with_referrer_view, name='signup_with_referrer_view'),

    # wallet page
    path("portfolio/", views.portfolio_view, name="portfolio"),

    # CRUD operations on cryptos
    path("search/", views.search_view, name="search"),
    path("add_to_portfolio/", views.add_to_portfolio_view, name="add_to_portfolio"),
    path('delete_from_portfolio/<int:pk>/', views.delete_from_portfolio_view, name='delete_from_portfolio'),

    # password reset stuff
    path('password_reset/', auth_views.PasswordResetView.as_view(template_name="reset/password_reset.html"), name='password_reset'),

    path('password_reset_done/', auth_views.PasswordResetDoneView.as_view(template_name="reset/password_reset_done.html"), name='password_reset_done'),

    path('password_reset_confirm/<uidb64>/<token>/', auth_views.PasswordResetConfirmView.as_view(
    template_name='reset/password_reset_confirm.html'), name='password_reset_confirm'),

    path('password_reset_complete/', auth_views.PasswordResetCompleteView.as_view(
    template_name='reset/password_reset_complete.html'), name='password_reset_complete'),
]
总的来说,urlpatterns列表提供了URL和相应视图之间的清晰映射,使我们可以轻松导航和使用我们的Web应用程序。
设置模板
视图和模板是Django中模型视图(MVT)体系结构的重要组成部分。视图处理应用程序的请求/响应流和业务逻辑,而模板为用户界面提供了演示层。
我们将在模板中使用一些自定义CSS和JavaScript文件。这些文件位于我们应用程序的static目录中。我们可以在模板中使用static模板标签导入这些文件。因此,继续在主应用程序中创建一个static目录,然后添加以下文件:
style.css
我们不会涵盖大量的CSS解释,因为Django是本文的重点。 style.css文件的内容如下:
@import url('https://fonts.googleapis.com/css2?family=Roboto:wght@300;400;500;700&display=swap');


::-webkit-scrollbar {
  width: 10px;
}

::-webkit-scrollbar-track {
  background: #f1f1f1;
}

::-webkit-scrollbar-thumb {
  background: #888;
  border-radius: 10px;
}

::-webkit-scrollbar-thumb:hover {
  background: #555;
}


body {
  overflow-x: hidden !important;
  color: white !important;
  font-family: 'Roboto', sans-serif !important;
  background-color: #130f40 !important;
  background-image: linear-gradient(315deg, #130f40 0%, #000000 74%) !important;
  background-repeat: no-repeat !important;
  background-attachment: fixed !important;
  background-size: cover !important;
  min-height: 100vh !important;
}

.green-arrow {
  font-size: 18px;
  color: green
}

.red-arrow {
  font-size: 18px;
  color: red
}

.flex-container {
  display: flex;
  flex-wrap: wrap;
  justify-content: center;
  gap: 20px;
}

.crypto-item {
  display: flex;
  flex-direction: row;
  justify-content: space-between;
  align-items: center;
  border: 1px solid gray;
  padding: 10px;
  width: 300px;
}

.crypto-info {
  margin-left: 10px;
}

.tt-menu {
  width: 100%;
}

.tt-suggestion {
  padding: 10px;
  font-size: 16px;
  cursor: pointer;
  background-color: #fff;
}

.tt-suggestion:hover {
  background-color: #f5f5f5;
}

.tt-suggestion.tt-cursor {
  background-color: #f5f5f5;
}

.typeahead {
  border-radius: 0;
}


.custom-nav-logo {
  font-family: 'Roboto', sans-serif;
  font-size: 24px;
  font-weight: 500;

}

nav {
  box-shadow: -10px 8px 0px rgb(196 181 253);
  background: #0f0f0f;
  color: white;
  margin-bottom: 50px;
  position: fixed ;
  top: 0;
  width: 100%;
  z-index: 1;
}


footer {
  position: fixed;
  left: 0;
  bottom: 0;
  width: 100%;
  background-color: rgb(0, 0, 0);
  color: white;
  text-align: center;
}

.referral-code {
  background-color: #080808;
  border-radius: 5px;
  padding: 1rem;
  margin-bottom: 1rem;
  border: 1px solid #fff;
}

.referral-code p {
  font-size: 1.1rem;
}

.custom-heading {
  font-family: 'Montserrat', sans-serif;
  font-size: 2.5rem;
  font-weight: 600;
  letter-spacing: 2px;
  text-transform: uppercase;
  text-decoration: underline #fff solid 1px;
  text-underline-offset: 10px;
  margin-bottom: 1rem;
}

.custom-table {
  text-transform: uppercase;
  width: 100%;
  margin-bottom: 1rem;
  color: #fff;
  background-color: rgba(255, 255, 255);
  box-shadow: 10px -8px 0px rgb(253 230 138);
}

th,
td {
  padding: 0.75rem;
  vertical-align: middle;
  border-top: 1px solid rgba(255, 255, 255, 0.1);
}

th {
  font-weight: bold;
  text-transform: uppercase;
  border-bottom: 5px solid rgb(0, 0, 0) text-align: center;
  font-family: 'Roboto', sans-serif;
}

tbody tr:hover {
  background-color: rgba(255, 255, 255, 0.1);
}

.alert {
  border-radius: 2px !important;
  color: #fff !important;
  font-weight: bold !important;
  font-size: 1rem !important;
  letter-spacing: 0.05em !important;
  font-weight: 300 !important;
  padding: 0.5rem 1rem !important;
}

.alert-success {
  background-color: #007f1e;
  color: rgb(0, 0, 0) !important;
  font-weight: bold !important;
}

.alert-info {
  background-color: #009cb4;
  color: rgb(0, 0, 0) !important;
  font-weight: bold !important;
}

.alert-danger {
  background-color: #520008 !important;
  color: rgb(0, 0, 0) !important;
  font-weight: bold !important;
}

.fancy-color {
  background-color: #4158D0;
  background-image: linear-gradient(43deg, #4158D0 0%, #C850C0 46%, #FFCC70 100%);
}

.custom-title {
  margin-left: -175px !important;
  margin-top: -30px !important;
  margin-bottom: 50px !important;
  padding: 0.5rem 0.5rem !important;
  width: fit-content !important;
  background: rgba(255, 255, 255, 0.9);
}

.welcome-user-text {
  font-size: 1rem !important;
  font-weight: 500 !important;
  letter-spacing: 0.05em !important;
}
还记得我们在urls.py文件中定义了urlpatterns列表吗?列表中的每个URL模式都映射到视图功能。例如,home_view函数映射到我们应用程序的根网址。我们还在应用程序目录中制作了一个templates文件夹。这是我们将所有HTML模板存储并将其链接到相应视图的地方。
只是为了让您了解我们应用的结构,这是templates文件夹的屏幕截图:
我们将在应用程序中创建以下模板,以便您可以继续为其制作空的HTML文件。现在让我们开始写我们的观点和模板。
在编写视图之前,让我们首先在templates文件夹中创建一个base.html文件。该文件将包含将在我们所有模板中使用的通用HTML代码。我们将使用Bootstrap CSS框架来设计模板。因此,我们将在base.html文件中添加Bootstrap CDN链接。我们还将添加我们在base.html文件中的style.css文件中编写的CSS代码。 base.html文件看起来像这样:
{% load static %}

<!doctype html>
<html lang="en">
  <head>
    <!-- Required meta tags -->
    <meta charset="utf-8">
    <meta name="viewport" content="width=device-width, initial-scale=1, shrink-to-fit=no">

    <!--Custom CSS-->
    <link href="{% static 'css/custom.css' %}" rel="stylesheet">
    <link href="{% static 'css/style.css' %}" rel="stylesheet">

    <!-- Bootstrap CSS -->
    <link rel="stylesheet" href="https://stackpath.bootstrapcdn.com/bootstrap/4.3.1/css/bootstrap.min.css" integrity="sha384-ggOyR0iXCbMQv3Xipma34MD+dH/1fQ784/j6cY/iJTQUOhcWr7x9JvoRxT2MZw1T" crossorigin="anonymous">
    <link href="https://cdnjs.cloudflare.com/ajax/libs/font-awesome/5.13.0/css/all.min.css" rel="stylesheet">


    <!--Clipboard-->
    <script src="https://cdnjs.cloudflare.com/ajax/libs/clipboard.js/2.0.11/clipboard.min.js"></script>

    <!--Sweet Alert-->
    <script src="https://unpkg.com/sweetalert/dist/sweetalert.min.js"></script>


    <title>Crypto App | {% block title %}{% endblock title %}</title>
  </head>
  <body>
    {% include 'navbar.html' %}
    <div class="container">
      {% block content %}
      {% endblock content %}
    </div>
    {% include 'footer.html' %}
    {% block scripts %}
    {% endblock scripts %}

    <!-- Optional JavaScript -->
    <!-- jQuery first, then Popper.js, then Bootstrap JS -->
    <script src="https://code.jquery.com/jquery-3.3.1.slim.min.js" integrity="sha384-q8i/X+965DzO0rT7abK41JStQIAqVgRVzpbzo5smXKp4YfRvH+8abtTE1Pi6jizo" crossorigin="anonymous"></script>
    <script src="https://cdnjs.cloudflare.com/ajax/libs/popper.js/1.14.7/umd/popper.min.js" integrity="sha384-UO2eT0CpHqdSJQ6hJty5KVphtPhzWj9WO1clHTMGa3JDZwrnQq4sF86dIHNDz0W1" crossorigin="anonymous"></script>
    <script src="https://stackpath.bootstrapcdn.com/bootstrap/4.3.1/js/bootstrap.min.js" integrity="sha384-JjSmVgyd0p3pXB1rRibZUAYoIIy6OrQ6VrjIEaFf/nJGzIxFDsf4x0xIM+B07jRM" crossorigin="anonymous"></script>
  </body>
</html>
现在,由于我们在base.html文件中引用了navbar.html和footer.html文件,因此我们需要在templates文件夹中创建这些文件。 navbar.html文件将包含我们应用程序的导航栏,而footer.html文件将包含我们应用程序的页脚。 navbar.html文件看起来像这样:
<nav class="navbar navbar-expand-md">
  <a class="navbar-brand text-light my-2 my-sm-0 custom-nav-logo" href="{% url 'home' %}">Crypto App</a>

    <button class="navbar-toggler" type="button" data-toggle="collapse" data-target="#navbarNav" aria-controls="navbarNav" aria-expanded="false" aria-label="Toggle navigation">
      <span class="navbar-toggler-icon"></span>
    </button>
    <div class="collapse navbar-collapse" id="navbarNav">
      <ul class="navbar-nav mr-auto">
      </ul>
      <ul class="navbar-nav">
        {% if user.is_authenticated %}
        <div class="btn-group" role="group">
          <a class="btn btn-primary my-2 my-sm-0 mr-2" href="{% url 'portfolio' %}">View My Wallet</a>
          <a class="btn btn-danger my-2 my-sm-0 mr-2" href="{% url 'logout' %}">Logout</a>
        </div>


        {% else %}
        <div class="btn-group" role="group">
          <a class="btn btn-primary my-2 my-sm-0 mr-2" href="{% url 'login' %}">Login</a>
          <a class="btn btn-success my-2 my-sm-0" href="{% url 'signup' %}">Signup</a>
        </div>
        {% endif %}
      </ul>
    </div>
  </nav>
footer.html文件看起来像这样:
{% load static %}
<footer>

        <div class="row justify-content-center">
            <div class="col-lg-12 col-md-12 col-sm-12 col-xs-12">
                <div class="copy-right text-center">
                    <p>© 2023 Crypto App. Developed By <a href="#" class="text-light">Atharva Shah</a></p>
                </div>
            </div>
        </div>

</footer>
</div>
现在,模板设置的最后一步是编写alerts.html文件。该文件将包含用于向用户显示警报的代码。在Django中,警报是在某些事件或操作发生后可以向用户显示的消息,例如成功的登录或失败的表单提交。它们是向用户提供有关发生的事情的反馈的一种方式,可以用于传达重要信息或说明。
django提供了一个内置消息框架,使您可以在应用程序中易于使用警报。该框架使您可以创建不同类型的消息,例如成功,警告或错误消息,并自定义显示它们的方式。
alerts.html文件看起来像这样:
{% if messages %}
{% for message in messages %}
<div class="alert alert-{{message.tags}} alert-dismissible fade show w-50 d-flex justify-content-center align-items-center ml-auto mr-auto " role="alert">
{{ message }}
<button type="button" class="close" data-dismiss="alert" aria-label="Close">
<span aria-hidden="true">×</span>
</button>
</div>
{% endfor %}
{% endif %}
设置视图
要使用Django中的视图和模板,我们首先需要导入必要的模块。 requests模块用于将HTTP请求发送到外部API。 auth模块用于用户身份验证相关功能。 messages模块用于向用户显示消息。 decorators模块用于根据某些条件将功能添加到视图中,例如要求用户登录或具有某些权限。 forms模块用于创建映射到Django型号的HTML表单。 models模块用于定义应用程序的数据库架构和ORM。
我们可以使用views.py中的以下代码段导入这些模块,因为我们将在视图中使用它们:
import requests
from django.contrib import auth, messages
from django.contrib.auth import authenticate, login, logout
from django.contrib.auth.decorators import login_required, user_passes_test
from django.contrib.auth.forms import AuthenticationForm, UserCreationForm
from django.contrib.auth.hashers import make_password
from django.contrib.auth.models import User
from django.contrib.auth.tokens import default_token_generator
from django.core.exceptions import PermissionDenied
from django.db import IntegrityError
from django.http import HttpResponse, HttpResponseNotAllowed
from django.shortcuts import redirect, render
from django.template.defaultfilters import slugify
from django.utils.http import urlsafe_base64_decode

from .forms import CustomUserCreationForm
from .models import Cryptocurrency, Portfolio, Profile, Referal
一旦导入这些模块,我们就可以开始编写视图和模板来为应用程序创建所需的功能。
ð - 请注意,这些观点的大多数彼此取决于彼此,因此我们建议您遵循此处呈现的顺序。并在最后对其进行测试,因为它们都是互连的,并且如果尚未创建因视图/模板,您可能会发现错误。
报名
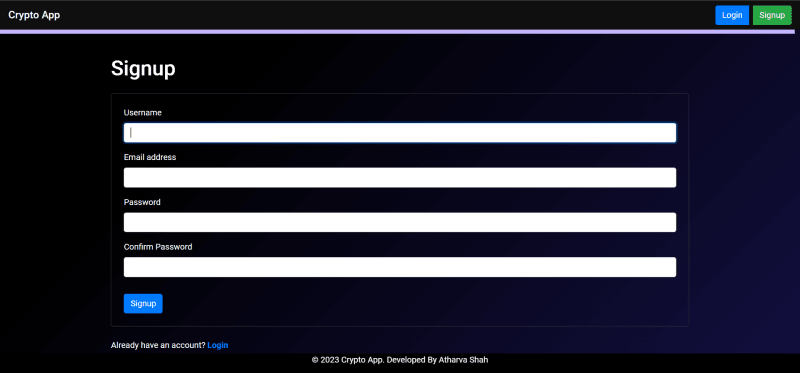
让我们从signup_view函数开始。此视图映射到urls.py文件中的/signup/ URL模式。 signup_view函数负责向用户显示注册表单,并在该表单有效时创建新的用户帐户。
def signup_view(request):
    # check if user is already logged in
    if request.user.is_authenticated:
        return redirect('portfolio')

    if request.method == 'POST':
            form = CustomUserCreationForm(request.POST)

            if form.is_valid():
                user = form.save(commit=False)
                user.password = make_password(form.cleaned_data['password1'])
                user.email = form.cleaned_data['email']
                user.save()
                messages.success(request, 'You have successfully signed up!', extra_tags='success')
                return redirect('login')
    else:
        form = CustomUserCreationForm()
    return render(request, 'signup.html', {'form': form})


# block access to signup page if user is already logged in
def signup_with_referrer_view(request, referral_code):

    # check if user is already logged in
    if request.user.is_authenticated:
        return redirect('portfolio')

    try:
        # get the User Profile of the referrer
        referrer = User.objects.get(profile__referral_code=referral_code)
    except User.DoesNotExist:
        # show error message if referrer does not exist
        return HttpResponse("Referrer does not exist")

    if request.method == 'POST':
        form = CustomUserCreationForm(request.POST)
        if form.is_valid():
            user = form.save(commit=False)
            user.password = make_password(form.cleaned_data['password1'])
            user.email = form.cleaned_data['email']
            user.save()
            # create a referral instance
            referral = Referal.objects.create(user=user, referrer=referrer)
            referral.save()

            if referrer is not None:
                referrer.profile.bonus += 100  # add referral bonus to referrer
                referrer.profile.save()
                messages.success(request, f'{referrer.username} recieved a bonus of 100 points from you because you signed up using their referral link!')


            messages.success(request, 'You have successfully signed up!')
            return redirect('login')
    else:
        form = CustomUserCreationForm()

    return render(request, 'signup.html', {'form': form, 'referrer': referrer})
这是两个视图,可以处理有或没有推荐代码的用户注册。
第一个视图是signup_view。它检查了用户是否已经登录。如果用户登录,则将被重定向到其投资组合页面。如果请求方法已发布,它将验证用户的输入,创建新用户并将其保存在数据库中。密码在保存之前先进行哈希。如果表单不有效,它将呈现相同的模板,并显示错误。如果请求方法未发布,则视图将呈现注册表格。在这两种情况下,视图都将呈现signup.html模板。
第二视图是signup_with_referrer_view。它首先检查用户是否已经登录。如果是,则将重定向到其投资组合页面。然后,它将尝试使用URL中传递的推荐代码找到转介用户。如果转介不存在,它将显示一个错误消息。如果请求方法已发布,它将验证表单输入并创建新用户并将其保存在数据库中。它还将创建一个新的推荐实例并将其保存在数据库中。转介实例将将新用户链接到推荐子。它还将在推荐人的个人资料中添加100点的推荐奖金。最后,它将通过成功消息将用户重定向到登录页面。如果请求方法不发布,则该视图将呈现注册表格,并在页面上显示的转介符的用户名。在这两种情况下,该视图都将呈现cignup.html模板,并带有表单和推荐人的用户名(如果存在)。
现在,signup.html模板将通过两种视图呈现。它将向用户显示注册表格。为了制作表单并在模板中渲染,我们将使用Django表单模块。我们将在CryptoApp目录中创建一个名为forms.py的新文件,并向其添加以下代码。
from django import forms
from django.contrib.auth.forms import UserCreationForm
from django.contrib.auth.models import User


class CustomUserCreationForm(UserCreationForm):
    username = forms.CharField(required=True, label='Username', help_text='Required. 150 characters or fewer. Letters, digits and @/./+/-/_ only.', widget=forms.TextInput(attrs={'class': 'form-control'}))

    email = forms.EmailField(required=True, label='Email', help_text='Required. Enter a valid email address.', widget=forms.TextInput(attrs={'class': 'form-control'}))

    password1 = forms.CharField(required=True, label='Password', help_text='Required. Enter a valid password.', widget=forms.PasswordInput(attrs={'class': 'form-control'}))

    password2 = forms.CharField(required=True, label='Password confirmation', help_text='Enter the same password as before, for verification.', widget=forms.PasswordInput(attrs={'class': 'form-control'}))

    class Meta:
        model = User
        fields = ['username', 'email', 'password1', 'password2']
现在准备好表单,我们可以将其呈现在Ingip.html模板中。我们将在模板目录中创建一个名为signup.html的新文件,并在其中添加以下代码。
{% extends 'base.html' %}
{% block title %}
Sign Up
{% endblock title %}
{% block content %}
<h1 class="mb-4">Signup</h1>
<form method="post" class="my-4 p-4 border border-dark rounded">
  {% csrf_token %}
  <div class="form-group">
    <label for="username">Username</label>
        {{ form.username }}

  </div>
  <div class="form-group">
    <label for="email">Email address</label>
    {{ form.email }}
  </div>
  <div class="form-group">
    <label for="password1">Password</label>
    {{ form.password1 }}
  </div>
  <div class="form-group">
    <label for="password2">Confirm Password</label>
    {{ form.password2 }}
  </div>
  <button type="submit" class="btn btn-primary mt-3">Signup</button>


</form>

{% if form.errors %}
  <div class="alert alert-danger mt-3 mb-5">
    <strong>Error:</strong> {{ form.errors }}
  </div>
{% endif %}

<div class="mt-3">
  Already have an account? <a href="{% url 'login' %}" class="text-primary font-weight-bold">Login</a>
</div>

{% endblock %}
这是扩展基本模板的注册页面的Django模板。它显示带有用户名,电子邮件,密码和确认密码的字段的注册表格。如果有任何形式错误,则将它们显示在警报框中。它还包括指向登录页面的链接。该模板使用Django的模板语言显示表单字段和错误。
以来,由于用户注册后,我们想为他们制作一个配置文件,我们将在CryptoApp目录中创建一个名为signals.py的新文件,并向其添加以下代码。
import shortuuid
from django.contrib.auth.models import User
from django.db.models.signals import post_save
from django.dispatch import receiver

from .models import Profile

# This file is used to generate a referral code for each user as soon as they sign up.
def generate_referral_code():
    return shortuuid.ShortUUID().random(length=10)

@receiver(post_save, sender=User)
def create_profile(sender, instance, created, **kwargs):
    if created:
        profile = Profile.objects.create(user=instance, referral_code=generate_referral_code())
        profile.save()
该信号代码在注册后立即为用户生成转介代码。它通过收听用户模型发送的"post_save"信号来做到这一点。创建新的用户实例时,此信号会触发"create_profile"函数,该功能为该用户创建一个配置文件实例,并使用Shortuuid库生成唯一的推荐代码。然后将此生成的推荐代码保存到配置文件实例。
现在注册此信号,我们将更改apps.py文件。
from django.apps import AppConfig


class MainappConfig(AppConfig):
    default_auto_field = "django.db.models.BigAutoField"
    name = "mainapp"

    def ready(self):
        import mainapp.signals
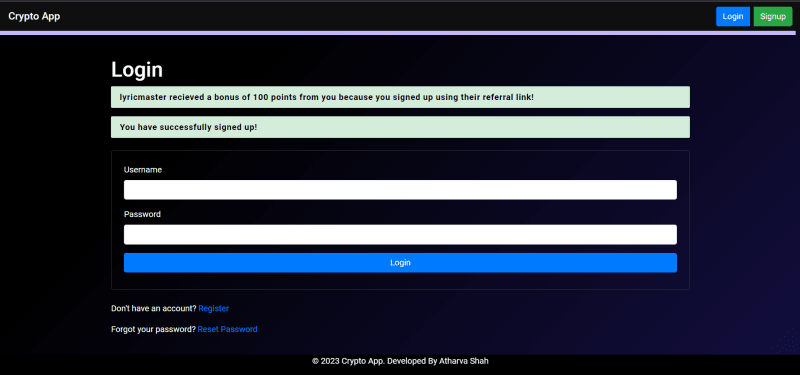
登录屏幕
登录页面的视图将与注册视图相似。在views.py中继续添加以下代码。
def login_view(request):
    # check if user is already logged in
    if request.user.is_authenticated:
        return redirect('portfolio')

    if request.method == 'POST':
        form = AuthenticationForm(request, data=request.POST)
        if form.is_valid():
            username = form.cleaned_data.get('username')
            raw_password = form.cleaned_data.get('password')
            user = authenticate(request, username=username, password=raw_password)
            if user is not None:
                login(request, user)
                return redirect('portfolio')
        else:
            messages.error(request, "Invalid username or password.", extra_tags='danger')
    else:
        form = AuthenticationForm()
    return render(request, 'login.html', {'form': form})


@login_required(login_url="login")
def logout_view(request):
    logout(request)
    messages.success(request, 'You have successfully logged out!')
    return redirect('home')
这是与Django Web应用程序中用户身份验证相关的两个视图。
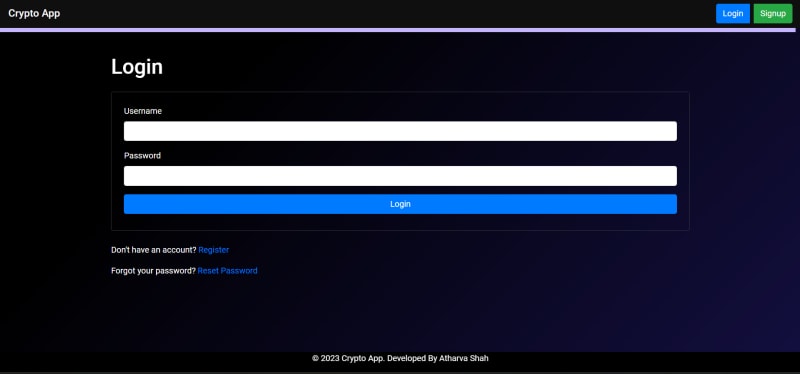
login_view处理用户登录过程。它检查用户是否已经登录,如果没有登录,则从表单中接受具有登录凭据(用户名和密码)的发布请求,并使用Django的内置authenticationform表单验证它们,并在用户身上记录用户,如果它们已进行了认证, 。如果表单无效,它将显示一个错误消息。如果请求不是发布请求,则显示登录表格。
logout_view处理用户注销过程。它使用Django的注销功能来注销用户,显示成功消息,并将用户重定向到主页。此视图要求用户登录,如果不是,则将其重定向到login_required Decorator的login_url参数中指定的登录页面。
登录页面的HTML模板类似于注册页。在模板目录中创建一个名为login.html的新文件,然后向其添加以下代码。
{% extends 'base.html' %}
{% block title %}
Login
{% endblock title %}
{% block content %}
  <h1>Login</h1>
  {% for message in messages %}
    <p class="alert alert-{{ message.tags }}">{{ message }}</p>
  {% endfor %}
  <form method="post" class="my-4 p-4 border border-dark rounded">
    {% csrf_token %}
    <div class="form-group">
      <label for="username">Username</label>
      <input type="text" name="username" class="form-control">
    </div>
    <div class="form-group">
      <label for="password">Password</label>
      <input type="password" name="password" class="form-control">
    </div>
    <button type="submit" class="btn btn-primary btn-block my-2">Login</button>
  </form>

  <p>Don't have an account? <a href="{% url 'signup' %}">Register</a></p>
  <p>Forgot your password? <a href="{% url 'password_reset' %}">Reset Password</a></p>
{% endblock %}
现在准备就绪登录视图,我们也可以照顾忘记密码功能。
忘记密码页面
密码重置电子邮件
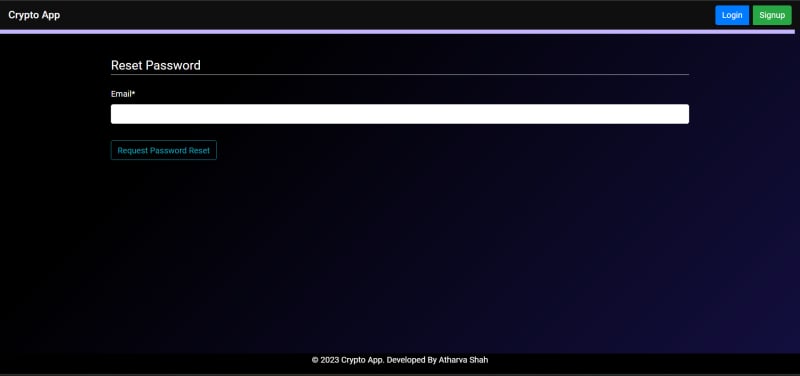
为了使您的精神分组,我们将忘记密码查看模板并将其保存在templates目录内的reset文件夹中。在reset目录中创建一个名为password_reset.html的新文件,然后向其添加以下代码。
{% extends "base.html" %}
{% load crispy_forms_tags %}
{% block content %}
    <div class="content-section">
        <form method="POST">
            {% csrf_token %}
            <fieldset class="form-group">
                <legend class="border-bottom mb-4">Reset Password</legend>
                {{ form|crispy }}
            </fieldset>
            <div class="form-group">
                <button class="btn btn-outline-info" type="submit">Request Password Reset</button>
            </div>
        </form>
    </div>
{% endblock content %}
现在,制作一个称为password_reset_done.html的文件。它将显示一条消息,即已将电子邮件发送给用户的电子邮件ID。
{% extends "base.html" %}
{% block content %}
    <div class="alert alert-info">
        An email has been sent with instructions to reset your password
    </div>
{% endblock content %}
用户单击此链接后,他将被重定向到密码重置页面。在这里,他可以输入他的新密码并确认。
因此,为此目的
现在,制作一个称为password_reset_confirm.html的文件。它将提示新密码。
{% extends "base.html" %}
{% load crispy_forms_tags %}
{% block content %}
    <div class="content-section">
        <form method="POST">
            {% csrf_token %}
            <fieldset class="form-group">
                <legend class="border-bottom mb-4">Reset Password</legend>
                {{ form|crispy }}
            </fieldset>
            <div class="form-group">
                <button class="btn btn-outline-info" type="submit">Reset Password</button>
            </div>
        </form>
    </div>
{% endblock content %}
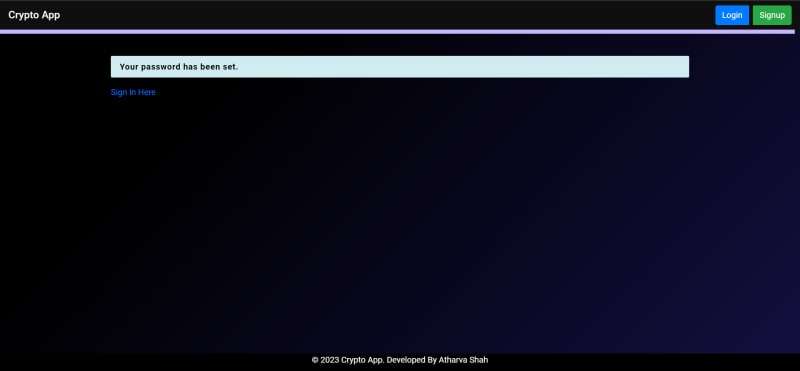
制作一个名为password_reset_complete.html的最终文件。它将显示一条消息说密码已成功更改。
{% extends "base.html" %}
{% block content %}
    <div class="alert alert-info">
        Your password has been set.
    </div>
    <a href="{% url 'login' %}">Sign In Here</a>
{% endblock content %}
密码重置成功
请记住,我们无需在此处定义任何自定义视图,因为Django为我们提供了密码重置的默认视图。请参阅urls.py文件。
主页
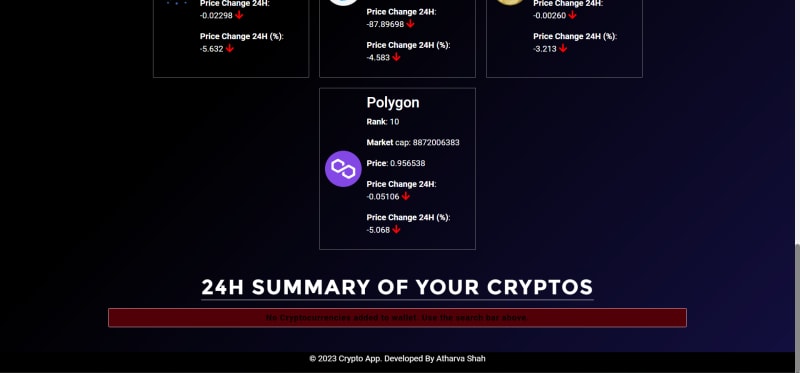
现在让我们专注于主页。我们将在主页上显示前10个加密货币。我们将使用Coingecko API获取数据。
此页面的视图将是:
def home_view(request):
    # get the top 10 crypto currencies by market cap
    top_10_crypto_url_global = 'https://api.coingecko.com/api/v3/coins/markets?vs_currency=USD&order=market_cap_desc&per_page=10&page=1&sparkline=true'
    top_10_crypto_data_global = requests.get(top_10_crypto_url_global).json()

    # check if user is logged in
    if request.user.is_authenticated:

        # get user's crypto currencies
        user_cryptocurrencies = Cryptocurrency.objects.filter(user=request.user)
        user_portfolio = Portfolio.objects.filter(user=request.user).first()

        # get the prices and price changes for user's cryptocurrencies
        names = [crypto.name for crypto in user_cryptocurrencies]
        symbols = [crypto.symbol for crypto in user_cryptocurrencies]
        ids = [crypto.id_from_api for crypto in user_cryptocurrencies]
        prices=[]

        # NOTE: Only showing the price change for the last 24 hours for now and not the percentage change to reduce the number of api calls. Only 10-20 api calls per minute are allowed for free users. Otherwise, I could have used the /coins/{id}/market_chart?vs_currency=usd&days=1 endpoint to get the price change for the last 24 hours and calculate the percentage change from that.

        for crytpo_id in ids:
            prices_url = f'https://api.coingecko.com/api/v3/simple/price?ids={crytpo_id}&vs_currencies=usd&include_24hr_change=true'
            prices_data = requests.get(prices_url).json()

            price_change = prices_data[crytpo_id]['usd_24h_change']
            prices.append(price_change)

        # make a dictionary out of the names and prices
        crypto_price_changes = dict(zip(names, prices))

        context = {
            'top_10_crypto_data_global': top_10_crypto_data_global,
            'user_cryptocurrencies': user_cryptocurrencies,
            'user_portfolio': user_portfolio,
            'crypto_price_changes': crypto_price_changes,
        }

    else:
        context = {'top_10_crypto_data_global': top_10_crypto_data_global}

    return render(request, 'home.html', context)
该函数执行以下操作:
- 将GET请求发送到Coingecko API,以通过美元市值检索十大加密货币的数据。
- 检查用户是否已进行身份验证。
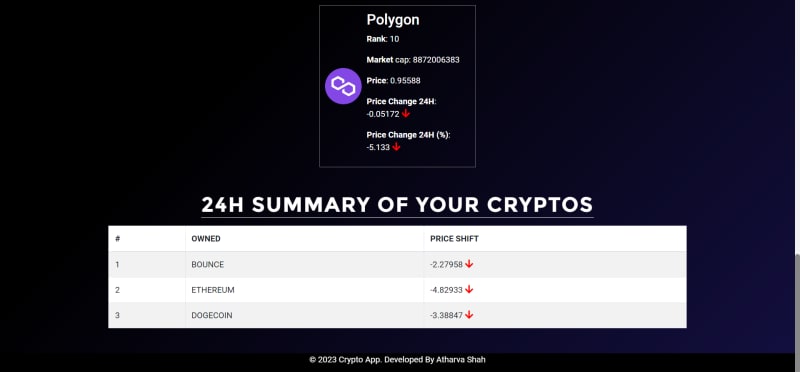
- 如果用户经过身份验证,它将从数据库中检索用户的加密货币,并进行API调用以获取过去24小时的价格和价格更改。
- 创建一个词典将加密货币的名称映射到其价格变化。
- 使用上下文字典渲染主页模板,其中包含十大加密货币数据,用户的加密货币,用户的投资组合和加密货币的价格变化。
视图功能处理未经认证的情况,在这种情况下,它仅呈现带有前10个加密货币数据的主页模板。
coingko api can be found here的JSON响应。
在模板目录中创建一个名为home.html的新文件,然后在其中添加以下代码。
{% extends 'base.html' %}
{% block title %}
Home
{% endblock title %}
{% block content %}
<!--Print messages-->
{% if messages %}
{% for message in messages %}
<div class="alert alert-success alert-dismissible fade show" role="alert">
{{ message }}
<button type="button" class="close" data-dismiss="alert" aria-label="Close">
<span aria-hidden="true">×</span>
</button>
</div>
{% endfor %}
{% endif %}
{% if user.is_authenticated %}
<div class="row justify-content-left custom-title">
<h2 class="text-uppercase text-primary welcome-user-text">Welcome {{ user.username | capfirst }} </h2>
</div>
{% endif %}
<!--SEARCH BAR-->
<div class="container mt-5 mb-5">
<div class="row justify-content-center">
<h2 class="text-center custom-heading">Search Cryptocurrency</h2>
</div>
<div class="row mt-3 justify-content-center">
<div class="col-md-6 col-lg-4">
<form action="{% url 'search' %}" method="post">
{% csrf_token %}
<div class="input-group">
<input class="form-control" type="text" placeholder="Search cryptocurrencies..." name="search_query" required>
<div class="input-group-append">
<button class="btn btn-primary" type="submit">Search</button>
</div>
</div>
</form>
</div>
</div>
</div>
<!--GLOBAL CRYPTO CURRENCIES-->
<div class="row justify-content-center">
<h2 class="text-center mt-5 mb-0 custom-heading"> Top 10 CryptoCurrency Rankings </h2>
</div>
<br><br><br>
<div class="flex-container">
{% if top_10_crypto_data_global %}
{% for obj in top_10_crypto_data_global %}
<div class="crypto-item">
<img src={{obj.image}} height='70'>
<div class="crypto-info">
<h3>{{obj.name}}</h3>
<p><b>Rank</b>: {{obj.market_cap_rank}}</p>
<p><b>Market</b> cap: {{obj.market_cap}}</p>
<p><b>Price</b>: {{obj.current_price}}</p>
<p><b>Price Change 24H</b>: {{obj.price_change_24h|floatformat:5 }}
{% if obj.price_change_percentage_24h > 0 %}
<i class="fa fa-arrow-up green-arrow"></i>
{% else %}
<i class="fa fa-arrow-down red-arrow"></i>
{% endif %}
</p<b>
<p><b>Price Change 24H (%)</b>: {{obj.price_change_percentage_24h|floatformat:3 }}
{% if obj.price_change_percentage_24h > 0 %}
<i class="fa fa-arrow-up green-arrow"></i>
{% else %}
<i class="fa fa-arrow-down red-arrow"></i>
{% endif %}
</p>
</div>
</div>
{% endfor %}
{% else %}
<h3>No data</h3>
{% endif %}
</div>
<!--USER CRYPTO CURRENCIES-->
{% if user.is_authenticated %}
<div class="row justify-content-center">
<h2 class="text-center mt-5 mb-3 custom-heading">24H Summary of Your Cryptos </h2>
</div>
{% if user_cryptocurrencies %}
<div class="table-responsive">
<table class="table table-striped table-bordered custom-table">
<thead>
<tr>
<th>#</th>
<th>Owned</th>
<th>Price Shift</th>
</tr>
</thead>
<tbody>
{% for k, v in crypto_price_changes.items %}
<tr>
<td>{{ forloop.counter }}</td>
<td>{{ k }}</td>
<td>{{ v | floatformat:5}}
{% if v > 0 %}
<i class="fa fa-arrow-up green-arrow"></i>
{% else %}
<i class="fa fa-arrow-down red-arrow"></i>
{% endif %}
</td>
</tr>
{% endfor %}
</tbody>
</table>
{% else %}
<h3 class="text-center alert alert-danger">No Cryptocurrencies added to wallet. Use the search bar above. </h3>
</div>
{% endif %}
{% endif %}
<br><br><br>
{% endblock content %}
{% block scripts %}
{% endblock scripts %}
此DJANGO模板用于显示一个具有两个部分的加密货币仪表板:全球前10个加密货币和用户拥有的加密货币,并在过去24小时内的价格变化。它还包括一个搜索栏,以查找特定的加密货币。逻辑涉及检查用户是否经过身份验证,使用for循环显示数据,并使用条件语句显示适当的消息和符号。
添加货币 /搜索结果页面
让我们移至搜索页面,可以通过查找顶部的主页搜索框中的加密货币访问。添加以下视图:
@login_required(login_url="login")
def search_view(request):
    if request.method != 'POST':
        # return HTTP status code 405 if the request method is not POST along with a message
        return HttpResponseNotAllowed(['POST'], 'Only POST requests are allowed for this view. Go back and search a cryptocurrency.')

    if not (search_query := request.POST.get('search_query')):
        return HttpResponse('No crypto currency found based on your search query.')

    api_url = f'https://api.coingecko.com/api/v3/search?query={search_query}'
    response = requests.get(api_url)
    search_results = response.json()
    try:
        data = search_results['coins'][0]
    except IndexError:
        return HttpResponse('No crypto currency found based on your search query.')
    coin_id = data['id']
    image = data['large']
    symbol = data['symbol']
    market_cap = data['market_cap_rank']

    # check if the crypto currency is already in the users portfolio and pass that information to the template
    current_user = request.user
    is_already_in_portfolio = False

    user_cryptocurrencies = Cryptocurrency.objects.filter(user=current_user)
    for cryptocurrency in user_cryptocurrencies:
        if cryptocurrency.name.lower() == coin_id.lower():
            is_already_in_portfolio = True

    context = {
        'data': data,
        'coin_id': coin_id,
        'image': image,
        'symbol': symbol,
        'market_cap': market_cap,
        'is_already_in_portfolio': is_already_in_portfolio,
    }
    return render(request, 'search.html', context)

@login_required(login_url="login")
def add_to_portfolio_view(request):
    if request.method != 'POST':
        return HttpResponse('Need a crypto currency to add to your portfolio. Go back to the home page and search for a crypto currency.')

    # get values from the form
    coin_id = request.POST.get('id')
    quantity = request.POST.get('quantity')
    print(coin_id)

    # get the crypto currency data from the coingecko api based on the coin id
    api_url = f'https://api.coingecko.com/api/v3/coins/{coin_id}'
    response = requests.get(api_url)
    data = response.json()
    print(data)
    # store the name, symbol, current price, and market cap rank of the crypto currency
    user = request.user
    name = data['name']
    id_from_api = data['id']
    symbol = data['symbol']
    current_price = data['market_data']['current_price']['usd']

    try:
        # save the crypto currency to the database
        crypto_currency = Cryptocurrency.objects.create(
            user = user,
            name= name,
            id_from_api= id_from_api,
            symbol= symbol,
            quantity= quantity,
            current_price=current_price,
        )
    except IntegrityError:
        crypto_currency = Cryptocurrency.objects.get(user=user, name=name)
        crypto_currency.quantity += int(quantity)

    crypto_currency.save()

    # calculate the total value of the crypto currency
    total_value = int(quantity) * int(current_price)

    # save the total value of the crypto currency to the database in the portfolio model
    # check if the user already has a portfolio
    if Portfolio.objects.filter(user=user).exists():
        portfolio = Portfolio.objects.get(user=user)
        portfolio.total_value += total_value
    else:
        portfolio = Portfolio(user=user, total_value=total_value)

    portfolio.save()
    messages.success(request, f'{name} has been added to your portfolio.')

    # if all the above steps are successful, redirect the user to the portfolio page
    return redirect('portfolio')
提供的代码由两个Django视图组成:search_view和add_to_portfolio_view。两种视图都需要在访问@login_required装饰器强制执行之前登录用户。
search_view允许用户通过使用搜索查询将邮政请求发送到视图来搜索加密货币。然后,视图与搜索查询查询Coingecko API以检索加密货币的数据。如果查询返回结果,则视图从响应中提取相关信息,并通过检索到的数据呈现模板。
如果用户已经将搜索的加密货币添加到其投资组合中,则视图将信息传递给模板以通知用户。
add_to_portfolio_view负责向用户的投资组合添加加密货币。该视图期望具有加密货币ID和数量的邮政请求。收到后,视图查询Coingecko API以检索加密货币的数据并将其保存到数据库中。如果加密货币已经存在于用户的投资组合中,则视图会更新数量。然后,该视图根据当前价格和数量计算加密货币的总价值,并将其保存到用户的投资组合中。最后,视图将用户重定向到其投资组合页面。
如果用户试图使用get请求访问视图,则视图返回错误消息。
两种视图都使用requests库来查询Coingecko API和HttpResponse和HttpResponseNotAllowed类,以向用户发送HTTP响应。视图还利用Django messages框架向用户发送成功消息。
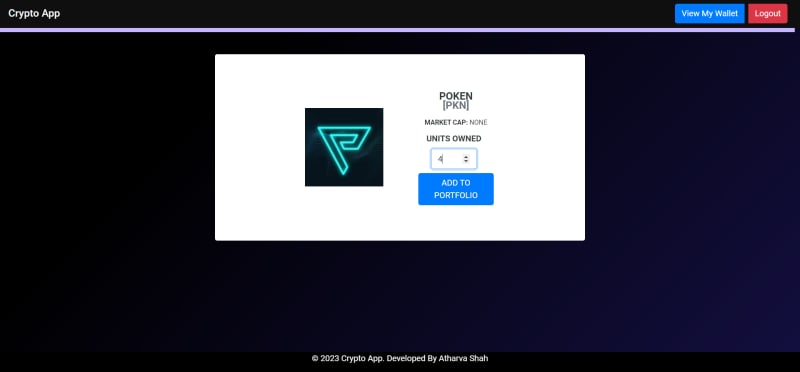
现在,搜索页的模板 - > search.html:
{% extends 'base.html' %} {% block title %} Search Results {% endblock title %} {% block content %}

<div class="text-white border-0 col-md-8 mx-auto mt-5">
  <!-- NOTIFY USER IF THEY HAVE ALREADY ADDED THIS CURRENCY IN THEIR WALLET. ANY NEW ADDITIONS WILL BE INCREMENTED, NOT OVERWRITTEN. -->
  {% if is_already_in_portfolio %}
  <div class="card-body">
    <p class="card-text text-uppercase mb-0"><small>{{ coin_id }} is already in your portfolio.</small></p>
    <p class="card-text"><small>Any changes to the quantity will be reflected in your portfolio. Units will be added to the existing quantity.</small></p>
    <hr class="border-white">
  </div>
  {% endif %}

  <div class="card mb-3 text-center border-0">
    <div class="row justify-content-center align-items-center p-5">

      <div class="col-md-4">
        <img src="{{ image }}" height="150" width="150" class="img-fluid" alt="{{ symbol }}">
      </div>

      <div class="col-md-4">
        <div class="card-body text-dark">
          <h5 class="card-title text-uppercase mb-2"><b>{{ coin_id }}</b><p class="card-subtitle mb-2 text-muted"><b>[{{ symbol }}]</b></p></h5>

          <p class="card-text text-uppercase mb-2"><small><b>MARKET CAP:</b> {{ market_cap }}</small></p>
          <form action="{% url 'add_to_portfolio' %}" method="post" class="d-inline-block">
            {% csrf_token %}
            <input type="hidden" name="id" value="{{ coin_id }}">
            <label class="mr-2 font-weight-bold text-uppercase">Units Owned</label>
            <input type="number" name="quantity" min="1" max="500" value="1" class="form-control d-inline-block w-auto mr-2 mb-2"><br>
            <button type="submit" class="btn btn-primary text-uppercase">Add to Portfolio</button>
          </form>
      </div>
      </div>
    </div>

  </div>
</div>
{% endblock content %} {% block scripts %}  {% endblock scripts %}
此模板用于在投资组合管理应用程序中显示加密货币的搜索结果。它允许用户通过指定拥有的数量来将所选的加密货币添加到其投资组合中。如果加密货币已经在投资组合中,则模板会通知用户,并提供了增加数量的选项。该模板使用bootstrap类用于样式和Django标签来处理表单。
钱包页面
现在,进入项目的最终和最重要的部分,即钱包页面。钱包页面是用户可以在其中查看其添加到其投资组合中的所有加密货币的页面。钱包页面还显示用户投资组合的总价值。钱包页面是应用程序中最重要的页面,因为它是用户可以看到其投资组合的总价值以及他们对投资的损益的页面。
钱包页面的视图如下:
@login_required(login_url="login")
def portfolio_view(request):
    # get the current logged in user
    current_user = request.user

    # get the referal code of the current user
    referral_code = current_user.profile.referral_code

    # get a list of all users who have the current user as their referrer
    referrals = Referal.objects.filter(referrer=current_user)

    # get total bonus earned by the current user
    total_bonus = current_user.profile.bonus

    # get the list of cryptocurrencies owned by the current user
    user_cryptocurrencies = Cryptocurrency.objects.filter(user=current_user)

    if user_portfolio := Portfolio.objects.filter(user=current_user).first():
        portfolio = Portfolio.objects.get(user=current_user)

        # get all the crypto currencies in the portfolio and recalculate the total value of the portfolio
        new_portfolio_value = 0

        user_cryptocurrencies = Cryptocurrency.objects.filter(user=current_user)
        for cryptocurrency in user_cryptocurrencies:
            total_value = cryptocurrency.quantity * cryptocurrency.current_price
            new_portfolio_value += total_value

        portfolio.total_value = new_portfolio_value
        portfolio.save()

        context = {
            'current_user': current_user,
            'referral_code': referral_code,
            'user_cryptocurrencies': user_cryptocurrencies,
            'user_portfolio': user_portfolio,
            'referrals': referrals,
            'total_bonus': total_bonus,
            'new_portfolio_value': new_portfolio_value,
        }
    else:
        context = {
            'current_user': current_user,
            'referral_code': referral_code,
            'user_cryptocurrencies': user_cryptocurrencies,
            'user_portfolio': user_portfolio,
            'referrals': referrals,
            'total_bonus': total_bonus,
        }
    return render(request, 'portfolio.html', context)


@login_required(login_url="login")
def delete_from_portfolio_view(request, pk):
    # get the current logged in user
    user = request.user

    # get the crypto currency object from the database
    crypto_currency = Cryptocurrency.objects.get(pk=pk)

    # delete the crypto currency from the database
    crypto_currency.delete()

    # update the total value of the portfolio
    portfolio = Portfolio.objects.get(user=user)

    # get all the crypto currencies in the portfolio and recalculate the total value of the portfolio
    user_cryptocurrencies = Cryptocurrency.objects.filter(user=user)
    for cryptocurrency in user_cryptocurrencies:
        total_value = cryptocurrency.quantity * cryptocurrency.current_price
        portfolio.total_value += total_value

    portfolio.save()

    # send an alert to the user that the crypto currency has been deleted from the portfolio
    messages.warning(request, f'{crypto_currency.name} has been deleted from your portfolio.')

    return redirect('portfolio')
第一个功能portfolio_view负责渲染用户的投资组合页面。它从数据库中检索了当前用户的信息及其加密货币持有量,以及他们的推荐代码,推荐和总奖金。如果用户具有投资组合,则该函数会根据自己拥有的加密货币的当前价格重新计算其总价值,更新数据库中的投资组合,并将新值添加到上下文中。最后,它使用检索到的信息呈现portfolio.html模板。
第二个功能delete_from_portfolio_view处理从用户的投资组合中删除特定的加密货币。它首先根据其主键从数据库中检索当前用户的信息和特定的加密货币对象。然后,它从数据库中删除加密货币,并根据其剩余持有量重新计算用户投资组合的总价值。最后,它向用户发送警告消息,通知他们已删除了加密货币,并将其重定向到其投资组合页面。
现在,剩下的就是为投资组合页面制作HTML模板。模板如下:
{% extends 'base.html' %}
{% block title %}
Wallet
{% endblock title %}
{% block content %}

{% if messages %}
  {% for message in messages %}
    <div class="alert alert-success" role="alert">
      {{ message }}
    </div>
  {% endfor %}
{% endif %}

<h1 class="mb-4 custom-heading">REFERRALS</h1>
<div class="my-4 py-3 px-4 rounded-lg referral-code">
  <div class="d-flex align-items-center justify-content-between">
    <p class="mb-0">Your Referral Code is <strong>http://localhost:8000/signup/{{ referral_code }}</strong></p>
    <button class="btn btn-dark btn-md copy-btn" onclick="sendToClipboard()"><i class="fas fa-copy"></i></button>
  </div>

  <p class="ml-0 mt-3 mb-0"><a href="http://localhost:8000/signup/{{ referral_code }}">Share this link with your friends to earn 100 points for each friend who signs up!</a></p>
</div>

{% if referrals %}
<div class="mb-5">
<table class="table table-striped table-hover custom-table mt-5">
    <thead>
      <tr>
        <th scope="col">#</th>
        <th scope="col">Referral User</th>
        <th scope="col">Date Joined</th>
      </tr>
    </thead>
    <tbody>
      {% for referral in referrals %}
        <tr>
          <td>{{ forloop.counter }}</td>
          <td>{{ referral.user }}</td>
          <td>{{ referral.user.date_joined }}</td>
        </tr>
      {% endfor %}
    </tbody>
  </table>

  <div class="row mt-5">
    <div class="col-md-6">
      <div class="alert alert-success py-3 mb-3">
        <h4 class="mb-0">Total Referrals</h4>
        <p class="mb-0 display-4">{{ referrals|length }}</p>
      </div>
    </div>
    <div class="col-md-6">
      <div class="alert alert-info py-3 mb-3">
        <h4 class="mb-0 text-dark">Total Points Earned</h4>
        <p class="mb-0 display-4 text-dark">{{ total_bonus }}</p>
      </div>
    </div>
  </div>
</div>
{% else %}
<div class="alert alert-danger my-4 p-3 rounded text-center text-light">
  You have not referred any friends yet.
</div>

{% endif %}

<h1 class="mb-4 mt-5 custom-heading">Wallet for {{ current_user|upper }}</h1>

{% if user_cryptocurrencies %}
  <div class="table-responsive">
    <table class="table table-striped mb-4 mt-2 custom-table">
      <thead>
        <tr>
          <th scope="col">Cryptocurrency</th>
          <th scope="col">Current Price</th>
          <th scope="col">Amount Owned</th>
          <th scope="col">Action</th>
        </tr>
      </thead>
      <tbody>
        {% for crypto in user_cryptocurrencies %}
          <tr>
            <td>{{ crypto.name }}</td>
            <td>{{ crypto.current_price }}</td>
            <td>{{ crypto.quantity }}</td>
            <td><a href="{% url 'delete_from_portfolio' crypto.id %}"><i class="fa fa-trash red-arrow"></i></a></td>
          </tr>
        {% endfor %}
      </tbody>
    </table>
  </div>
    <div class="alert alert-info py-3 mb-3 fancy-color">
      <h4 class="mb-0 text-light">Total Portfolio Value</h4>
      <p class="mt-2 display-4 text-light">${{ new_portfolio_value }}</p>
    </div>


{% else %}
<div class="alert alert-danger my-3 p-3 rounded text-center text-light">
  You have not added any cryptocurrencies to your portfolio yet.
</div>
<p><a class="btn btn-primary" href="{% url 'home' %}">Add Cryptocurrencies</a></p>
{% endif %}

<br><br><br><br>
<script>
  function sendToClipboard() {
    var copyText = document.querySelector(".referral-code strong");
    copyText.textContent = "http://localhost:8000/signup/" + copyText.textContent;
    var textArea = document.createElement("textarea");
    textArea.value = copyText.textContent;
    document.body.appendChild(textArea);
    textArea.select();
    document.execCommand("Copy");
    textArea.remove();
    alert("Copied to clipboard");
  }
</script>
{% endblock %}
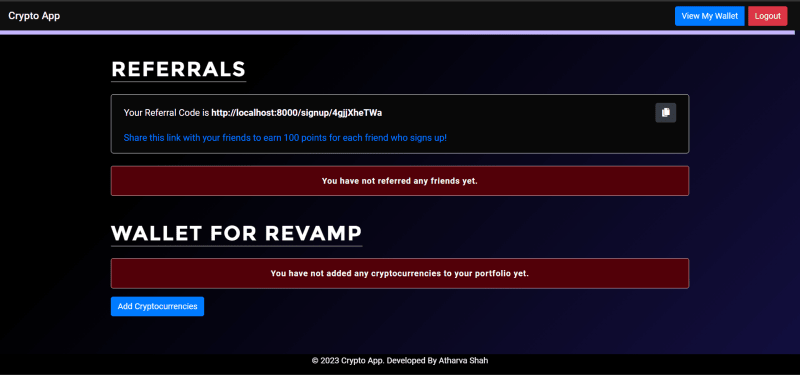
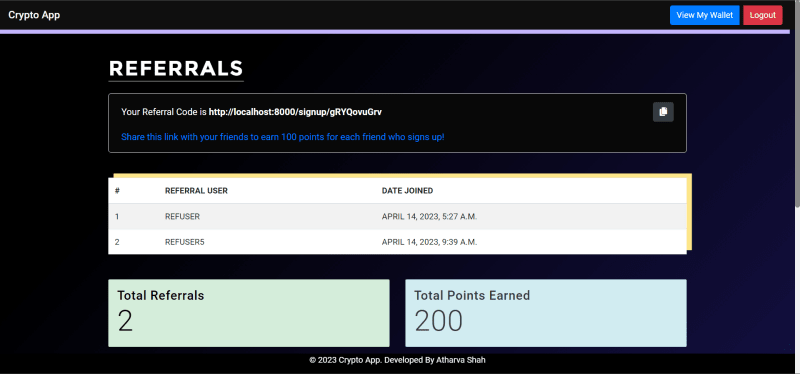
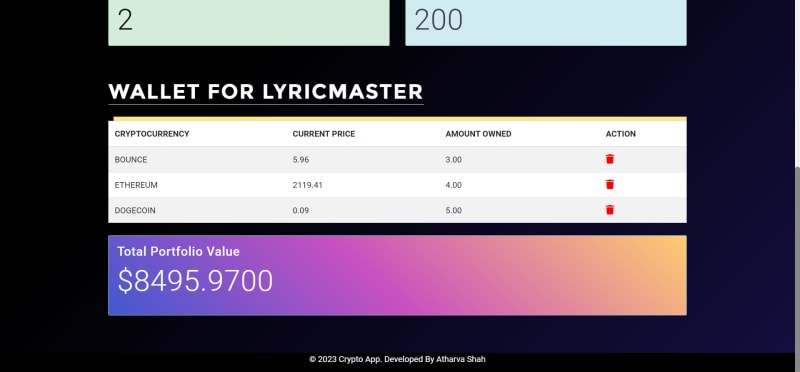
此Django模板生成一个网页,该网页显示两个主要部分:推荐和加密货币投资组合。推荐部分显示了用户的推荐链接和用户进行的所有转介的表。用户可以复制推荐链接以与朋友共享,并为每个成功推荐赢得奖励积分。加密货币投资组合部分显示了用户当前拥有的所有加密货币及其当前价格和数量的表。还显示了总投资组合值。如果用户没有在投资组合中添加任何加密货币,则会显示一条消息,提示他们添加一些消息。该模板还包括一个JavaScript函数,用于将转介链接复制到剪贴板时,当用户单击“复制”按钮时。
运行加密应用程序
现在,关于加密应用程序。让我们运行该应用程序,看看它的外观。在终端中运行以下命令:
python manage.py makemigrations
python manage.py migrate
python manage.py runserver
现在,在浏览器中打开以下URL http://localhost:8000/signup。该应用程序应显示应用程序的主页。您可以注册一个新帐户,然后登录到应用程序。登录后,您将被重定向到主页。您可以在投资组合中添加加密货币,然后在投资组合页面上查看投资组合和推荐。您也可以将推荐链接复制到剪贴板并与您的朋友分享以赚取奖金。
结论
在本大型教程的第二部分中,我们学习了如何使用Django构建加密货币投资组合Web应用程序。
在我们的Django开发旅程中,我们介绍了以下主题:
- 使用Coingecko API获取最新的加密货币价格以及如何使用Django Orm将数据存储在数据库中。
- Django的身份验证系统创建用户帐户。
- Django消息框架向用户显示消息。
- Django的模板系统生成动态网页。
- django orm查询数据库并执行各种操作,例如获取数据,更新和从数据库中删除数据,并编写复杂的查询。
- 使用django orm执行汇总查询并在数据库上加入。
- 对特定数据类型(例如JSON,Arrays,uuid)进行交易,日期和时间查询以及数据库中的查询。
- 编写高度指定的视图,装饰器和请求方法来处理复杂的业务后端逻辑,例如向投资组合添加加密货币,从投资组合中删除加密货币等等。 。
总的来说,我们涵盖了Django开发的各个方面,这将有助于我们构建强大而可扩展的Web应用程序。在本教程的最后部分,在下一篇文章中,我们将介绍测试所有端点,视图和模型,因此绝对不要错过。


