创建一个既吸引力又易于使用的课程目录可能是一个挑战。但是,通过Pink Design和Nuxt.js的组合,我们可以为用户设计出色而直观的目录。
在本文中,我们将学习如何构建一个课程目录,允许用户搜索,通过可用课程进行过滤以及查看课程描述和先决条件。
沙箱
我们在Code Sandbox中完成了该项目;叉并运行它以快速入门。
GitHub存储库
 Olanetsoft
/
Course-Catalog-With-Pink-Design-Nuxt.js
这是一篇文章的项目,旨在构建课程目录,该目录允许用户通过可用的课程搜索和过滤,查看课程描述和先决条件。
Course-Catalog-With-Pink-Design-and-Nuxt
Build Setup
# install dependencies
$ yarn install

# serve with hot reload at localhost:3000
$ yarn dev

# build for production and launch server
$ yarn build
$ yarn start

# generate static project
$ yarn generate
For detailed explanation on how things work, check out the documentation.
特殊目录
您可以创建以下额外目录,其中一些目录具有特殊的行为。仅需要pages;如果您不想使用它们的功能,则可以删除它们。
assets
资产目录包含您未编译的资产,例如手写笔或SASS文件,图像或字体。
有关此目录在the documentation中使用的更多信息。
components
组件目录包含您的vue.js组件。组件组成页面的不同部分,可以重复使用并导入到您的页面,布局甚至其他组件中。
有关此目录使用的更多信息
nuxt.js入门
Nuxt.js是我们vue.js项目的基石,提供结构和灵活性,同时让我们自信地扩展。
它是可扩展的,提供了强大的模块生态系统和钩引擎。集成我们的休息或GraphQL端点,喜欢的CMS,CSS框架和其他第三方应用程序是无缝的。
项目设置和安装
为了创建一个新项目,我们将使用下面的命令来踩新项目:
npx create-nuxt-app <project-name>
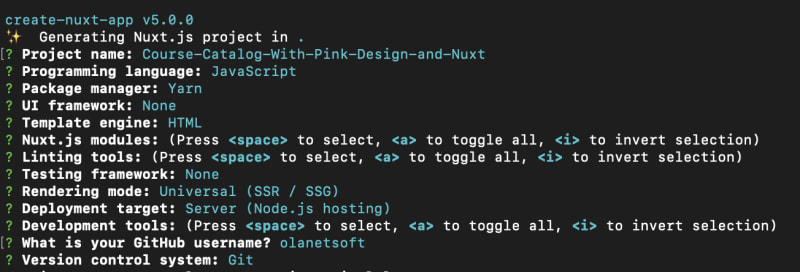
命令将出现一系列提示。这是我们建议的默认值:
上面的命令创建一个新的nuxt.js项目。
接下来,我们导航到项目目录并使用以下命令启动开发服务器。
cd <project name> && yarn dev
nuxt.js将在http://localhost:3000默认访问一个热线装饰的开发环境。
AppWrite粉红色设计设置
要在此项目中设置Appwrite粉红色设计,我们将使用Appwrite pink design CDN配置我们的项目。导航到根目录中的nuxt.config.js并添加以下配置。
    export default {
      // Global page headers: https://go.nuxtjs.dev/config-head
      head: {
         //...
        link: [
          { rel: "icon", type: "image/x-icon", href: "/favicon.ico" },
          {
            rel: "stylesheet",
            href: "https://unpkg.com/@appwrite.io/pink",
          },
          {
            rel: "stylesheet",
            href: "https://unpkg.com/@appwrite.io/pink-icons",
          },
        ],
      },

     //...
    };
创建样本课程目录JSON
在此步骤中,我们将创建一个样本课程目录,我们将在应用程序中用作课程的数据库。在项目的根中,创建一个名为courses.json的新JSON文件并添加以下课程示例。
    [
      {
        "id": 1,
        "title": "Introduction to Web Development",
        "description": "Learn the basics of web development with HTML, CSS, and JavaScript.",
        "level": "Beginner",
        "prerequisites": [],
        "category": 1
      },
      {
        "id": 2,
        "title": "Advanced Web Development",
        "description": "Build complex web applications with React, Node.js, and MongoDB.",
        "level": "Intermediate",
        "prerequisites": ["Introduction to Web Development"],
        "category": 1
      },
      {
        "id": 3,
        "title": "Introduction to Mobile Development",
        "description": "Learn the basics of mobile development with React Native and Expo.",
        "level": "Beginner",
        "prerequisites": ["Introduction to Web Development"],
        "category": 2
      },
      {
        "id": 4,
        "title": "Data Analysis with Python",
        "description": "Learn how to analyze and visualize data using Python and Pandas.",
        "level": "Intermediate",
        "prerequisites": ["Introduction to Web Development"],
        "category": 3
      },
      {
        "id": 5,
        "title": "User Interface Design Fundamentals",
        "description": "Learn the basics of user interface design with Sketch.",
        "level": "Beginner",
        "prerequisites": [],
        "category": 4
      },
      {
        "id": 6,
        "title": "Cloud Computing with AWS",
        "description": "Learn how to deploy and scale web applications on Amazon Web Services.",
        "level": "Intermediate",
        "prerequisites": ["Introduction to Web Development"],
        "category": 5
      }
    ]
在上面的示例数据中,我们为每个记录id,a title,category,description,description,level,prerequisites和category提供标识符。
为课程目录设计布局
让我们通过以下代码段更新pages/index.vue,为本节中的课程目录设计一个具有美观的设计。
    <template>
      <div>
        <div class="container">
          <div class="sidebar">
            <!-- Sidebar content goes here -->
           </div>
          <div class="content">
             <!-- Search and Course list goes here -->
          </div>
        </div>
        <div class="course-modal" v-if="selectedCourse">
          <div class="modal-content">
            <!-- Modal goes here -->
          </div>
        </div>
      </div>
    </template>
让我们通过在根目录中创建一个名为styles.css的新文件并使用以下CSS片段进行更新。
通过使用以下代码段更新pages/index.vue来导入样式。
    <template>
      <!--  -->
    </template>

    <style>
    @import '@/styles.css';
    </style>
开发功能以检索所有课程
在上一步中,我们成功设计了应用程序布局;现在,我们将实现功能,以从我们之前创建的JSON文件中检索所有课程。
在pages/index.vue文件中,使用以下代码段进行更新。
    <template>
      <div>
        <div class="container">
          <div class="sidebar">

          </div>
          <div class="content">
            <h1 class="course-catalogue-title">
              Course Catalog With Pink Design and Nuxt.js
            </h1>
             <!-- Search goes here -->
            <div class="courses">
              <div
                class="course-card"
                v-for="course in filteredCourses"
                :key="course.id"
              >
                <div class="card" @click="openCourseModal(course)">
                  <div class="card-content">
                    <h3 class="title">{{ course.title }}</h3>
                    <div class="description">{{ course.description }}</div>
                    <div class="details">
                      <div class="level">{{ course.level }}</div>
                    </div>
                  </div>

                </div>
              </div>
            </div>
          </div>
        </div>
        </div>
        <div class="course-modal" v-if="selectedCourse">
          <div class="modal-content">
           <!-- Modal goes here -->
          </div>
        </div>
      </div>
    </template>
    <!--  -->

    <!-- Importing data from a JSON file named courses.json -->
    <script>
    import coursesData from '../courses.json'

    export default {
      // Defining the data property of the component
      data() {
        // Returning an object with a key of 'courses' and its value set to the imported coursesData
        return {
          courses: coursesData,
        }
      },
    }
    </script>
在上面的代码段中,
- 我们从名为
courses.json的JSON文件中导入数据。 -
data()函数返回带有courses键的对象及其值设置为导入的coursesData变量。
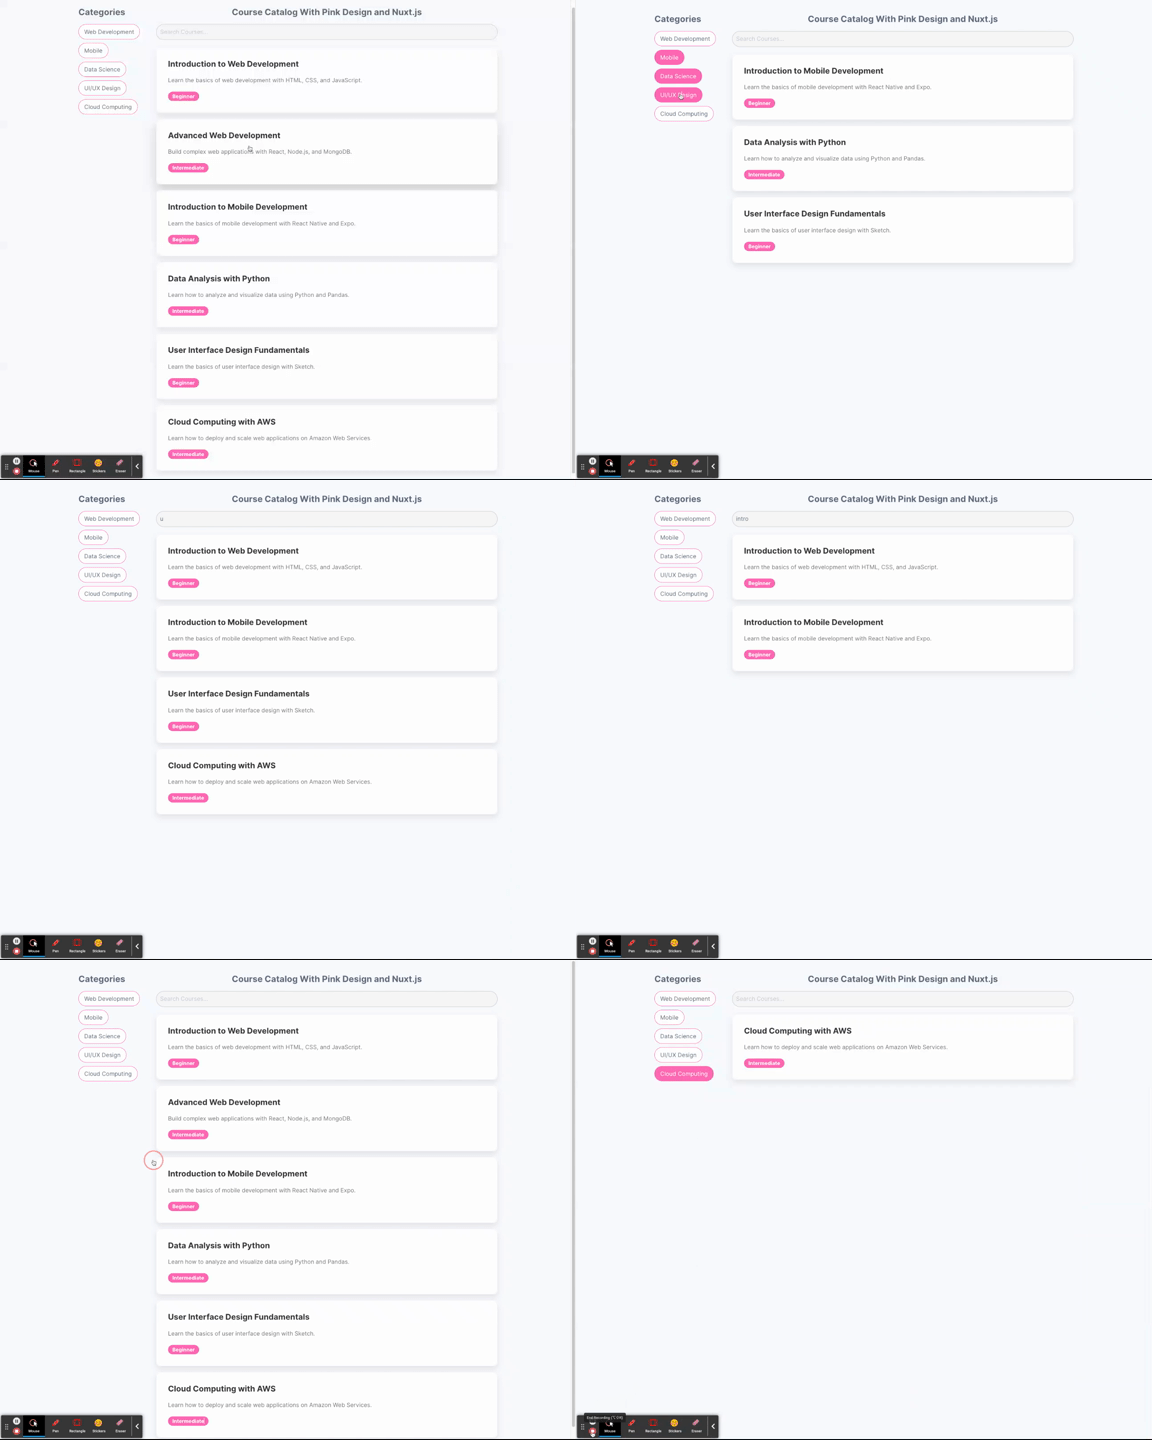
我们应该有类似于下面所示的东西。
在课程目录中添加按类别功能添加搜索和过滤器
在来源中,我们有不同的类别。让我们通过使用以下代码片段更新pages/index.vue文件来实现课程过滤搜索功能以根据课程类别过滤。
在上面的代码段中:
- 使用课程数据使用导入的JSON文件
- 定义了使用导入的课程数据作为初始状态 的vue.js组件
- 创建了组件的数据属性,其中包括搜索
searchQuery,categories和当前选择的类别 - 定义了一个基于搜索查询过滤课程的
computed属性,当前选择的类别 - 返回了组件的计算属性中的过滤课程
我们快到了!我们可以检索所有课程并进行搜索和过滤课程,但我们无法查看各个课程,让我们在下一步中实现它。
实施课程视图功能
要实现课程视图功能,我们将在用户单击单个课程时添加modal以查看课程内容。让我们使用以下代码段更新pages/index.vue文件。
<template>
<div>
<div class="container">
<!-- //... -->
</div>
<div class="course-modal" v-if="selectedCourse">
<div class="modal-content">
<span class="close-modal" @click="closeCourseModal">×</span>
<h2 class="modal-title">{{ selectedCourse.title }}</h2>
<div class="modal-description">{{ selectedCourse.description }}</div>
<div class="details">
<div class="modal-level">{{ selectedCourse.level }}</div>
</div>
<div class="modal-prerequisites">
<h3>Prerequisites</h3>
<ul v-if="selectedCourse.prerequisites.length">
<li
v-for="prerequisite in selectedCourse.prerequisites"
:key="prerequisite"
>
{{ prerequisite }}
</li>
</ul>
<p v-else>None</p>
</div>
</div>
</div>
</div>
</template>
<script>
// Import courses data from JSON file
import coursesData from "../courses.json";
export default {
data() {
return {
//...
selectedCourse: null,
};
},
methods: {
//...
openCourseModal(course) {
this.selectedCourse = course;
},
closeCourseModal() {
this.selectedCourse = null;
},
},
computed: {
//...
},
};
</script>
//...
在上面的代码段中,
- 课程列表容器使用
v-for动态生成了过滤课程列表中每个课程的课程元素 - 每个课程元素都有一个
on-click事件,该事件触发@click="openCourseModal(course)"方法 -
selectedCourse变量设置为course对象,以使用openCourseModal方法显示模式 - 单击关闭模式图标时,
selectedCourse变为null,触发closeCourseModal方法
测试应用程序,我们应该有类似于下面显示的内容。
结论
这篇文章演示了如何设计具有粉红色设计和nuxt.js的用户友好的课程目录。此外,您学会了如何搜索,通过可用课程进行过滤以及查看课程描述和先决条件。


