当我们开始以角度构建应用程序并需要创建形式时,我们必须选择两种口味之一:“反应性”或“模板形式”。
对于初学者而言,模板表格是自然的,对于新的木匠来说似乎不那么复杂,但是一些开发人员可能会说服您“如果您想拥有真正的控制,则必须使用反应性表单”。
我相信确定哪种选项优越的最有效方法是通过解决这两种替代方案的相同问题?
设想
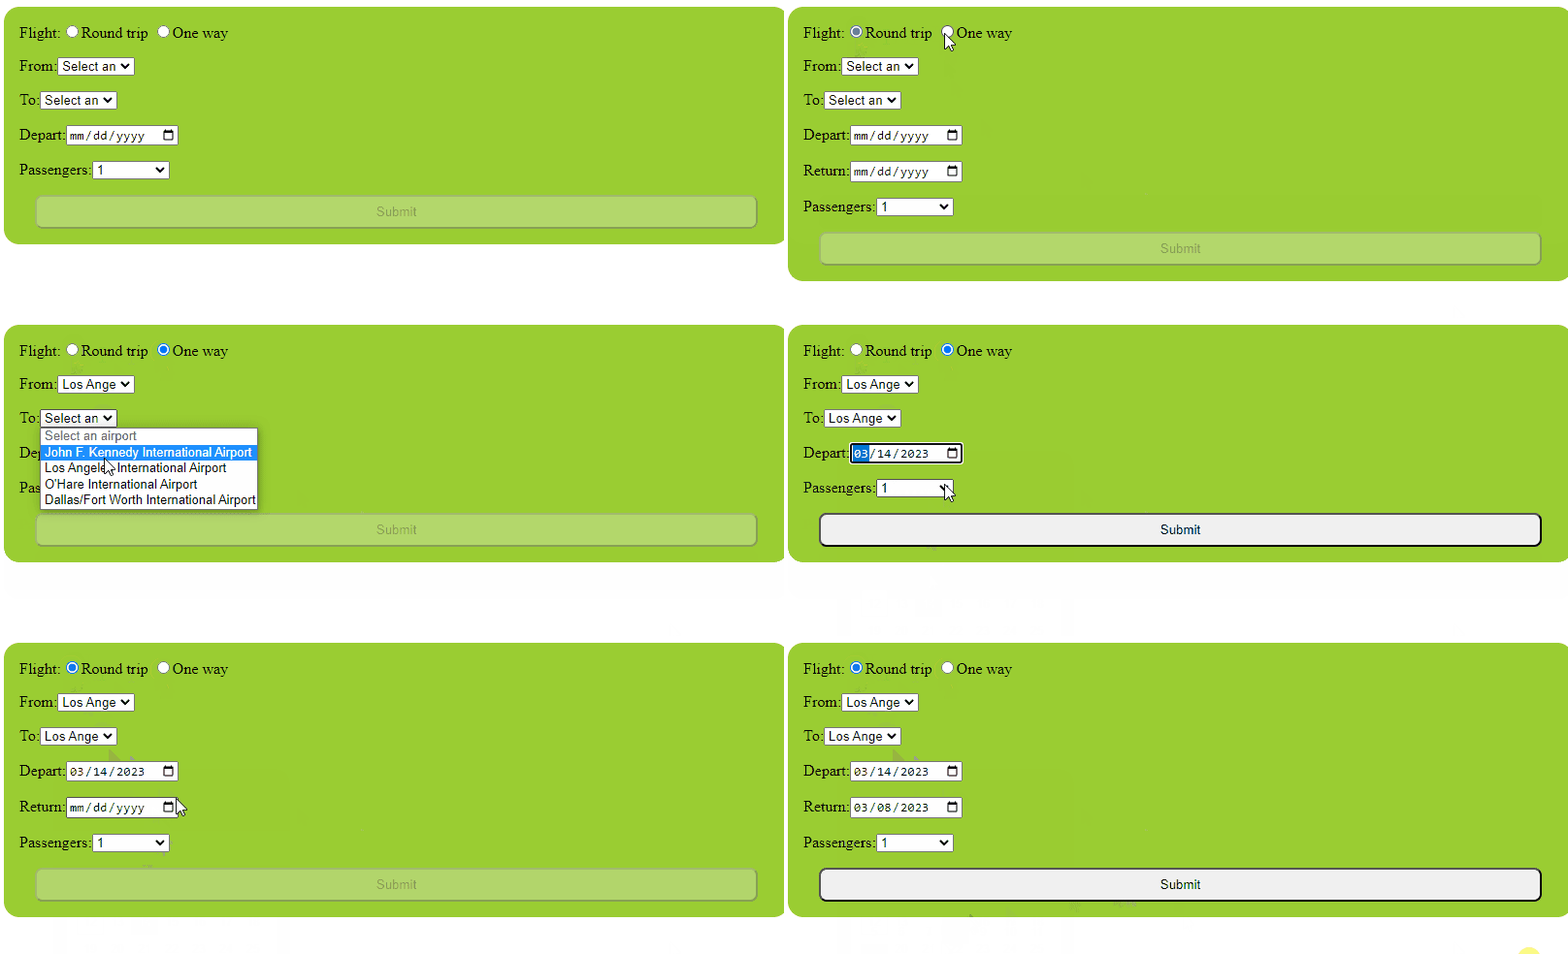
我正在为一家飞行公司的网站工作,该公司需要用户搜索航班的表格
-
一种方法:隐藏返回日期选择器。
-
所有字段都是必需的。
-
如果某些字段为空,则禁用搜索。
表格看起来像这样:
我不专注于UI样式;我主要致力于建立形式及其行为。
在使用这两种方法创建相同的形式之前,让我们首先深入到角度的基础。
开始之前
在核心上,反应性和模板驱动的形式都具有一些共同的特征和行为。
Angular Forms模块提供了用于管理表格的各种内置服务,指令和验证器。
既使用formgroup and formcontrol类来创建和管理表单模型及其数据。模板驱动使与这些类互动变得容易,而反应形式更喜欢更多代码。
虽然反应性和模板驱动的形式在管理形式数据和行为方面有所不同,但它们共享了由角色形式模块提供的一组共同的功能和工具。
模板驱动的形式
让我们使用angular/cli创建模板驱动的表单。
ng g c components/flights
我们必须在app.module
中导入formmodule
打开flights.component.ts并声明我们表格的数据。
import { Component } from '@angular/core';

@Component({
  selector: 'app-flights',
  templateUrl: './flights.component.html',
  styleUrls: ['./flights.component.css']
})
export class FlightsComponent {

  flightType: string = "";
  from: string = "";
  to: string = "";
  depart: string = "";
  return: string = "";
  passengers: number = 1;
  passengerOptions: number[] = [1, 2, 3, 4, 5];

  onSubmit(flightForm: any) {
    console.log(flightForm.value);
  }
}
可以使用双向数据绑定语法访问表单数据,这使您可以将表单数据绑定到组件的属性并进行更新。
首先,使用ngForm声明#flightForm对象的形式,并添加以选择飞行类型,原点和目的地机场,出发和返回日期以及乘客的数量的表单控件。
使用ngModel指令绑定到组件中的属性,该指令启用双向数据绑定。在表单模板中,我们添加required属性和[disabled]属性以根据表格的有效性启用或禁用提交按钮。
<form #flightForm="ngForm" (ngSubmit)="onSubmit(flightForm)" novalidate>
  <div>
    <label>Flight:</label>
    <input
      type="radio"
      name="flightType"
      value="roundtrip"
      [(ngModel)]="flightType"
      required
    />Round trip
    <input
      type="radio"
      name="flightType"
      value="oneway"
      [(ngModel)]="flightType"
      required
    />One way
  </div>
  <div>
    <label>From:</label>
    <select name="from" [(ngModel)]="from" required>
      <option value="" disabled>Select an airport</option>
      <option value="JFK">John F. Kennedy International Airport</option>
      <option value="LAX">Los Angeles International Airport</option>
      <option value="ORD">O'Hare International Airport</option>
      <option value="DFW">Dallas/Fort Worth International Airport</option>
    </select>
  </div>
  <div>
    <label>To:</label>
    <select name="to" [(ngModel)]="to" required>
      <option value="" disabled>Select an airport</option>
      <option value="JFK">John F. Kennedy International Airport</option>
      <option value="LAX">Los Angeles International Airport</option>
      <option value="ORD">O'Hare International Airport</option>
      <option value="DFW">Dallas/Fort Worth International Airport</option>
    </select>
  </div>
  <div>
    <label>Depart:</label>
    <input type="date" name="depart" [(ngModel)]="depart" required />
  </div>
  <div *ngIf="flightType === 'roundtrip'">
    <label>Return:</label>
    <input type="date" name="return" [(ngModel)]="return" required />
  </div>
  <div>
    <label>Passengers:</label>
    <select name="passengers" [(ngModel)]="passengers" required>
      <option value="" disabled>Select number of passengers</option>
      <option *ngFor="let i of passengerOptions" [value]="i">{{ i }}</option>
    </select>
  </div>
  <button type="submit" [disabled]="!flightForm.valid">Submit</button>
</form>
保存更改,我们的表格有效。
模板驱动的表单是用户友好的,并且使用本机HTML属性(如所需),这对于熟悉NGModel的新移民来说是一件轻松的任务。我们的下一个挑战是使用反应性形式进行构建。
反应性形式
再次使用Angular/CLI创建组件,但带有另一个名称。
ng g c components/flights-reactive
我们必须在app.module
中导入formsmodule和reactiveformsModule
打开flaights-reactive.component.ts,从反应性形式开始。
-
声明
flightForm的flightForm对象FormGroup -
添加
airports带有各自的代码和名称,与passengerOptions相同。 -
在构造函数中注入FormBuilder。
-
添加
flightType,from,to,depart,return和return的表单控件,并指定其初始值和验证规则。 -
设置
flightType,from,to,depart和passengersform controls均按照Validators.required进行标记。 -
不需要
return表单控制,因为仅在飞行类型为“往返”时才需要
import { Component } from '@angular/core';
import { FormBuilder, FormGroup, Validators } from '@angular/forms';

@Component({
  selector: 'app-flights-reactive',
  templateUrl: './flights-reactive.component.html',
  styleUrls: ['./flights-reactive.component.css']
})
export class FlightsReactiveComponent {
  flightForm: FormGroup;
  airports: { code: string, name: string }[] = [
    { code: 'JFK', name: 'John F. Kennedy International Airport' },
    { code: 'LAX', name: 'Los Angeles International Airport' },
    { code: 'ORD', name: 'Hare International Airport' },
    { code: 'DFW', name: 'Dallas Fort Worth International Airport' },
  ];
  passengerOptions: number[] = [1, 2, 3, 4, 5];

  constructor(private fb: FormBuilder) {
    this.flightForm = this.fb.group({
      flightType: ['roundtrip', Validators.required],
      from: ['', Validators.required],
      to: ['', Validators.required],
      depart: ['', Validators.required],
      return: [''],
      passengers: [1, Validators.required]
    });
  }
在HTML标记中,我们使用formGroup指令将表单绑定到flightForm,而ngSubmit指令指定提交表单时要调用的方法。
使用formControlName指令,每个表单控件都绑定到flightForm对象中相应的形式控件。例如,用于选择飞行类型的无线电按钮绑定到flightType表单控件,选择原点机场的下拉菜单和目标机场绑定到from和to表单控件,等等。
我们使用*ngIf指令的flightType表单控件的值隐藏返回日期选择器。
最后,使用[disabled]属性无效时,禁用了提交按钮,该属性绑定到flightForm对象的valid属性。
<form [formGroup]="flightForm" (ngSubmit)="onSubmit()">
  <div>
    <label>Flight:</label>
    <input type="radio" formControlName="flightType" value="roundtrip" />Round
    trip <input type="radio" formControlName="flightType" value="oneway" />One
    way
  </div>
  <div>
    <label>From:</label>
    <select formControlName="from">
      <option *ngFor="let airport of airports" [value]="airport.code">
        {{ airport.name }}
      </option>
    </select>
  </div>
  <div>
    <label>To:</label>
    <select formControlName="to">
      <option *ngFor="let airport of airports" [value]="airport.code">
        {{ airport.name }}
      </option>
    </select>
  </div>
  <div>
    <label>Depart:</label>
    <input type="date" formControlName="depart" />
  </div>
  <div *ngIf="flightForm.get('flightType')?.value === 'roundtrip'">
    <label>Return:</label>
    <input type="date" formControlName="return" />
  </div>
  <div>
    <label>Passengers:</label>
    <select formControlName="passengers">
      <option *ngFor="let i of passengerOptions" [value]="i">{{ i }}</option>
    </select>
  </div>
  <button type="submit" [disabled]="!flightForm.valid">Submit</button>
</form>
完成!该表单的工作原理与模板驱动相同。主要区别是FormGroup声明,使用FormBuilder以及使用验证器的每个控件的初始化。
我个人在此过程中没有遇到任何痛苦,也许是因为我一直使用反应性形式。但是,我不能代表那些刚接触该框架的人或来自其他框架的人,因为他们的经历可能有所不同。
差异:
| 模板驱动 | 反应性形式 | |
|---|---|---|
| 形式创建/结构 | 模板语法,基于HTML | 的结构使用FormGroup和FormBuilder | 声明
| 数据绑定 | 双向数据binding[(ngModel)]
|
通过反应性形式控制 | 的显式数据绑定
| 验证 | 使用required和pattern之类的属性在HTML模板中验证规则
|
使用Angular Forms模块提供的验证器 |
总体而言,模板驱动的表单更易于使用,并且需要更少的代码来创建,但是它们提供的灵活性和控制范围比反应性形式更少。
反应性形式更强大,可以对形式行为提供更大的控制,但是它们需要更多的代码,并且更复杂地设置和使用。
您是否想学会迅速建立复杂的形式并形成控件?
Go to learn the Advanced Angular Forms & Custom Form Control Masterclass by Decoded Frontend.
那测试呢?
我不想在我的代码中添加测试而不要完成,并且显示模板驱动和反应性的表格的写作测试并不难。
让我们从模板驱动开始,但首先配置测试床导入FlightFormComponent和FormsModule模块;通过为FlightFormComponent创建ComponentFixture并编译模板来设置测试环境。
接下来,写一些测试:
-
验证表单是通过检查
component变量是真实的。 -
通过将表单字段设置为无效状态并检查提交按钮的
disabled属性是true。 -
通过将表单字段设置为有效状态并检查提交按钮的
disabled属性是false。 -
通过在
onSubmit()方法上设置间谍,在表格上触发提交事件并检查间谍是否已调用Spy。
import { ComponentFixture, TestBed } from '@angular/core/testing';
import { FormsModule } from '@angular/forms';

import { FlightFormComponent } from './flight-form.component';

describe('FlightFormComponent', () => {
  let component: FlightFormComponent;
  let fixture: ComponentFixture<FlightFormComponent>;

  beforeEach(async () => {
    await TestBed.configureTestingModule({
      declarations: [ FlightFormComponent ],
      imports: [ FormsModule ]
    })
    .compileComponents();
  });

  beforeEach(() => {
    fixture = TestBed.createComponent(FlightFormComponent);
    component = fixture.componentInstance;
    fixture.detectChanges();
  });

  it('should create the form', () => {
    expect(component).toBeTruthy();
  });

  it('should disable the submit button when the form is invalid', () => {
    component.flightType = 'roundtrip';
    component.from = 'JFK';
    component.to = 'LAX';
    component.depart = '2022-03-15';
    component.return = '';
    component.passengers = 2;

    fixture.detectChanges();

    const submitButton = fixture.nativeElement.querySelector('button[type="submit"]');
    expect(submitButton.disabled).toBe(true);
  });

  it('should enable the submit button when the form is valid', () => {
    component.flightType = 'oneway';
    component.from = 'JFK';
    component.to = 'LAX';
    component.depart = '2022-03-15';
    component.passengers = 2;

    fixture.detectChanges();

    const submitButton = fixture.nativeElement.querySelector('button[type="submit"]');
    expect(submitButton.disabled).toBe(false);
  });

  it('should call onSubmit() when the form is submitted', () => {
    spyOn(component, 'onSubmit');
    component.flightType = 'oneway';
    component.from = 'JFK';
    component.to = 'LAX';
    component.depart = '2022-03-15';
    component.passengers = 2;

    fixture.detectChanges();

    const form = fixture.nativeElement.querySelector('form');
    form.dispatchEvent(new Event('submit'));
    expect(component.onSubmit).toHaveBeenCalled();
  });
});
反应性形式相似,导入FlightFormComponent和ReactiveFormsModule模块;通过为FlightFormComponent创建ComponentFixture并编译模板来设置测试环境。
接下来,写相同的测试:
-
通过检查组件的
form属性是错误的(因为表单最初是无效的)而创建表单,并且component变量是真实的。 -
通过将表单字段设置为无效状态并检查提交按钮的
disabled属性是true。 -
通过将表单字段设置为有效状态并检查提交按钮的
disabled属性是false。 -
通过在
onSubmit()方法上设置间谍,触发提交事件并检查间谍是否已调用SPY时,将调用onSubmit()方法。
import { ComponentFixture, TestBed } from '@angular/core/testing';
import { ReactiveFormsModule } from '@angular/forms';
import { FlightsReactiveComponent } from './flights-reactive.component';

describe('FlightsReactiveComponent', () => {
  let component: FlightsReactiveComponent ;
  let fixture: ComponentFixture<FlightsReactiveComponent>;

  beforeEach(async () => {
    await TestBed.configureTestingModule({
      declarations: [ FlightsReactiveComponent],
      imports: [ ReactiveFormsModule ]
    })
    .compileComponents();
  });

  beforeEach(() => {
    fixture = TestBed.createComponent(FlightsReactiveComponent);
    component = fixture.componentInstance;
    fixture.detectChanges();
  });

  it('should create the form', () => {
    expect(component.form.valid).toBeFalsy();
    expect(component).toBeTruthy();
  });

  it('should disable the submit button when the form is invalid', () => {
    component.form.controls['flightType'].setValue('roundtrip');
    component.form.controls['from'].setValue('JFK');
    component.form.controls['to'].setValue('LAX');
    component.form.controls['depart'].setValue('2022-03-15');
    component.form.controls['return'].setValue('');
    component.form.controls['passengers'].setValue(2);

    fixture.detectChanges();

    const submitButton = fixture.nativeElement.querySelector('button[type="submit"]');
    expect(submitButton.disabled).toBe(true);
  });

  it('should enable the submit button when the form is valid', () => {
    component.form.controls['flightType'].setValue('oneway');
    component.form.controls['from'].setValue('JFK');
    component.form.controls['to'].setValue('LAX');
    component.form.controls['depart'].setValue('2022-03-15');
    component.form.controls['passengers'].setValue(2);

    fixture.detectChanges();

    const submitButton = fixture.nativeElement.querySelector('button[type="submit"]');
    expect(submitButton.disabled).toBe(false);
  });

  it('should call onSubmit() when the form is submitted', () => {
    spyOn(component, 'onSubmit');
    component.form.controls['flightType'].setValue('oneway');
    component.form.controls['from'].setValue('JFK');
    component.form.controls['to'].setValue('LAX');
    component.form.controls['depart'].setValue('2022-03-15');
    component.form.controls['passengers'].setValue(2);

    fixture.detectChanges();

    const form = fixture.nativeElement.querySelector('form');
    form.dispatchEvent(new Event('submit'));
    expect(component.onSubmit).toHaveBeenCalled();
  });
});
回顾
这个想法是表明这两种解决方案都很好,但是我认为,反应性形式对于需要复杂的验证和数据处理的复杂,动态或形式是理想的。
使用模板驱动的表单比反应性形式更快,更简单地管理表单。这些表格非常适合使用简单的数据处理和验证处理简单的形式,因为它们需要最小的设置代码。
如果您想对每个人有更深入的了解,请查看以下视频。他们提供了对角形式的全面见解。
-
ððððioqian10
ðð½ Advanced Angular Forms by Dmytro
-
ððððiooqian12
leon dewiwje摄于Unsplash
