我的附带项目需要自动化我的Google Nest恒温器,因此我决定尝试Smart Device Management (SDM) API。
设置
我从Nest's Get Started Guide开始。这将详细介绍整个过程,因此我将在此处进行回顾,并在某些地方提供更多上下文。
注册在Nest Device Access Console中创建了一个项目,我最初跳过了Oauth客户端ID和Pub/sub Events设置。
接下来我是created a GCP project访问SDM API。之后,我转到 apis&services>凭据,然后单击创建凭据> oauth client id ,并将其设置为a web应用程序与uris,包括https://www.google.com ,https://www.getpostman.com/oauth2/callback和http://localhost:8080/。
使用创建的OAuth凭据,我将客户端ID 复制到Device Access Console项目中。
最后一步是linking my Nest Google account to the Device Access project,打开此URL:
 https://nestservices.google.com/partnerconnections/ {project-id}/auth
			?redirect_uri = https://www.google.com
			&access_type =离线
			&提示=同意
			&client_id = {oauth2-client-id}
			&response_type =代码
			&scope = https://www.googleapis.com/auth/sdm.service
邮局配置
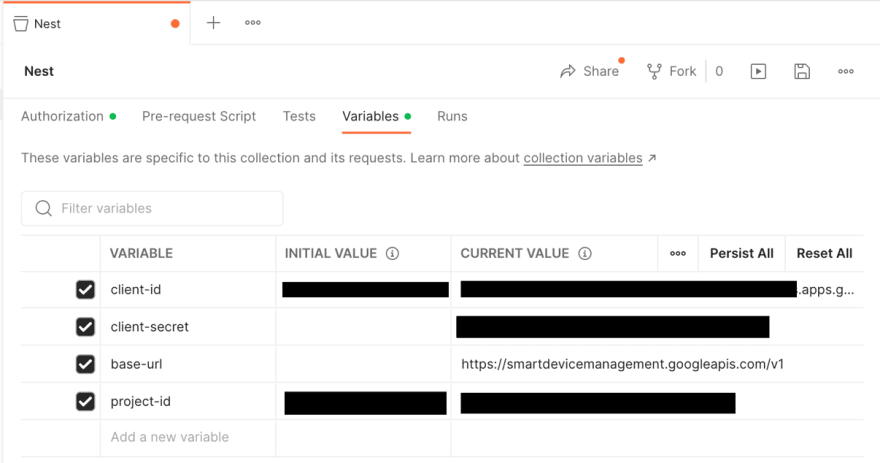
为简单起见,我从Postman开始测试API调用。首先,我在集合级别设置了一些变量,以减少以后的重复和硬编码。
-
{{base-url}}: https://smartdevicemanagement.googleapis.com/v1 -
{{client-id}}:来自GCP OAuth credentials -
{{client-secret}}:来自GCP OAuth credentials -
{{project-id}}:来自Device Access Console
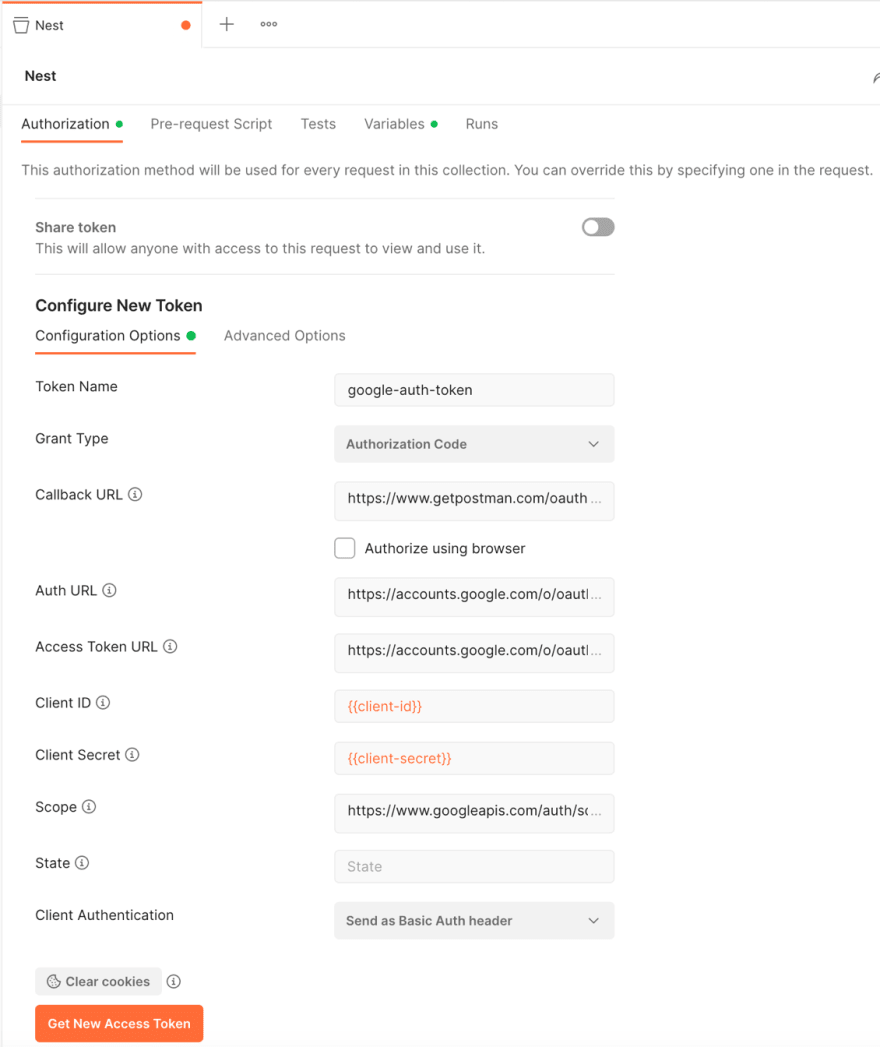
同样,在集合级别设置了授权:
- 授予类型:授权代码
- 回调URL:https://www.getpostman.com/oauth2/callback
- auth url:https://accounts.google.com/o/oauth2/auth
- 访问令牌网址:https://accounts.google.com/o/oauth2/token
- 客户端ID:GCP OAuth credentials的
{{client-id}}变量 - 客户秘密:GCP OAuth credentials的
{{client-secret}}变量 - 范围:https://www.googleapis.com/auth/sdm.service
邮递员测试
使用Auth令牌,第一个逻辑SDM端点是Device list,{{base-url}}/enterprises/{{project-id}}/devices/检索授权设备。
设备列表产生的输出类似于以下。
{
    "devices": [
        {
            "name": "enterprises/{{project-id}}/devices/{{device-id}}",
            "type": "sdm.devices.types.THERMOSTAT",
            "assignee": "enterprises/{{project-id}}/structures/{{structure-id}}/rooms/{{room-id}}",
            "traits": {
                "sdm.devices.traits.Info": {
                    "customName": ""
                },
                "sdm.devices.traits.Humidity": {
                    "ambientHumidityPercent": 45
                },
                "sdm.devices.traits.Connectivity": {
                    "status": "ONLINE"
                },
                "sdm.devices.traits.Fan": {
                    "timerMode": "OFF"
                },
                "sdm.devices.traits.ThermostatMode": {
                    "mode": "HEAT",
                    "availableModes": [
                        "HEAT",
                        "COOL",
                        "HEATCOOL",
                        "OFF"
                    ]
                },
                "sdm.devices.traits.ThermostatEco": {
                    "availableModes": [
                        "OFF",
                        "MANUAL_ECO"
                    ],
                    "mode": "OFF",
                    "heatCelsius": 15.458176,
                    "coolCelsius": 26.784546
                },
                "sdm.devices.traits.ThermostatHvac": {
                    "status": "OFF"
                },
                "sdm.devices.traits.Settings": {
                    "temperatureScale": "FAHRENHEIT"
                },
                "sdm.devices.traits.ThermostatTemperatureSetpoint": {
                    "heatCelsius": 24.473785
                },
                "sdm.devices.traits.Temperature": {
                    "ambientTemperatureCelsius": 24.709991
                }
            },
            "parentRelations": [
                {
                    "parent": "enterprises/{{project-id}}/structures/{{structure-id}}/rooms/{{room-id}}",
                    "displayName": "Thermostat"
                }
            ]
        }
    ]
}
列表响应的{{name}}字段中的{{device-id}}然后用作对恒温器进行API调用的键,将值插入新的{{device-id}} Postman Collection变量。
Changing the temperature是我的下一个逻辑测试: post {{base-url}}/enterprises/{{project-id}}/decections/{{device-id}}:executecommand
对其进行编码
在Postman中工作的请求是时候编写一些代码了。我的项目想法涉及使用Raspberry Pi和Python库,因此我决定从Python开始。我会说我已经做了很少的python,这可能显示出这一点,而且这只是发现工作。
我从pip3 install开始,用于这些关键包:
主脚本利用Click用于快速命令行接口。这使我能够快速运行命令,例如:python3 main.py temp 75 --mode Cool
import click

from env import get_project_id
from thermostat import Thermostat, ThermostatMode

@click.group()
@click.option('--debug/--no-debug', default=False)
@click.pass_context
def cli(ctx, debug):
    ctx.ensure_object(dict)
    ctx.obj['DEBUG'] = debug

    thermostat = Thermostat(projectId=get_project_id(), deviceName=None, debug=debug)
    thermostat.initialize()
    ctx.obj['thermostat'] = thermostat

    pass

@cli.command()
@click.pass_context
@click.option('--mode', required=True,
              type=click.Choice(['Cool', 'Heat'], case_sensitive=True))
@click.argument('temp', nargs=1, type=click.FLOAT)
def temp(ctx, temp: float, mode):
    modeType = ThermostatMode[mode]
    ctx.obj['thermostat'].set_temp(modeType, temp)

cli.add_command(temp)

if __name__ == '__main__':
    cli()
主要功能由Thermostat类处理。在创建时,它使用Google Python API Client创建服务对象。稍后,它用于帮助构建和执行API请求。在应用程序退出服务对象。
import atexit
import json

from credentials import get_credentials_installed
from enum import Enum
from googleapiclient.discovery import build
from temperature import celsius_to_fahrenheit, fahrenheit_to_celsius
from urllib.error import HTTPError

ThermostatMode = Enum('ThermostatMode', ['Cool', 'Heat'])

class Thermostat:
  def __init__(self, projectId, deviceName, debug):
    self.projectId = projectId
    self.projectParent = f"enterprises/{projectId}"
    self.deviceName = deviceName
    self.debug = debug
    credentials = get_credentials_installed()
    self.service = build(serviceName='smartdevicemanagement', version='v1', credentials=credentials)
    atexit.register(self.cleanup)

  def cleanup(self):
    self.service.close()
    print('Service closed')

# ...
Thermostat创建还启动了凭证设置。有different OAuth flows可用。首先,我选择了已安装的应用程序流,请将OAuth凭据从GCP OAuth credentials下载到Git忽略的./secrets/client_secret.json文件。它第一次运行时有一个交互式登录步骤。之后,凭据是pickled到secrets目录文件中。
import pickle
import os
from google_auth_oauthlib.flow import InstalledAppFlow
from google.auth.transport.requests import Request

def get_credentials_installed():
  SCOPES = ['https://www.googleapis.com/auth/sdm.service']

  credentials = None

  pickle_file = './secrets/token.pickle'

  if os.path.exists(pickle_file):
        with open(pickle_file, 'rb') as token:
            credentials = pickle.load(token)

  if not credentials or not credentials.valid:
        if credentials and credentials.expired and credentials.refresh_token:
            credentials.refresh(Request())
        else:
            flow = InstalledAppFlow.from_client_secrets_file('./secrets/client_secret.json', SCOPES)
            credentials = flow.run_local_server()

        with open(pickle_file, 'wb') as token:
            pickle.dump(credentials, token)

  return credentials
后来,我计划更多地查看服务帐户,但现在安装的应用程序Flow适合我的需求。
创建Thermostat之后,初始化获取设备列表,解决目标设备并读取和打印当前的恒温器设置。
def initialize(self):
    request = self.service.enterprises().devices().list(parent=self.projectParent)
    response = self.__execute(request)
    device = self.__get_device(response)

    traits = device['traits']
    self.deviceName = device['name']
    self.mode = traits['sdm.devices.traits.ThermostatMode']['mode']
    self.tempC = traits['sdm.devices.traits.Temperature']['ambientTemperatureCelsius']
    self.tempF = celsius_to_fahrenheit(self.tempC)

    setpointTrait = traits['sdm.devices.traits.ThermostatTemperatureSetpoint']
    key = f'{self.mode.lower()}Celsius'
    self.setpointC = setpointTrait[key]
    self.setpointF = celsius_to_fahrenheit(self.setpointC)

    print(f'Nest mode is {self.mode}, ' +
          f'temp is {round(self.tempF, 0)} °F, ' +
          f'setpoint is {round(self.setpointF, 0)} °F')
初始化调用几个助手功能。首先是围绕执行服务请求的包装。
def __execute(self, request):
try:
  response = request.execute()

  if self.debug:
    print(json.dumps(response, sort_keys=True, indent=4))

  return response

except HTTPError as e:
  if self.debug:
    print('Error response status code : {0}, reason : {1}'.format(e.status_code, e.error_details))
  raise e
第二是解决授权设备之间的恒温器设备的一种。如果在创建过程中指定了设备名称,则将寻找该名称。如果未指定设备,则只有一个设备,如果只有一个设备。
def __get_device(self, response):
    device = None
    device_count = len(response['devices'])

    if (self.deviceName) is not None:
      full_device_name = f"{self.projectParent}/devices/{self.deviceName}"

      for d in response['devices']:
        if d['name'] == full_device_name:
          device = d
          break

      if device is None:
        raise Exception("Failed find device by name")

    else:
      if device_count == 1:
        device = response['devices'][0]
      else:
        raise Exception(f'Found ${device_count} devices, expected 1')

    return device
最后,更有趣的位包括更改thermostat mode ...
def set_mode(self, mode: ThermostatMode):
    data = {
      "command": "sdm.devices.commands.ThermostatMode.SetMode",
      "params": {
        "mode": mode.name.upper()
      }
    }

    request = self.service.enterprises().devices().executeCommand(name=self.deviceName, body=data)
    response = self.__execute(request)
    print(f'Nest set to mode {mode.name}')
...最感兴趣的,commands to set the temperature。值得注意的是,改变温度需要恒温器处于正确的模式,以便首先更改或检查。
def set_temp(self, mode: ThermostatMode, tempF: float):
    self.set_mode(mode)
    tempC = fahrenheit_to_celsius(tempF)

    data = {
      "command": f"sdm.devices.commands.ThermostatTemperatureSetpoint.Set{mode.name}",
      "params": {
        f"{mode.name}Celsius": tempC
      }
    }

    request = self.service.enterprises().devices().executeCommand(name=self.deviceName, body=data)
    response = self.__execute(request)

    print(f'Nest set to temp {round(tempF, 0)} °F ({round(tempC, 0)} °C) for mode {mode.name}')
完整的代码可以在github.com/thnk2wn/google-nest-sandbox上找到。
样本测试看起来像这样。回购的.vscode文件夹中也有一些启动配置。现在就是这样,正在进行更有趣的巢积分。


