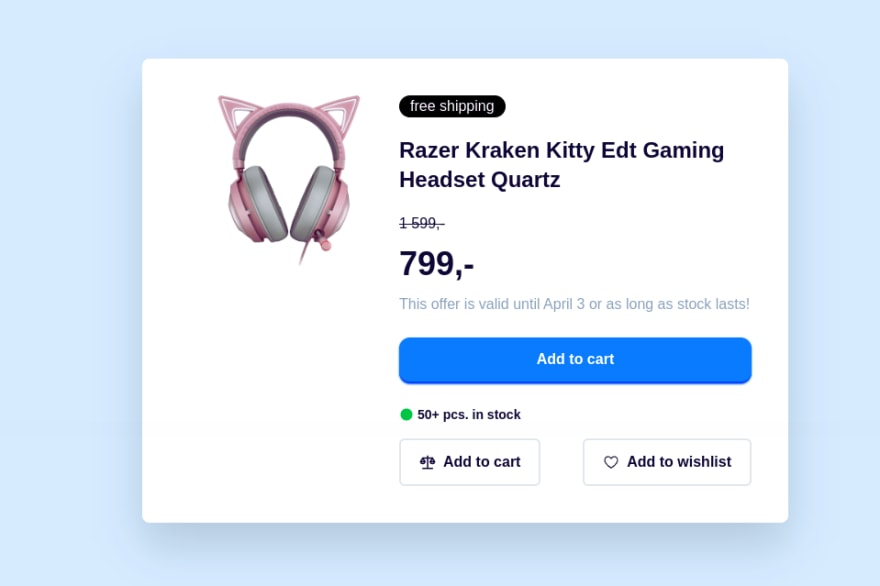
我们大家以一种或另一种方式与以前与购买购物车商品组件联系或使用。它用于电子商务网站上,或者在网站上购买特定产品时(电子书,在线课程等)。
。购物车项目组件,让您在购物车中添加购物项目。您还可以添加有关给定产品,标题,描述,价格,可用性等的详细信息。
客户对产品是什么,成本,也可以进一步购买。
让我们看一下如何构建如此惊人的组件。
应注意,本教程是使用tailwindcss完成的,该教程使用Node Package Manager(NPM)进行工作,因此安装节点很重要,然后应稍后安装TailWindCSS。您可以在https://tailwindcss.com/docs/installation
上阅读更多信息
了解任务
您的眼睛和注意力很大,我相信您会注意到该购物车可以分为2个主要部分。项目预览图像和项目详细信息
考虑到这项任务,它并没有使我们可以更好地看待设计,还可以帮助我们更好地构造代码。
代码结构
<body>
    <!-- Cart Start -->
 <div>
  <div class="cart">
        <!-- Item image-->
          <div></div>

           <!-- Item detail -->
          <div></div>
  </div>
 </div>
    <!-- Cart End-->
</body>
我相信我们现在可以更好地了解购物车项目的结构,而不会浪费时间,让我们这样做。
让我们完成购物车的第一部分:i* tem图像预览*
<!-- Item image-->
<div class="mx-4">
    <img src={image src} alt="" class="h-52 aspect-square object-center">
</div>
对于图像SRC,您可以用您选择的任何图像替换它。如果您想使用与本教程相同的图像以跟随,则可以在此处获取; Headset Image
这就是购物车结构的第一部分。容易吧? ð
让我们对上述代码有了解。
-
mx-4:它仅给本节给出1REM(〜16px)的边距。 -
h-52 aspect-square object-center:此属性旨在使项目图像在不同的屏幕上响应,同时保持其长宽比
就是这样!是的 !简单的peasyð
现在,让我们看一下该购物车项目的第二部分。 。 。
<div>
    <div class="text-white bg-black rounded-full w-fit px-3"><h2>free shipping</h2></div>
    <div class="item-name text-2xl font-semibold py-5 w-96">
        <h2>Razer Kraken Kitty Edt Gaming Headset Quartz</h2>
    </div>
    <div class="item-price">
        <div class="item-price-discount line-through"><p>1 599,-</p></div>
        <div class="item-new-price text-4xl font-extrabold py-3"><p>799,-</p></div>
        <p class="text-slate-400">This offer is valid until April 3 or as long as stock lasts!</p>
    </div>

    <div class="add-to-cart text-white text-center font-semibold bg-blue-500 py-3 my-6 rounded-xl shadow-sm shadow-blue-600 border-b-2 border-blue-700 cursor-pointer hover:bg-blue-600 transition-all ease-linear duration-300">
        <h2>Add to cart</h2>
    </div>
    <div class="flex items-center gap-1 pb-4">
        <div class="text-green-500"><svg xmlns="http://www.w3.org/2000/svg" width="1em" height="1em" preserveAspectRatio="xMidYMid meet" viewBox="0 0 256 256"><path fill="currentColor" d="M232 128A104 104 0 1 1 128 24a104.2 104.2 0 0 1 104 104Z"/></svg></div>
        <h2 class="text-sm font-semibold">50+ pcs. in stock</h2></div>

    <div class="call-to-action-btn flex [&>*]:flex justify-between [&>*]:items-center [&>*]:px-5 [&>*]:py-3 [&>*]:border-2 [&>*]:gap-2 [&>*]:rounded-md cursor-pointer [&>*:hover]:bg-slate-900 [&>*:hover]:text-white [&>*]:font-semibold [&>*>div>svg]:text-lg [&>*]:transition-all [&>*]:ease-linear [&>*]:duration-300">
        <div>
            <div>
                <svg xmlns="http://www.w3.org/2000/svg" width="1em" height="1em" preserveAspectRatio="xMidYMid meet" viewBox="0 0 48 48"><g fill="none" stroke="currentColor" stroke-linecap="round" stroke-linejoin="round" stroke-width="4"><path d="m16 22l-6-10l-6 10"/><path d="M10 28a6 6 0 0 0 6-6H4a6 6 0 0 0 6 6Z" clip-rule="evenodd"/><path d="m44 22l-6-10l-6 10"/><path d="M38 28a6 6 0 0 0 6-6H32a6 6 0 0 0 6 6Z" clip-rule="evenodd"/><path d="M24 6v36M10 12h28m-28 0h28m0 30H10"/></g></svg>
            </div>
            <h2>Add to cart</h2></div>
        <div>
            <div>
                <svg xmlns="http://www.w3.org/2000/svg" width="1em" height="1em" preserveAspectRatio="xMidYMid meet" viewBox="0 0 256 256"><path fill="currentColor" d="M128 224a7.8 7.8 0 0 1-3.9-1C119.8 220.6 20 163.9 20 92a60 60 0 0 1 108-36a60 60 0 0 1 108 36c0 30.6-17.7 62-52.6 93.4a314.3 314.3 0 0 1-51.5 37.6a7.8 7.8 0 0 1-3.9 1Zm-3.9-15ZM80 48a44 44 0 0 0-44 44c0 55.2 74 103.7 92 114.7c18-11 92-59.5 92-114.7a44 44 0 0 0-84.6-17a8 8 0 0 1-14.8 0A43.8 43.8 0 0 0 80 48Z"/></svg>
            </div>
            <h2>Add to wishlist</h2></div>
    </div>
</div>
本节看上去有点长,让我们将其分成小部分,然后更好地理解它( Divide and Conquer ðü)
<div>
<!-- Item Descriptions -->

  <div class="text-white bg-black rounded-full w-fit px-3"><h2>free shipping</h2></div>
  <div class="item-name text-2xl font-semibold py-5 w-96">
      <h2>Razer Kraken Kitty Edt Gaming Headset Quartz</h2>
  </div>
  <div class="item-price">
      <div class="item-price-discount line-through"><p>1 599,-</p></div>
      <div class="item-new-price text-4xl font-extrabold py-3"><p>799,-</p></div>
      <p class="text-slate-400">This offer is valid until April 3 or as long as stock lasts!</p>
  </div>
本小节的重点是提供有关此项目的详细信息。
这里使用的所有不同属性都具有相当不言而喻的性能,但是让我们一起理解它们。
-
text-white bg-black rounded-full w-fit px-3:简单地说,背景色:黑色,颜色:白色(文本颜色),边框 - 拉迪乌斯:100%,宽度:fit-content和padding-inline:0.75REM。这些属性都应用于购物车顶部的免费送货组件(是!Line-through:正如您可能猜到的那样,它只是在其应用的文本上放了一条线。
让我们看第二节。
<div class="add-to-cart text-white text-center font-semibold bg-blue-500 py-3 my-6 rounded-xl shadow-sm shadow-blue-600 border-b-2 border-blue-700 cursor-pointer hover:bg-blue-600 transition-all ease-linear duration-300">
        <h2>Add to cart</h2>
    </div>
    <div class="flex items-center gap-1 pb-4">
        <div class="text-green-500">
            <svg xmlns="http://www.w3.org/2000/svg" width="1em" height="1em" preserveAspectRatio="xMidYMid meet" viewBox="0 0 256 256"><path fill="currentColor" d="M232 128A104 104 0 1 1 128 24a104.2 104.2 0 0 1 104 104Z"/></svg>
        </div>

        <h2 class="text-sm font-semibold">50+ pcs. in stock</h2>
    </div>

    <div class="call-to-action-btn flex [&>*]:flex justify-between [&>*]:items-center [&>*]:px-5 [&>*]:py-3 [&>*]:border-2 [&>*]:gap-2 [&>*]:rounded-md cursor-pointer [&>*:hover]:bg-slate-900 [&>*:hover]:text-white [&>*]:font-semibold [&>*>div>svg]:text-lg [&>*]:transition-all [&>*]:ease-linear [&>*]:duration-300">
        <div>
            <div>
                <svg xmlns="http://www.w3.org/2000/svg" width="1em" height="1em" preserveAspectRatio="xMidYMid meet" viewBox="0 0 48 48"><g fill="none" stroke="currentColor" stroke-linecap="round" stroke-linejoin="round" stroke-width="4"><path d="m16 22l-6-10l-6 10"/><path d="M10 28a6 6 0 0 0 6-6H4a6 6 0 0 0 6 6Z" clip-rule="evenodd"/><path d="m44 22l-6-10l-6 10"/><path d="M38 28a6 6 0 0 0 6-6H32a6 6 0 0 0 6 6Z" clip-rule="evenodd"/><path d="M24 6v36M10 12h28m-28 0h28m0 30H10"/></g></svg>
            </div>
            <h2>Add to cart</h2></div>
        <div>
            <div>
                <svg xmlns="http://www.w3.org/2000/svg" width="1em" height="1em" preserveAspectRatio="xMidYMid meet" viewBox="0 0 256 256"><path fill="currentColor" d="M128 224a7.8 7.8 0 0 1-3.9-1C119.8 220.6 20 163.9 20 92a60 60 0 0 1 108-36a60 60 0 0 1 108 36c0 30.6-17.7 62-52.6 93.4a314.3 314.3 0 0 1-51.5 37.6a7.8 7.8 0 0 1-3.9 1Zm-3.9-15ZM80 48a44 44 0 0 0-44 44c0 55.2 74 103.7 92 114.7c18-11 92-59.5 92-114.7a44 44 0 0 0-84.6-17a8 8 0 0 1-14.8 0A43.8 43.8 0 0 0 80 48Z"/></svg>
            </div>
            <h2>Add to wishlist</h2></div>
    </div>
</div>
该小节主要包含对操作按钮的所有不同调用,例如:**添加到购物车**和添加到愿望清单
您可以获取本教程here
中使用的所有图标
属性[&>*]只是指选择每个孩子,这使我们可以将相同的样式属性应用于所有直系亲属
就是这样!一切都很好! ð
现在,让我们关注主组件,看看我们如何设计背景。 。 。
回到主容器,让我们做一个弯曲盒,也给一些很酷的造型。
<body class="bg-blue-100 flex items-center justify-center min-h-screen">
    <!-- Cart Start -->
 <div class="text-slate-900">
  <div class="card flex bg-white rounded-lg w-fit p-10 mx-auto drop-shadow-2xl">
        <!-- Item image-->
          <div></div>

           <!-- Item detail -->
          <div></div>
  </div>
 </div>
    <!-- Cart End-->
</body>
-
bg-blue-100 flex items-center justify-center min-h-screen:此属性可确保我们的购物车正好在屏幕中心(显示:flex align-items:中心合理性:中心:中心最低:100VH) -
flex bg-white rounded-lg w-fit p-10 mx-auto drop-shadow-2xl:这使我们的购物车要容器一个具有适合宽度和落下阴影的弹性盒。
我们做到了! ð
结论
我们刚刚构建了一个简单的购物车项目组件,而无需打开CSSfileð。感谢parwindcss。许多雇主将需要将这些组件添加到他们的网站上,现在您应该为自己是少数人知道如何在不到5分钟内建造它的人而感到自豪,而您甚至在不留下HTML Documes 。
您可以在codepen上进行实时预览,也可以在github上找到代码
不要与我分享如果您能够完成本教程,我很高兴看到您添加了您在购物车中添加的任何添加样式。
如果您有任何担忧或建议,请不要犹豫将其留在评论部分! ð
见ya! ð


