使用新的版本和工具,设置节点服务器已经变得非常简单,直到Nodejs带有typescript内置的nodejs sharp ship inthing typescript是必不可少的。
我将向您展示最简单的设置,您必须自信地启动下一个节点项目。为简单起见,您可以使用完成项目所需的内容进行自定义。
项目目录设置
让我们首先设置项目目录
mkdir YOUR_PROJECT_NAME
cd YOUR_PROJECT_NAME

git init # start your git project

npm init -y # initialize npm with defaults

mkdir src # create the source directory for all the code
设置打字稿
让我们从几个安装开始
npm install -D typescript @types/node
@types/node几乎为整个节点本身设置了类型。
现在,我们可以通过运行:
创建ts-config.json文件
npx tsc --init
这将在项目的根部添加一个ts-config.json文件,其中包括所有默认值包括评论。我们需要具有以下配置
{
  "compilerOptions": {
     "target": "es2016",
     "module": "commonjs",
     "rootDir": "./",
     "resolveJsonModule": true, /* in case you are importing JSON files */
     "outDir": "./build",
     "esModuleInterop": true,
     "forceConsistentCasingInFileNames": true,
     "strict": true,
     "noImplicitAny": true,
     "skipLibCheck": true,
  }
}
随意取消其他一些选择以适合您的项目。这应该很好。
创建一个简单的服务器
要测试一切是否正常,让我们添加一个简单的服务器代码。
创建一个文件src/index.ts并添加以下代码:
// src/index.ts

import http from "http";

export const server = http.createServer((req, res) => {
  res.writeHead(200, { "Content-Type": "application/json" });
  res.end(
    JSON.stringify({
      data: "It Works!",
    })
  );
});

server.listen(3000, () => {
  console.log("Server running on http://localhost:3000/");
});
这是一个简单的HTTP节点服务器在端口3000上侦听。应该足以测试我们的设置。
现在,让我们尝试通过将构建脚本添加到我们的软件包。
"scripts": {
  "build": "tsc"
}
现在,如果运行npm run build,则应该看到使用src目录和package.json文件添加到项目根文件夹中的构建目录。服务器代码应该看起来像:
"use strict";
var __importDefault = (this && this.__importDefault) || function (mod) {
    return (mod && mod.__esModule) ? mod : { "default": mod };
};
Object.defineProperty(exports, "__esModule", { value: true });
exports.server = void 0;
const http_1 = __importDefault(require("http"));
exports.server = http_1.default.createServer((req, res) => {
    res.writeHead(200, { "Content-Type": "application/json" });
    res.end(JSON.stringify({
        data: "It Works!",
    }));
});
exports.server.listen(3000, () => {
    console.log("Server running on http://localhost:3000/");
});
这确认了我们的构建作品!
设置如何运行服务器
我们必须根据最终构建来考虑它。因为我们知道最终构建将在构建目录中,并且将在JavaScript中,所以我们可以这样设置“开始”脚本:
"scripts": {
  "build": "tsc",
  "start": "node src"
}
,如果我们尝试从根目录中运行它,因为我们的源代码在打字稿中,则开始工作。为此,我们需要做更多的设置。
npm install -D nodemon rimraf npm-run-all ts-node
在安装的内容中,让我们通过添加clean脚本并在新构建之前使build脚本清洁来改进我们的构建。
"scripts": {
  "clean": "rimraf ./build",
  "build": "npm run clean && tsc",
  "start": "node src",
}
这样,让我们添加脚本以本地运行该项目:
"scripts": {
  "clean": "rimraf ./build",
  "build": "npm run clean && tsc",
  "start": "node src",
  "local": "ts-node src",
  "local:watch": "nodemon src -e ts,json --exec 'npm run local'",
}
本地脚本使用ts-node来运行我们的项目,而不是node命令。这几乎是一个节点,但在打字稿中。
但是local命令只能运行服务器一次,不会检测您的更改。这就是为什么需要local:watch,以便我们运行服务器并在您工作时注意更改。
它使用nodemon在src目录中运行该项目,以观察扩展名(-e)ts和json,因此每当有更改要更改(--exec)npm run local脚本命令。
开发时,只需运行npm run local:watch。
注意:我正在使用Chrome
中的JSON查看器扩展测试设置
我不建议您不进行测试。通过在节点中发布内置的测试跑步者的测试方面发生了很棒的事情,这将使事情变得更简单。
但是,我仍然使用开玩笑,如果您愿意,以下设置很容易交换。
从以下安装开始:
npm i -D supertest @types/supertest jest @types/jest ts-jest
我们将使用supertest测试我们的服务器,其余的只是jest,其类型(@types/jest)和开玩笑的Typescript版本(ts-jest)来运行东西。
现在,您可以使用以下代码将jest.config.js文件添加到Project Root文件夹中:
module.exports = {
  transform: {
    '^.+\\.ts?$': 'ts-jest',
  },
  testEnvironment: 'node',
  testRegex: './src/.*\\.(test|spec)?\\.(js|ts)$',
  moduleFileExtensions: ['ts', 'js', 'json'],
  roots: ['<rootDir>/src'],
};
设置非常简单,随时可以根据需要添加更多扩展名,但总的来说,这是从Jest和Typescript开始的全部。
因此,我们可以添加测试脚本:
"scripts": {
  "clean": "rimraf ./build",
  "build": "npm run clean && tsc",
  "start": "node src",
  "local": "ts-node src",
  "local:watch": "nodemon src -e ts,json --exec 'npm run local'",
  "test": "jest"
}
现在,让我们通过以下代码在SRC目录中添加index.test.ts文件来测试我们的服务器:
import supertest from "supertest";
import { server } from "./index";

describe("Server", function () {
  const request = supertest.agent(server);

  afterAll((done) => {
    server.close(done);
  });

  it("should get /", () => {
    request.get("/").expect(200, { data: "It Works!" });
  });
});
这只是检查当我们向基本服务器提出GET请求时,我们将其设置为返回。
我们现在需要做的一件事是将测试文件(*.test.ts)从我们的构建中排除,将其添加到ts-config.json文件中的排除选项中。
{
  "compilerOptions": {
     "target": "es2016",
     "module": "commonjs",
     "rootDir": "./",
     "resolveJsonModule": true, /* in case you are importing JSON files */
     "outDir": "./build",
     "esModuleInterop": true,
     "forceConsistentCasingInFileNames": true,
     "strict": true,
     "noImplicitAny": true,
     "skipLibCheck": true,
  },
  "include": [
     "src",
     "package.json"
  ],
  "exclude": [
     "src/**/*.test.ts"
  ]
}
我们还想包括package.json,因此当我们在 netlify 等地方部署构建目录时,npm start可以工作起作用。等等
使用排除列表并包含列表以添加或删除最终生产工件。
Eslint和Priptier设置
覆盖和自动形成我们的代码使其一致且易于阅读。它还可以通过更多地提高代码的质量来吸引我们通常不关注的东西。
从安装几件事开始:
npm install -D @typescript-eslint/parser @typescript-eslint/eslint-plugin eslint prettier eslint-config-prettier
现在创建具有以下代码的.eslintrc文件:
{
  "extends": [
    "eslint:recommended", "plugin:@typescript-eslint/recommended", "prettier"
  ],
  "parser": "@typescript-eslint/parser",
  "plugins": [
    "@typescript-eslint"
  ],
  "root": true
}
我们现在可以创建lint,format和format:check脚本,例如:
"scripts": {
  "clean": "rimraf ./build",
  "build": "npm-run-all lint format clean && tsc",
  "start": "node src",
  "local": "ts-node src",
  "local:watch": "nodemon src -e ts,json --exec 'npm run local'",
  "lint": "eslint src",
  "format": "npx prettier --write src",
  "format:check": "npx prettier --check src",
  "test": "jest"
}
请注意,build脚本已更改为在清洁和构建之前运行lint脚本。
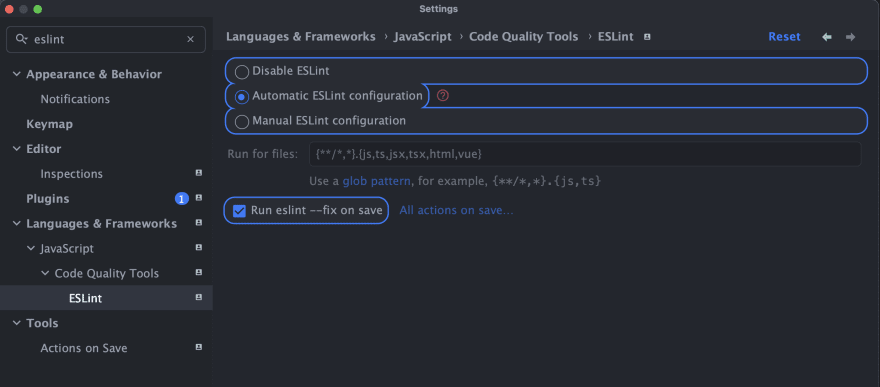
您应该配置您的IDE或代码编辑器,以使用ESLINT配置来自动检查和格式,然后进行代码保存以获得此设置的最佳状态。否则,自己手动运行这些命令。
这就是Intellij和Webstorm等喷气桥的外观:
最终触摸
我们需要.gitignore文件,以确保我们不犯下我们不需要的事情。看起来应该像这样
# IntelliJ project files
.idea
*.iml
out
gen

# VSCode
.vscode/*
!.vscode/settings.json
!.vscode/tasks.json
!.vscode/launch.json
!.vscode/extensions.json
!.vscode/*.code-snippets

# Local History for Visual Studio Code
.history/

# Built Visual Studio Code Extensions
*.vsix

# Folders
dist
build
node_modules
带走
此设置是您需要启动的全部。根据您的项目,您可能需要其他内容。
检查following template repo中的所有代码。让我知道您是否有任何疑问或需要进一步的帮助。
YouTube频道:Before Semicolon
网站:beforesemicolon.com


