信息:本教程用于创建带有斜杠命令的Discord机器人。
Learn more about using Slash Commands →
另外,available in French language
ð先决条件开始之前
在启动本教程之前,请按照以下说明进行操作。您需要安装多个工具供机器人工作,并创建一个具有任何名称的文件夹,最好是短而没有空格。这将是包含机器人文件的文件夹。
工具和事物清单:
- 知道JavaScript的基础
- Install the latest stable version of Node.js
- 有访问终端
- 有一个良好的互联网连接
- a 文本编辑器或IDE (记事本++,Atom,webstorm,vscode ...)
- 能够阅读文档英语
我们将首先检查是否已安装了所有内容,打开您的命令提示符,而不是Node.js安装的命令提示符(如果您在Windows上),然后键入:
node --version
应该告诉您已安装了哪个版本。为其余的安装打开此窗口。
- 我们将为本教程做什么
在阅读之前,您应该了解需要更改一些值,例如ID和命令名称。我们将使用 slash命令进行简单的 Discord bot ,然后我们将添加一个模块以非常轻松地使我们的命令列表同步。最后,示例命令:/ping。
/ping命令的主体的示例图像
还应注意,包含固定版本的示例中的软件包,因此请不要犹豫检查是否有每个更新。
项目和包装的安装
正确安装了最新版本的node.js后,您需要转到机器人的文件夹。转到命令提示:
cd /nameOfTheFolder
为了简单起见,请使用GUI而不是命令提示符转到您的文件夹,然后在顶部复制URL。然后通过在复制文本之前添加cd将其粘贴到命令提示符中。
如果您不使用命令提示符在机器人文件夹中,请查看顶部的行。我们将安装包装以使机器人工作。该软件包称为 discord.js ,它是一个库,可以帮助与Discord API互动,并在JavaScript中开发。
不同的软件包
我们将需要不同的节点软件包(npm)才能使机器人工作。
- discord.js:为创建机器人并回复消息
- discord-api-types/v10:用于创建 slash命令
- discord-sync-commands:这不是一个软件包,但是我们将其用作同步斜线命令的模块。
npm install discord.js discord-api-types/v10 fs
package.json的示例
您本身可以具有相同的package.json:
{
  "name": "example_discord_bot_slash_commands",
  "version": "1.0.0",
  "main": "app.js",
  "scripts": {
    "start": "node app.js"
  },
  "keywords": [
    "discordapp",
    "bot",
    "discordjs"
  ],
  "author": "Thomas Bnt <contact+git@thomasbnt.fr>",
  "license": "GPL-3.0-only",
  "dependencies": {
    "discord-api-types": "^0.37.31",
    "discord.js": "^14.7.1"
  }
}
您可以阅读,我们在脚本中指定了一个文件,app.js是我们将运行bot的文件。
因此,我们将安装所有软件包:
npm install
ðÖ在平台上创建机器人
现在,您必须在Discord平台上创建机器人并将其添加到服务器中。我们将以两个步骤进行操作。
遵循此过程,您必须登录到您的Discord帐户才能访问此页面。
- Go to: https://discord.com/developers/applications
- 然后应用程序 新应用程序。
- 填写表格。完成后,单击“ 创建”。
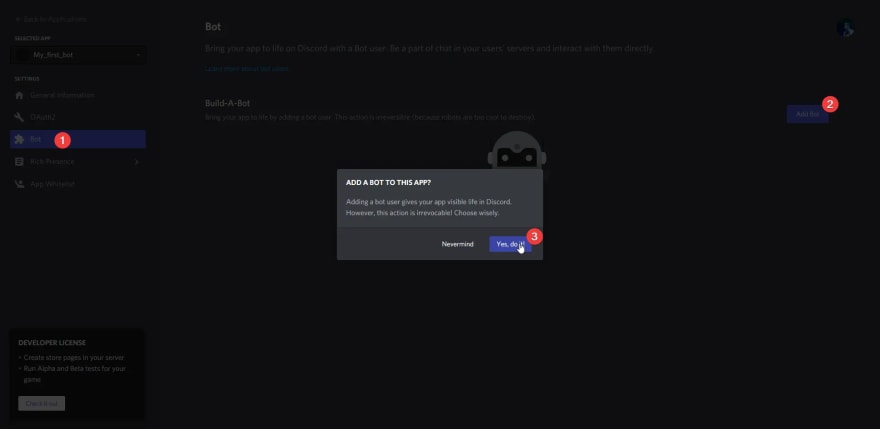
- 转到 bot tab
- 单击“ 添加bot ”,然后单击“ 是的,做!”
剩下的就是将其添加到您自己的服务器中。为此,只需转到 oauth2选项卡,允许它具有适当工作的必要权限,然后生成链接。 /p>
将其复制并在新选项卡中打开,要求您选择服务器。选择您的并单击“允许”。现在,您的机器人在服务器上,但它是离线的。这是完全正常的!按照下面的步骤打开。
ð创建第一个命令
我们在这里!这是我们创建第一个命令的时刻。
主文件:app.js
正确安装了所有内容后,您需要创建app.js文件。
它简单地用作您的项目的根,我喜欢将其称为心脏ð。因为这是一切开始的地方。
这是一个名为app.js的文件的示例:
/**
 @document   : app.js
 @author     : Thomas Bnt
 @version    : 3.0.0
 @copyright  : 2023, Thomas Bnt
 @license    : GNU General Public License v3.0
 @repository : https://github.com/thomasbnt/Bord-Pi
 @description: Un robot Discord gérant et aidant les utilisateurs pour un serveur.
*/

const fs = require('fs')
const { Client, Collection, GatewayIntentBits, Options } = require('discord.js')

const client = new Client({
  // The intents will depend on what you want to do with the robot,
  // but don't forget to activate them in your discord.dev dashboard
  // at the address https://discord.com/developers/applications/{ID}/bot,
  // section "Privileged Gateway Intents"
  intents: [
    GatewayIntentBits.Guilds,
    GatewayIntentBits.GuildMessages
  ],
})

// We create a collection for commands
client.commands = new Collection()
const commandFiles = fs
  .readdirSync('./commands')
  .filter((file) => file.endsWith('.js'))

for (const file of commandFiles) {
  const command = require(`./commands/${file}`)
  client.commands.set(command.data.name, command)
}

// Events like ready.js (when the robot turns on),
// or messageCreate.js (when a user/robot sends a message)
const eventFiles = fs
  .readdirSync('./events')
  .filter((file) => file.endsWith('.js'))

for (const file of eventFiles) {
  const event = require(`./events/${file}`)
  if (event.once) {
    client.once(event.name, (...args) => event.execute(...args, client))
  } else {
    client.on(event.name, (...args) => event.execute(...args, client))
  }
}

// The interactionCreate event directly here, as this is the heart of the robot.
client.on('interactionCreate', async (interaction) => {
  if (!interaction.isCommand()) return
  const command = client.commands.get(interaction.commandName)
  if (!command) return

  // We log when a user makes a command
  try {
    await console.log(
      `/${interaction.commandName} — Par ${interaction.user.username}`
    )
    await command.execute(interaction, client)
    // But if there is a mistake,
    // then we log that and send an error message only to the person (ephemeral: true)
  } catch (error) {
    console.error(error)
    return interaction.reply({
      content: "An error occurred while executing this command!",
      ephemeral: true,
      fetchReply: true
    })
  }
})

// The token of your robot to be inserted
client.login("NICE TOKEN NEVER TO BE DISCLOSED")
斜线命令的同步
此文件将放在modules/文件夹中,并在使用Ready Event(events/ready.js)启动机器人后立即将其调用。我从 androz 制造的this GitHub repository中取了它。它允许您轻松同步并更新命令列表。
这是 slash命令同步文件(/modules/sync_commands.js):
const Discord = require('discord.js')
module.exports = async (client, commands, options = { debug: false, guildId: null }) => {
  const log = (message) => options.debug && console.log(message)

  const ready = client.readyAt
    ? await Promise.resolve()
    : new Promise((resolve) => client.once('ready', resolve))
  await ready
  const currentCommands = await client.application.commands.fetch(
    options.guildId && { guildId: options.guildId }
  )

  log(`Synchronizing commands...`)
  log(`Currently ${currentCommands.size} commands.`)

  const newCommands = commands.filter(
    (command) => !currentCommands.some((c) => c.name === command.name)
  )
  for (const newCommand of newCommands) {
    await client.application.commands.create(newCommand, options.guildId)
  }

  log(`Created ${newCommands.length} commands!`)

  const deletedCommands = currentCommands
    .filter((command) => !commands.some((c) => c.name === command.name))
    .toJSON()
  for (const deletedCommand of deletedCommands) {
    await deletedCommand.delete()
  }

  log(`Deleted ${deletedCommands.length} commands!`)

  const updatedCommands = commands.filter((command) =>
    currentCommands.some((c) => c.name === command.name)
  )
  let updatedCommandCount = 0
  for (const updatedCommand of updatedCommands) {
    const newCommand = updatedCommand
    const previousCommand = currentCommands.find(
      (c) => c.name === updatedCommand.name
    )
    let modified = false
    if (previousCommand.description !== newCommand.description) modified = true
    if (
      !Discord.ApplicationCommand.optionsEqual(
        previousCommand.options ?? [],
        newCommand.options ?? []
      )
    )
      modified = true
    if (modified) {
      await previousCommand.edit(newCommand)
      updatedCommandCount++
    }
  }

  log(`Updated ${updatedCommandCount} commands!`)

  log(`Commands synchronized!`)

  return {
    currentCommandCount: currentCommands.size,
    newCommandCount: newCommands.length,
    deletedCommandCount: deletedCommands.length,
    updatedCommandCount
  }
}
宽松的事物,但请记住,它限制了Discord的API请求,并且它毫不费力地同步了您的命令。这是一个模块,所以我们必须在 Ready !
的事件中称其为事件准备就绪文件
当您打开机器人时,每次此事件都会运行。因此,我们可以确保我们输入一个函数或其他应该从头开始运行的代码。
const synchronizeSlashCommands = require('../modules/SyncCommands')
const { ActivityType } = require('discord.js')
module.exports = {
  name: 'ready',
  async execute(client) {
    console.log(`Connected as ${client.user.username}`)
    client.user.setActivity(`/bord`, { type: ActivityType.Watching })

    // This is when the Slash Commands synchronisation starts
    await synchronizeSlashCommands(client,
      client.commands.map((c) => c.data),
      {
        // The parameters to be modified for synchronisation
        debug: true,
        // If you set a server ID, then it will ONLY be for the targeted server.
        // If you don't put guildID, it will be in GLOBAL,
        // So on all servers.
        guildId: client.config.serverId
      }
    )
  }
}
/ping命令为示例
因此,这是一个基本命令,但也可以用于检测连接中的异常。所以并不是没用。
const { EmbedBuilder } = require('discord.js')
module.exports = {
  // "data" is the body of the command,
  // this is what we will find when we type /ping
  data: {
    name: 'ping',
    description: 'Get the ping from the robot',
    options: []
  },
  // and all this is the logic of the order
  async execute(interaction, client) {
    // For example here we create an embed with EmbedBuilder from discord.js
    // We add a name and iconURL to it, and then modify it with the values.
    const PingBeforeEmbed = new EmbedBuilder().setAuthor({
      name: `The bird will come back with the bot ping...`,
      iconURL: client.user.avatarURL()
    })
    const sent = await interaction.reply({
      embeds: [PingBeforeEmbed],
      fetchReply: true,
      ephemeral: true
    })
    const TotalPing = sent.createdTimestamp - interaction.createdTimestamp
    const PingEmbed = new EmbedBuilder()
      .setAuthor({
        name: `Ping of ${client.user.username}`,
        iconURL: client.user.avatarURL()
      })
      .addFields(
        {
          name: 'Total ping',
          value: `${TotalPing}ms`,
          inline: true
        },
        {
          name: 'Websocket',
          value: `${client.ws.ping} ms`,
          inline: true
        }
      )
    await interaction.editReply({
      embeds: [PingEmbed],
      ephemeral: true
    })
  }
}
我应该在项目中拥有什么
- 创建
app.js文件 - 创建
events/文件夹和events/ready.js文件 - 创建
modules/文件夹和modules/sync_commands.js文件 - 创建
commands/文件夹和commands/ping.js文件
.
├── app.js
├── commands
│   └── ping.js
├── events
│   └── ready.js
├── modules
│   └── sync_commands.js
└── package.json
如果您缺少某些内容,那么您还没有阅读所有内容。 ð±
ð¥³启动机器人!
- 您需要从the Discord page for developers复制机器人的令牌。
- 并在
app.js末尾使用此代码插入它:
client.login("YOUR TOKEN HERE WITHOUT SPACES AND NEVER TO BE REVEALED")
- 保存文件并在命令提示符中执行此命令:
node app.js
ðð就是这样!您的机器人正在打开! ðð
ð机器人的例子
bord pi :专门为其自己的Discord服务器设计的机器人。
注意文档是用法语编写的,但代码不是。
这是Slash命令的一个示例,感觉free to download the repository and modify it。
这是一个在Discord.js库上运行并为您的Discord服务器设置的Discord机器人。它可以访问且易于配置您的方式。
| 检查我的Twitter account。您可以看到许多项目和更新。您也可以support me on Buy Me a Coffee, Stripe or GitHub Sponsors。感谢您阅读我的帖子! ðÖ© |
|---|


