创建实时数据分析平台可能具有挑战性,但是使用正确的工具可以使其更容易。这样的工具是Appwrite,这是一个现代而强大的后端服务(BAAS)平台,可轻松构建和部署网络和移动应用程序。另一个有用的工具是NUXT.JS,这是一个用于构建服务器渲染的vue.js应用程序的渐进框架。
本文涵盖了使用AppWrite和Nuxt.js创建实时数据分析平台的步骤,通过模拟简单的电子商务仪表板。
存储库
这里是回购的链接:
https://github.com/folucode/data-visualization-appwrite
先决条件
- 对CSS,JavaScript和Nuxt.js的基本理解
- docker桌面安装在计算机上(运行
docker -v命令以验证安装);如果没有,请从here安装 - 在您的计算机上运行的AppWrite实例。查看this post以创建本地AppWrite实例。它也可以使用digital ocean或gitpod安装
设置项目
使用以下命令创建一个新的NUXT.JS项目:
npx create-nuxt-app data-analytics-platform
这将指导您浏览几个提示来设置项目,包括选择软件包管理器,UI框架和其他功能。确保选择Axios作为HTTP客户端,因为您将使用它来稍后进行API调用。
完成设置项目后,您可以导航到项目目录并使用以下命令启动开发服务器:
cd data-analytics-platform
npm run dev
设置AppWrite数据库
要设置AppWrite存储桶,请登录到AppWrite控制台并创建一个新项目。接下来,单击Databases选项卡,然后单击Create database。您可以将其称为ecommerce。
单击电子商务数据库,然后在数据库中创建一个新集合;称其为orders。 Collections用作AppWrite中的数据库表。
接下来,单击集合,然后添加新属性。 Attributes用作AppWrite中的数据库列。
您将添加的属性是:
-
类型字符串的
customer - type double 的
price
单击“设置”选项卡,向下滚动以获取权限,然后在orders集合的所有权限中添加Users角色。
设置UI
在组件文件夹中,创建一个名为DataCard.vue的文件,然后将代码粘贴到其中:
    <template>
      <div class="chart">
        <div class="chart-inner stat-1">
          <div class="header">
            <div class="tagline">{{ tagline }}</div>
            <div class="count">{{ count }}</div>
          </div>
        </div>
      </div>
    </template>

    <script>
    export default {
      props: {
        tagline: String,
        count: Number,
      },
      name: "DataCard",
    };
    </script>
此组件是一张简单的卡,它将显示订单详细信息。有两个属性:标语和计数。
接下来,在index.vue文件中,粘贴以下代码:
    <template>
      <div>
        <div class="container-fluid">
          <DataCard tagline="Total Customers" :count="totalCustomers" />
          <DataCard tagline="Total Orders" :count="totalOrders" />
          <DataCard tagline="Total Revenue" :count="Math.round(totalRevenue)" />
        </div>

        <button class="button" @click.prevent="makeOrder()">Create Order</button>

        <h2>Orders</h2>
        <table>
          <tr>
            <th>Order ID</th>
            <th>Customer</th>
            <th>Price</th>
          </tr>
          <tr v-for="order in orders" :key="order.$id">
            <td>{{ order.$id }}</td>
            <td>{{ order.customer }}</td>
            <td>{{ order.price }}</td>
          </tr>
        </table>
      </div>
    </template>

    <script>
    export default {
      name: "IndexPage",
      data() {
        return {
          orders: [],
          totalCustomers: 0,
          totalOrders: 0,
          totalRevenue: 0,
        };
      },
      methods: {},
      mounted() {},
    };
    </script>

    <style>
    body {
      background-color: #252830;
      color: white;
    }
    .container-fluid {
      margin-left: 18%;
    }
    .chart {
      text-align: left;
      display: inline-block;
      width: 300px;
    }
    .chart-inner {
      background-color: rgba(233, 164, 164, 0.5);
    }
    .header {
      box-sizing: border-box;
      padding: 30px 15px;
      position: relative;
      text-shadow: 1px 1px 2px black;
    }
    .tagline {
      opacity: 0.75;
      text-transform: uppercase;
    }
    .count {
      display: inline-block;
      font-size: 32px;
      font-weight: 300;
      vertical-align: middle;
    }
    table {
      font-family: arial, sans-serif;
      border-collapse: collapse;
      width: 100%;
    }
    td,
    th {
      border: 1px solid #dddddd;
      text-align: left;
      padding: 8px;
    }
    .button {
      background-color: #4caf50; /* Green */
      border: none;
      color: white;
      padding: 15px 32px;
      text-align: center;
      text-decoration: none;
      display: inline-block;
      font-size: 16px;
    }
    </style>
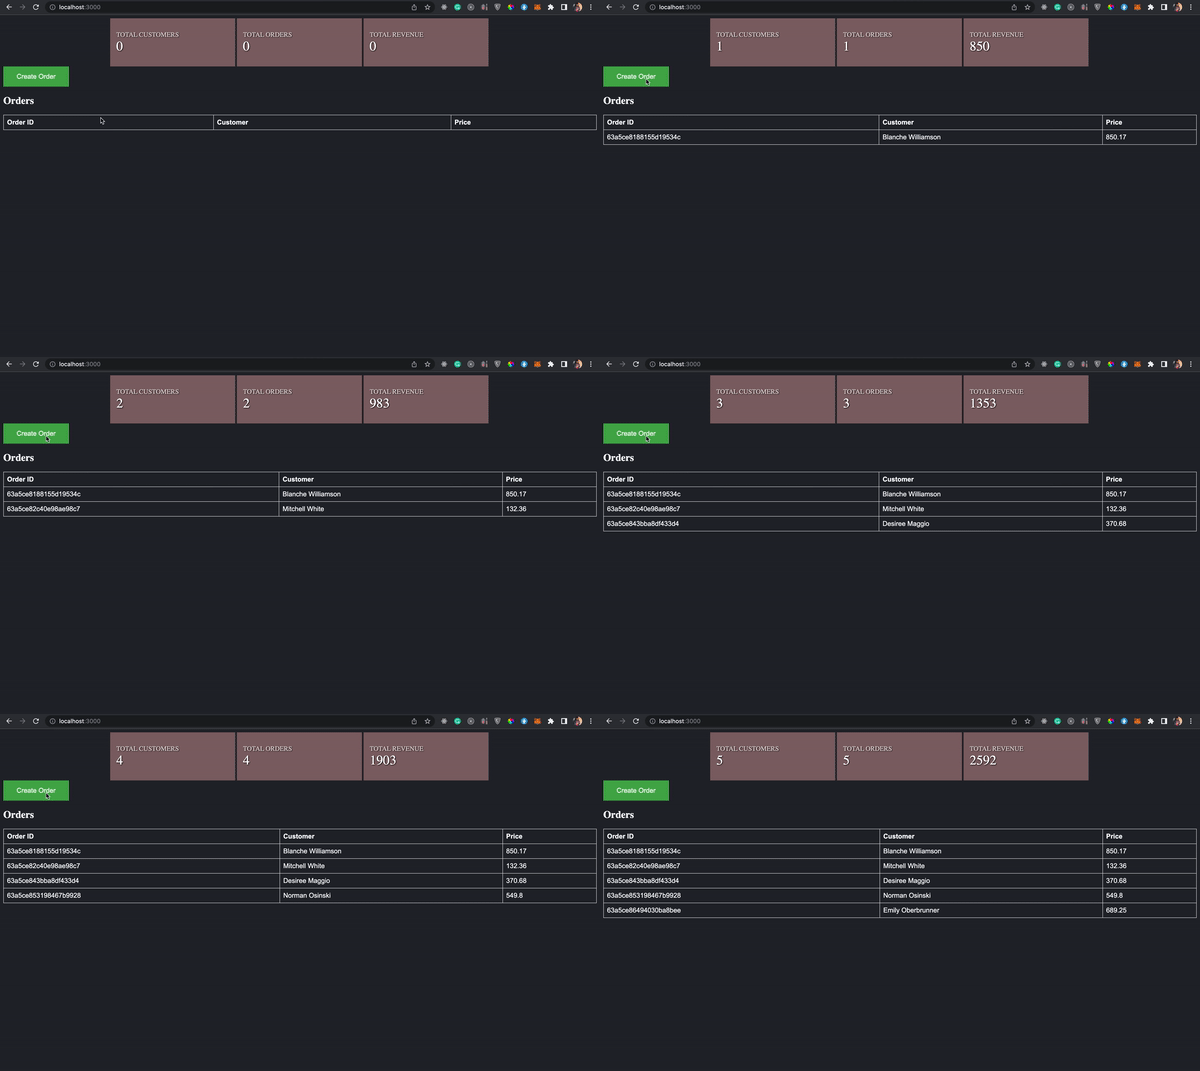
在此文件中,有一个数据库来显示总客户,总收入和总订单。您有一个按钮来创建订单,这有助于节省构建订单系统的时间,因为您主要对实时功能感兴趣。该按钮具有带有函数makeOrder()的单击事件,您将稍后创建。
还有一个表可列出AppWrite数据库中的所有订单。
构建应用程序
继续之前,请安装这两个软件包:AppWrite官方软件包和Faker.js,一个生成模拟数据的库。
npm i appwrite @faker-js/faker
连接到AppWrite
在pages/index.vue文件中,导入appwrite软件包和faker.js软件包,然后创建一个appwrite连接,这样:
    ...
    <script>
    import { Client, Account, Databases } from "appwrite";
    import { faker } from "@faker-js/faker";

    const client = new Client();

    client
      .setEndpoint("http://localhost/v1") // The Appwrite Endpoint
      .setProject("[YOUR-PROJECT-ID]");

    const account = new Account(client);
    const database = new Databases(client);

    account.createAnonymousSession().then(
      (response) => {
        console.log(response);
      },
      (error) => {
        console.log(error);
      }
    );

    export default {
      name: "IndexPage",
      data() {
        return {
          orders: [],
          totalCustomers: 0,
          totalOrders: 0,
          totalRevenue: 0,
        };
      },
      methods: {},
      mounted() {},
    };
    </script>
    ...
在此文件中,您可以创建一个AppWrite实例以及一个帐户和数据库,该帐户和数据库以后将在应用程序中使用。另外,设置一个匿名会议 - 这节省了我们制作整个身份验证系统的时间。
在安装的方法中,检查匿名帐户是否处于活动状态并订阅文档频道。在数据库中进行更改后,订阅频道将实时更新您的应用程序。
    ...
     mounted() {
        if (account.get !== null) {
          try {
            client.subscribe("documents", (response) => {
            });
          } catch (error) {
            console.log(error, "error");
          }
        }
      }
    ...
下订单
向称为makeOrder的方法对象添加一个新方法。在这种新方法中,您将使用Faker.js在AppWrite数据库中创建一个新订单,例如:
    async makeOrder() {
      await database.createDocument(
        "[YOUR-DATABASE-ID]",
        "[YOUR-COLLECTION-ID]",
        "unique()",
        {
          customer: faker.name.fullName(),
          price: faker.finance.amount(),
        }
      );
    },
分析数据
要分析数据,创建一个称为visualizeData的函数,并添加以下代码:
    async visualizeData() {
      const orderDetails = await database.listDocuments(
        "[YOUR-DATABASE-ID]",
        "[YOUR-COLLECTION-ID]"
     );

      this.orders = orderDetails.documents;
      this.totalCustomers = orderDetails.total;
      this.totalOrders = orderDetails.total;

      this.totalRevenue = orderDetails.documents.reduce(
        (accumulator, currentValue) => accumulator + currentValue.price,
        0
      );
    },
在此代码中,您首先从数据库中获取订单。降低功能积累了价格以获得总收入。
每当页面重新加载或更改发生在数据库中时,您都希望实时获取所有播客。为此,请在固定方法中调用可视化函数:
    ...
    mounted() {
      this.visualizeData();

      if (account.get !== null) {
        try {
          client.subscribe("documents", (response) => {
            this.visualizeData();
          });
        } catch (error) {
          console.log(error, "error");
        }
      }
    },
    ...
该应用应该看起来像:
结论
总而言之,使用Appwrite和nuxt.js构建实时数据分析平台可以提供强大而灵活的数据分析和可视化解决方案。通过利用AppWrite的实时功能和NUXT.JS的多功能性,您可以创建动态和交互式仪表板,使您的用户可以快速理解和探索他们的数据。
您是否正在建立业务分析,物联网数据分析或任何其他实时数据应用程序的平台,AppWrite和Nuxt.js可以提供成功所需的工具和框架。


