在本教程中,我们将向您展示如何通过在同一express.js服务器上并排运行Angular Universal和Remix项目来迁移Angular应用程序。我们将提供一个示例,源代码和屏幕截图,以帮助您了解该过程。
最终应用程序中包含Angular Universal和Remix在同一ExpressJS服务器上并排运行的示例,请访问:https://remix-angular.habibhinn.com/
当我们为任何一个框架运行构建命令时,它将生成服务器端脚本和客户端脚本。这些脚本处理服务器上应用程序的渲染以及渲染的HTML传输到客户端。
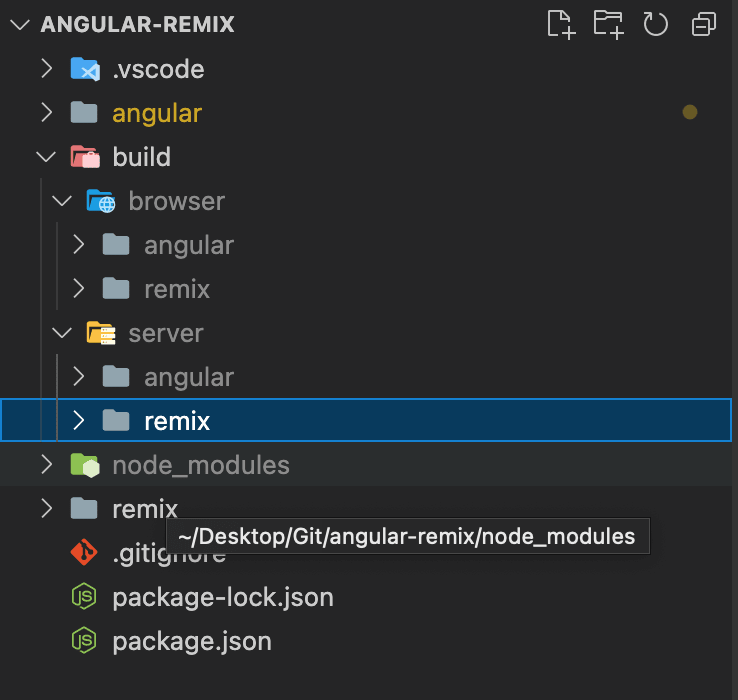
开始,我们将使用npm workspaces在同一存储库中管理多个项目。创建两个子文件夹 - 一个用于角源代码,另一个用于混音源代码。另外,我们将创建一个包含两个项目的输出捆绑包的构建文件夹。
为了更改角输出构建路径,我们需要更新build和server命令的angular.json文件。
"build": {
    "builder": "@angular-devkit/build-angular:browser",
    "options": {
        "outputPath": "../build/browser/angular",
        "index": "src/index.html",
        "main": "src/main.ts",
        "polyfills": ["zone.js"],
        "tsConfig": "tsconfig.app.json",
        "assets": ["src/favicon.ico", "src/assets"],
        "styles": ["src/styles.css"],
        "scripts": []
    },
"server": {
    "builder": "@angular-devkit/build-angular:server",
    "options": {
        "outputPath": "../build/server/angular",
        "main": "server.ts",
        "tsConfig": "tsconfig.server.json"
    },
也更新tsconfig.ts:
{
  "compileOnSave": false,
  "compilerOptions": {
    "baseUrl": "./",
    "outDir": "../build/out-tsc",
同样在混音中,我们将更新remix.config.js:
/** @type {import('@remix-run/dev').AppConfig} */
module.exports = {
    ignoredRouteFiles: ["**/.*"],
    appDirectory: "app",
    assetsBuildDirectory: "../build/browser/remix",
    serverBuildPath: "../build/server/remix/index.js",
    publicPath: "/browser/",
};
现在,您需要配置Express.js服务器来处理两个框架的客户端JavaScript和服务器端脚本。在本教程中,我们将更新Angular Server以服务混音路由。 (可以用另一种方式完成)
添加到server.ts来处理客户端脚本:
server.use(
    // Note: must match remix.config.js publicPath value
    '/browser',
    // Note: must match remix.config.js assetsBuildDirectory value
    express.static('../build/browser/remix'), {
        immutable: true,
        maxAge: '1y',
        })
    );
还添加服务器端脚本:
server.get(
     // Path or URL that should resolve to remix
    '/remix*',
     // Note: must match remix.config.js assetsBuildDirectory value
    createRequestHandler({
                // remix.config.js serverBuildPath
        build: require('../build/server/remix'),
    })
);
因此,server.ts文件的完整代码应为:
export function app(): express.Express {
    const server = express();
    const distFolder = join(BROWSER_FILES_BASE_PATH, 'angular');
    const indexHtml = existsSync(join(distFolder, 'index.original.html'))
            ? 'index.original.html'
            : 'index';

    // Our Universal express-engine (found @ https://github.com/angular/universal/tree/main/modules/express-engine)
    server.engine(
        'html',
        ngExpressEngine({
        bootstrap: AppServerModule,
        })
    );

    server.set('view engine', 'html');
    server.set('views', distFolder);

    server.use(
        '/browser',
        express.static(join(BROWSER_FILES_BASE_PATH, 'remix'), {
          immutable: true,
          maxAge: '1y',
        })
      );

    server.get(
        '/remix*',
        createRequestHandler({
          build: require('../build/server/remix'),
        })
      );

    // Example Express Rest API endpoints
    // server.get('/api/**', (req, res) => { });
    // Serve static files from /browser
    server.get(
        '*.*',
        express.static(distFolder, {
            maxAge: '1y',
        })
    );

    // All regular routes use the Universal engine
    server.get('*', (req, res) => {
        res.render(indexHtml, {
        req,
        providers: [{ provide: APP_BASE_HREF, useValue: req.baseUrl }],
        });
    });

    return server;
}
在应用程序之间导航时,在两个框架之间不轻松切换我们将使用锚定标签,如下:
混音:
<header className="bg-indigo-600">
    <nav className="mx-auto max-w-7xl px-6 lg:px-8" aria-label="Top">
        <div className="flex w-full items-center justify-between border-b border-indigo-500 py-6 lg:border-none">
            <div className="flex items-center">
                <div className="ml-10 block space-x-8">
                    <a
                    href={"/"}
                    className="text-base font-medium text-white hover:text-indigo-50"
                  >
                    Angular Application
                  </a>
                  <Link
                    to="/remix"
                    className="text-base font-medium text-white hover:text-indigo-50"
                  >
                    Remix Application
                  </Link>
                </div>
            </div>
        </div>
    </nav>
</header>
角:
<header class="bg-indigo-600">
    <nav class="mx-auto max-w-7xl px-6 lg:px-8" aria-label="Top">
        <div
          class="flex w-full items-center justify-between border-b border-indigo-500 py-6 lg:border-none"
        >
          <div class="flex items-center">
            <div class="ml-10 block space-x-8">
              <a
                routerLink="/"
                class="text-base font-medium text-white hover:text-indigo-50"
              >
                Angular Application
              </a>
              <a
                href="/remix"
                class="text-base font-medium text-white hover:text-indigo-50"
              >
                Remix Application
              </a>
            </div>
          </div>
        </div>
    </nav>
</header>
源代码:GitHub
原始文章:https://habibhinn.com/blog/from-angular-to-remix-route-by-route-migration
