在某个时候,每个开发人员最终都会编写某种电子邮件系统。对于填写表格或更复杂流程的SAS产品的人来说,这可能是简单的东西。但是,无论使用什么用案例,如果您曾经尝试在2023年从头开始写一封电子邮件,那么您就会知道这很痛苦。这不是一个愉快的经历。好吧,如果您可以用React和TypeScript编写电子邮件怎么办?
当前在Beta中,React电子邮件允许您使用与React相同的语法编写电子邮件。这意味着您可以使用JSX轻松创建和编辑电子邮件模板。
让我们开始ð
1。项目设置
首先从系统中设置项目。
- 在您的终端中粘贴以下代码:
npx create-email@latest
-
这将创建一个新文件夹,称为 React-Email-Starter 带有几个电子邮件模板。
-
现在,通过:
更改当前目录
cd react-email-starter
- 通过运行:安装依赖性:
npm install
- 好吧,现在通过以下方式将其旋转为服务器
npm run dev
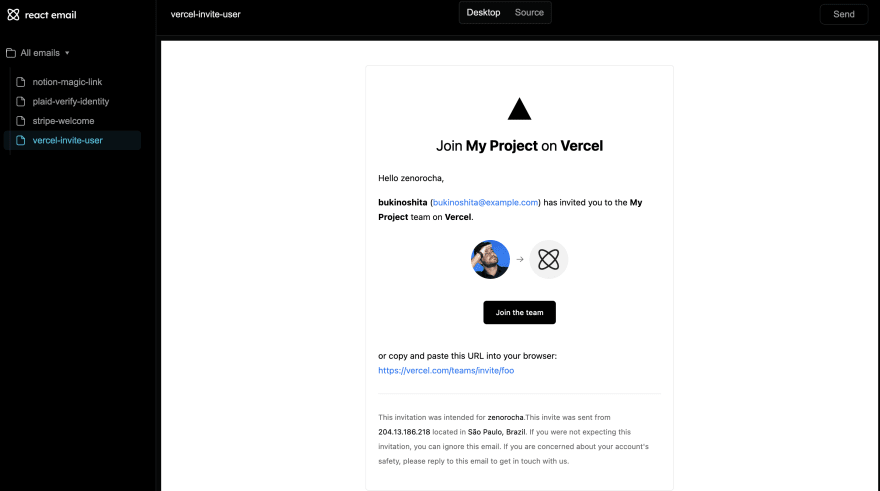
- 如果一切都正确完成,您将在“ http://localhost:3000/”上看到以下屏幕
2。与React生成电子邮件!
- 让我们开始编辑Awesome“ React电子邮件团队”的PER构建模板。
-
尽管您还可以通过遵循documentation。
来探索更多模板或创建自己的自定义模板。
-
粘贴以下代码:
import { Button } from '@react-email/button';
import { Container } from '@react-email/container';
import { Head } from '@react-email/head';
import { Hr } from '@react-email/hr';
import { Html } from '@react-email/html';
import { Img } from '@react-email/img';
import { Link } from '@react-email/link';
import { Preview } from '@react-email/preview';
import { Section } from '@react-email/section';
import { Text } from '@react-email/text';
import * as React from 'react';

export default function Email() {
  return (
    <Html>
      <Head />
      <Preview>Join my team</Preview>
      <Section style={main}>
        <Container style={container}>
          <Section style={{ marginTop: '32px' }}>
            <Img
              src="https://dipeshjaiswal.com/static/logos/dipeshjaiswal_logo.png"
              width="40"
              height="37"
              alt="Vercel"
              style={logo}
            />
          </Section>
          <Text style={h1}>
            Join <strong>My Awesome</strong> Project <strong></strong>
          </Text>
          <Text style={text}>Hello zenorocha,</Text>
          <Text style={text}>
            <strong>John Doe</strong> (
            <Link href="mailto:youremail@domain.com" style={link}>
            youremail@domain.com
            </Link>
            ) has invited you to the <strong>My Project</strong> team.
          </Text>
          <table
            style={spacing}
            border={0}
            cellPadding="0"
            cellSpacing="10"
            align="center"
          >
            <tr>
              <td style={center} align="left" valign="middle">
                <Img
                  style={avatar}
                  src="/static/myemoji.png"
                  width="64"
                  height="64"
                />
              </td>
              <td style={center} align="left" valign="middle">
                <Img
                  src="/static/vercel-arrow.png"
                  width="12"
                  height="9"
                  alt="invited you to"
                />
              </td>
              <td style={center} align="left" valign="middle">
                <Img
                  style={avatar}
                  src="https://dipeshjaiswal.com/static/logos/dipeshjaiswal_logo.png"
                  width="64"
                  height="64"
                />
              </td>
            </tr>
          </table>
          <Section style={{ textAlign: 'center' }}>
            <Button
              pX={20}
              pY={12}
              style={btn}
              href="https://domain.com/teams/invite"
            >
              Join the team
            </Button>
          </Section>
          <Text style={text}>
            <br />
            or copy and paste this URL into your browser:{' '}
            <Link
              href="https://domain.com/teams/invite"
              target="_blank"
              style={link}
              rel="noreferrer"
            >
              https://domain.com/teams/invite
            </Link>
          </Text>
          <Hr style={hr} />
          <Text style={footer}>
            This invitation was intended for{' '}
            <span style={black}>zenorocha</span>.This invite was sent from{' '}
            <span style={black}>204.13.186.218</span> located in{' '}
            <span style={black}>São Paulo, Brazil</span>. If you were not
            expecting this invitation, you can ignore this email. If you are
            concerned about your account's safety, please reply to this email to
            get in touch with us.
          </Text>
        </Container>
      </Section>
    </Html>
  );
}

const main = {
  backgroundColor: '#ffffff',
  margin: '0 auto',
};

const container = {
  border: '1px solid #eaeaea',
  borderRadius: '5px',
  margin: '40px auto',
  padding: '20px',
  width: '465px',
};

const logo = {
  margin: '0 auto',
};

const h1 = {
  color: '#000',
  fontFamily:
    "-apple-system, BlinkMacSystemFont, 'Segoe UI', 'Roboto', 'Oxygen', 'Ubuntu', 'Cantarell', 'Fira Sans', 'Droid Sans', 'Helvetica Neue', sans-serif",
  fontSize: '24px',
  fontWeight: 'normal',
  textAlign: 'center' as const,
  margin: '30px 0',
  padding: '0',
};

const avatar = {
  borderRadius: '100%',
};

const link = {
  color: '#067df7',
  textDecoration: 'none',
};

const text = {
  color: '#000',
  fontFamily:
    "-apple-system, BlinkMacSystemFont, 'Segoe UI', 'Roboto', 'Oxygen', 'Ubuntu', 'Cantarell', 'Fira Sans', 'Droid Sans', 'Helvetica Neue', sans-serif",
  fontSize: '14px',
  lineHeight: '24px',
};

const black = {
  color: 'black',
};

const center = {
  verticalAlign: 'middle',
};

const btn = {
  backgroundColor: 'rgb(0,199,255)',
  borderRadius: '5px',
  color: '#fff',
  fontFamily:
    "-apple-system, BlinkMacSystemFont, 'Segoe UI', 'Roboto', 'Oxygen', 'Ubuntu', 'Cantarell', 'Fira Sans', 'Droid Sans', 'Helvetica Neue', sans-serif",
  fontSize: '12px',
  fontWeight: 500,
  lineHeight: '50px',
  textDecoration: 'none',
  textAlign: 'center' as const,
};

const spacing = {
  marginBottom: '26px',
};

const hr = {
  border: 'none',
  borderTop: '1px solid #eaeaea',
  margin: '26px 0',
  width: '100%',
};

const footer = {
  color: '#666666',
  fontFamily:
    "-apple-system, BlinkMacSystemFont, 'Segoe UI', 'Roboto', 'Oxygen', 'Ubuntu', 'Cantarell', 'Fira Sans', 'Droid Sans', 'Helvetica Neue', sans-serif",
  fontSize: '12px',
  lineHeight: '24px',
};
- 输出看起来像:
- 您可以随时在您喜欢的框架中使用自己喜欢的颜色和主题 React ð。
3。让我们设置邮寄集成
- 一次,您对电子邮件很满意,该电子邮件是时候开始发送给用户了。
-
我将使用 nodemailer ,但您也可以在documentation中检查其他。
-
首先,安装以下依赖项:
npm install @react-email/render nodemailer
- 现在,创建一个新文件并粘贴以下代码:
import * as React from 'react';
import { render } from '@react-email/render';
import nodemailer from 'nodemailer';
import MyCustomEmail from './vercel-invite-user';

const transporter = nodemailer.createTransport({
  host: 'smtp.ethereal.email',
  port: 587,
  secure: false,
  auth: {
    user: 'my_user',
    pass: 'my_password',
  },
});

const emailHtml = render(<MyCustomEmail />);

const options = {
  from: 'you@example.com',
  to: 'user@gmail.com',
  subject: 'My Awesome Project',
  html: emailHtml,
};

transporter.sendMail(options);
-
render()函数返回您的自定义React电子邮件模板以HTML格式返回,可以通过邮寄诸如Gmail或Outlook之类的服务器来理解。 - 然后,您可以将此HTML传递给您的邮件,在这种情况下,NodeMailer Transporter。
- 这就是您需要与React创建精美电子邮件的全部。
4。预览您的电子邮件
- 如果您以这种方式过来,您实际上可以向自己发送预览。
- 单击“发送” 右上角的按钮,然后输入您自己的电子邮件。
- 单击发送,您将在收件箱中收到电子邮件的预览,这就是您与React创建精美电子邮件所需的全部。
总而言之,React电子邮件允许开发人员使用React和Typescript的功能创建精美而功能的电子邮件。通过使用预构建的模板或创建自定义设计,开发人员可以轻松地创建视觉上吸引和功能的电子邮件。在能够直接从应用程序中预览和发送电子邮件的额外好处,React电子邮件使构建电子邮件的过程变得更加愉快,更有效。给React电子邮件尝试一下,看看它在您的电子邮件开发过程中可以带来的区别。


