介绍
与React不同,我们有许多库可以与本文5 tips to improve integration with the backend, React with Axios中提到的后端进行通信,建议使用HTTPCLCLIENT和随附的RXJ,当然我们仍然可以安装Axios或使用A Axios或使用一个没有问题的情况。
即使Angular具有这些要点,重要的是考虑要点以帮助我们进行维护和更好的沟通,以免影响用户的可用性。
1-封装服务
我们必须与库一起创建一个通用服务,我们选择将其用于集成,并只是在应用程序中使用它,并具有相同的组件诸如卡,输入等组件的想法。
首先,我们必须创建一个Angular Service http-request.service.ts(请记住,您可以在需要的情况下放置另一个名称),它将包含所有通用的HTTP方法。
import { HttpClient } from '@angular/common/http';
import { Injectable } from '@angular/core';
import { Router } from '@angular/router';
import { Observable } from 'rxjs';
import { take } from 'rxjs/operators';
import { environment } from 'src/environments/environment';

@Injectable({
  providedIn: 'root'
})
export class HttpRequestService {
  private uri = `${environment.url}`;

  constructor(private http: HttpClient, private router: Router) {}

  private httpRequest<Data>(method: string, url: string, options: any): Observable<any> {
    return this.http.request(method, `${this.uri}${url}`, { ...options }).pipe(take(1));
  }

  post<Data>(url: string, body: any): Observable<any> {
    return this.httpRequest('post', url, { body: body });
  }

  get<Data>(url: string, params?: any): Observable<any> {
    return this.httpRequest('get', url, { params: params });
  }

  put<Data>(url: string, body: any): Observable<any> {
    return this.httpRequest('put', url, { body: body });
  }

  delete<Data>(url: string): Observable<any> {
    return this.httpRequest('delete', url, {});
  }
}
我们创建了一个被所有通用方法使用的httprequest函数(已经考虑重复使用),因为我们将在下一个主题中进化。
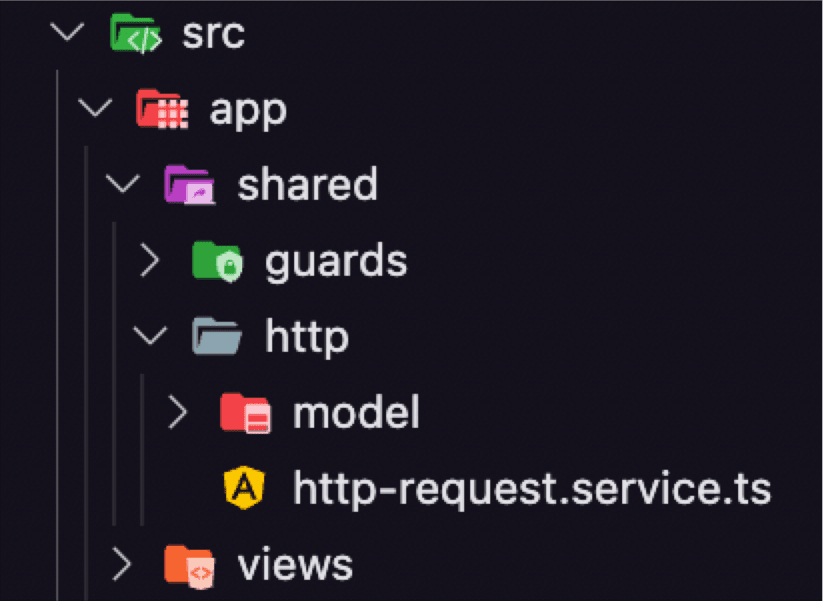
最后,我们将拥有这样的文件夹结构。
我们将能够以这种方式在我们的组件中使用该服务。
按照良好的做法,我们在模块中创建了一项服务。
import { Injectable } from '@angular/core';
import { HttpRequestService } from 'src/app/shared/http/http-request.service';

import { Authenticate } from '../model/authenticate';

@Injectable({
  providedIn: 'root'
})
export class AuthService {
  constructor(private httpRequest: HttpRequestService) {}

  login(user: Authenticate) {
    return this.httpRequest.post(`/authenticate`, user);
  }
}
现在只是将此服务导入我们的组件并将数据传递给它。
import { Component, OnInit } from '@angular/core';
import { FormBuilder, FormGroup, Validators } from '@angular/forms';

import { AuthService } from '../service/auth.service';

@Component({
  selector: 'app-login',
  templateUrl: './login.component.html',
  styleUrls: ['./login.component.scss']
})
export class LoginComponent implements OnInit {
  public loginForm!: FormGroup;
  public loading = false;
  public error = '';

  constructor(
    private _formBuilder: FormBuilder,
    private _authService: AuthService,
  ) {}

  ngOnInit(): void {
    this.loginForm = this._formBuilder.group({
      email: ['', [Validators.required, Validators.email]],
      password: ['', [Validators.required]]
    });
  }

  handleLogin() {
    this.loading = true;
    this._authService.login(this.loginForm.value).subscribe({
    next: data => {
        this.loginForm.reset();
        this.loading = false;
    },
    error: ({ error }) => {
        this.loading = false;
    }
    });
  }
}
但是为什么有必要使用这种方法?
当我们使用通用服务并仅将其导入应用程序时,以后维护和修改变得更加简单。看看我们如何在下面做到这一点。
2-将标题添加到所有请求中
现在,让我们为我们的所有请求配置标头,我们需要此点才能传递令牌,以及您的后端可能需要作为业务规则所需的其他信息。
让我们创建一个interceptor文件(记住如果需要的话,可以在其他名称中放置另一个名称),因为这不仅是重复代码的最佳方法。请参阅下面的示例。
import { HttpEvent, HttpHandler, HttpInterceptor, HttpRequest } from '@angular/common/http';
import { Injectable } from '@angular/core';
import { Observable } from 'rxjs';

interface Header {[key: string]: string}

@Injectable()
export class Intercept implements HttpInterceptor {
  intercept(httpRequest: HttpRequest<any>, next: HttpHandler): Observable<HttpEvent<any>> {
    if (httpRequest.headers.get('noHeader')) {
      const cloneReq = httpRequest.clone({
        headers: httpRequest.headers.delete('noHeader')
      });
      return next.handle(cloneReq);
    }

    const headers: Header = {
      Authorization: `Bearer ${localStorage.getItem('token') || ''}`
    };

    return next.handle(httpRequest.clone({ setHeaders: { ...headers } }));
  }
}
让我们在我们的appmodule中引用该拦截器。
import { HTTP_INTERCEPTORS, HttpClientModule } from '@angular/common/http';
import { NgModule } from '@angular/core';
import { BrowserModule } from '@angular/platform-browser';
import { BrowserAnimationsModule } from '@angular/platform-browser/animations';

import { AppRoutingModule } from './app-routing.module';
import { AppComponent } from './layouts/app/app.component';
import { Intercept } from './shared/http/intercept';

@NgModule({
  declarations: [AppComponent],
  imports: [
    BrowserModule,
    HttpClientModule,
    AppRoutingModule,
    BrowserAnimationsModule
  ],
  providers: [
    {
      provide: HTTP_INTERCEPTORS,
      useClass: Intercept,
      multi: true
    },
  ],
  bootstrap: [AppComponent]
})
export class AppModule {}
在这里,我们已经检索了localstorage令牌并将其添加到后端的所有调用中。
3-重定向未经授权或未经验证的用户
当用户没有授权或许可时,我们必须具有用户重定向策略,以便他不需要在我们的组件中执行此操作。
在这一点
import { HttpClient } from '@angular/common/http';
import { Injectable } from '@angular/core';
import { Router } from '@angular/router';
import { Observable } from 'rxjs';
import { retryWhen, scan, take } from 'rxjs/operators';
import { environment } from 'src/environments/environment';

@Injectable({
  providedIn: 'root'
})
export class HttpRequestService {
  private uri = `${environment.url}`;

  constructor(private http: HttpClient, private router: Router) {}

  private redirectUser(status: number): void {
    if (status === 401) {
      localStorage.clear();
      // User redirection rule for login page
      this.router.navigateByUrl('/login');
    }
    if (status === 403) {
      // User redirect rule to not allowed page
      this.router.navigateByUrl('/');
    }
  }

  private httpRequest<Data>(method: string, url: string, options: any): Observable<any> {
    return this.http.request(method, `${this.uri}${url}`, { ...options }).pipe(
      retryWhen(e =>
        e.pipe(
          scan((errorCount, error) => {
            this.redirectUser(error.status);
            if (errorCount >= environment.retryAttempts || error.status < 500) throw error;
            return errorCount + 1;
          }, 0)
        )
      ),
      take(1)
    );
  }

  post<Data>(url: string, body: any): Observable<any> {
    return this.httpRequest('post', url, { body: body });
  }

  get<Data>(url: string, params?: any): Observable<any> {
    return this.httpRequest('get', url, { params: params });
  }

  put<Data>(url: string, body: any): Observable<any> {
    return this.httpRequest('put', url, { body: body });
  }

  delete<Data>(url: string): Observable<any> {
    return this.httpRequest('delete', url, {});
  }
}
请打开打开,您要向用户发送401和403(未经授权)的用户。这样,即使用户设法访问他无法访问的页面,当后端请求带有状态代码时,系统已经指导他,该方法也适用于代币到期时,我们将查看稍后如何处理。
4-请求重试模式
现在,我们需要对我们的请求应用模式重试,以便我们的最终用户不会在应用程序中遭受不稳定性的困扰,因为它可能在呼叫时正在进行基础架构的部署或自动缩放。为此,我们定义了许多尝试,以防系统返回错误500或更高的错误。显示否。
的示例在RXJS操作员的帮助下,我们可以在Retryattempt环境中进行多次重试,每次请求的状态代码大于500时。
。5-刷新令牌
当我们使用身份验证工作时,有一个很好的实践和安全规则,可以使该令牌到期,以便即使不使用该应用程序也不会永远登录。
但是,我们必须解决一个问题:如果令牌在用户不能简单地要求他再次登录时到期,因为我们有刷新令牌的路线。
我们可以改进我们的http-request.service.ts服务,以便从您的应用程序调用路由时自动执行此操作。
import { HttpClient } from '@angular/common/http';
import { Injectable } from '@angular/core';
import { Router } from '@angular/router';
import { Observable } from 'rxjs';
import { retryWhen, scan, take } from 'rxjs/operators';
import { environment } from 'src/environments/environment';

interface Refresh {
  token: string;
  expired: number;
}

@Injectable({
  providedIn: 'root'
})
export class HttpRequestService {
  private uri = `${environment.url}`;

  constructor(private http: HttpClient, private router: Router) {}

  private refreshToken(httpRequest: Observable<any>): Observable<any> {
    const value: number = Number(localStorage.getItem('expired'));
    if (value && new Date(value) < new Date()) {
      this.refresh().subscribe(data => {
        localStorage.setItem('token', data.token);
        localStorage.setItem('expired', String(new Date().setSeconds(data.expired)));
        return httpRequest;
      });
    }
    return httpRequest;
  }

  private refresh(): Observable<Refresh> {
    return this.http.get<Refresh>(`${environment.url}/refresh `).pipe(take(1));
  }

  private notAuthorization(status: number): void {
    if (status === 401) {
      localStorage.clear();
      this.router.navigateByUrl('/login');
    }
  }

  private httpRequest<Data>(method: string, url: string, options: any): Observable<any> {
    return this.http.request(method, `${this.uri}${url}`, { ...options }).pipe(
      retryWhen(e =>
        e.pipe(
          scan((errorCount, error) => {
            this.notAuthorization(error.status);
            if (errorCount >= environment.retryAttempts || error.status < 500) throw error;
            return errorCount + 1;
          }, 0)
        )
      ),
      take(1)
    );
  }

  post<Data>(url: string, body: any): Observable<any> {
    return this.refreshToken(this.httpRequest('post', url, { body: body }));
  }

  get<Data>(url: string, params?: any): Observable<any> {
    return this.refreshToken(this.httpRequest('get', url, { params: params }));
  }

  put<Data>(url: string, body: any): Observable<any> {
    return this.refreshToken(this.httpRequest('put', url, { body: body }));
  }

  delete<Data>(url: string): Observable<any> {
    return this.refreshToken(this.httpRequest('delete', url, {}));
  }
}
我们创建了一个RefReshToken()函数,该功能接收可观察并返回相同的功能,但是它将检查令牌是否已过期已经过去了,如果是这样,请对后端进行新调用,续签令牌和过期。例如,请记住该逻辑根据后端和刷新路线起作用,例如,从过期到续订令牌后,它具有时间限制,这将更像是业务规则。
结论
在这篇文章中,我们看到了改善与后端的沟通并考虑到最终用户的最佳体验的五种方法,还有许多其他方法可以改善我们的后端呼叫服务,但是仅通过实施这些概念,我们就会具有更好的系统维护和可用性。在以后的帖子中,我们将看到如何进一步改善此服务。
到下一个
参考
Angular -https://angular.io/
RXJS -https://rxjs.dev


