关于RPC
在应用程序开发过程中,集成组件(例如 database 和外部系统)的过程成为很难分开的一部分。此集成过程通常使用数据库或特定外部系统的 api (应用程序编程接口)。例如,当您要集成 mySQL数据库时,我们需要知道通过 mysql 提供的命令,要么通过 cli (命令)线接口)或数据库连接器来自我们使用的编程语言,以便我们可以在 database中操纵数据。
集成应用程序的另一种更流行的方法是使用 rpc 或 http/json api 。 rpc 如果是一个考虑性,则可以用于集成应用程序,并且我们可以完全控制我们管理的服务的过程如果考虑到开发过程的便利性,并且该应用程序将来有一个计划以及。
实践
下载Protobuf编译器
需要准备的第一件事是 Protobuf编译器。 编译器对我们创建的.proto文件的生成编程语言代码很有用。朋友可以访问tautan ini以根据您使用的操作系统下载编译器Protobuf 。本文使用Windows 64位3.21.12版本的Protobuf编译器。
朋友设法下载了Protobuf编译器并提取ZIP文件后,下一步是添加已下载到环境变量< /em>。有问题的bin文件夹是这样的。
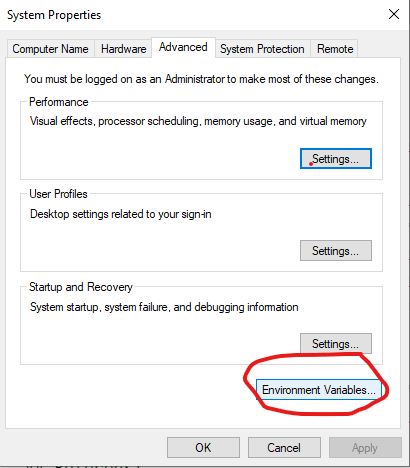
复制可执行路径文件,然后将其粘贴到环境上的Path。要将Protobuf编译器添加到环境变量可执行文件中,请朋友,您可以在Windows Friends搜索栏上找到Edit the system and environment variable。然后在User variables for admin部分中选择Path,按New,然后粘贴Protobuf编译器文件夹路径。这些步骤就是这样。
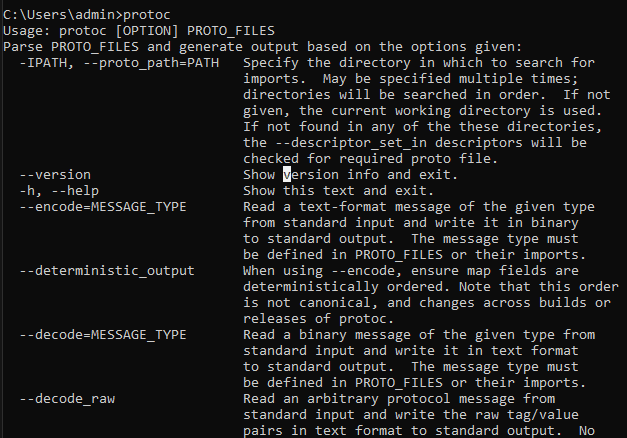
要检查 protobuf编译器是否已经正确安装了,请打开cmd并键入protoc。如果正确安装了 protobuf编译器,则外观将如下。
执行
请朋友创建一个具有这样的结构的新项目/文件夹。
在student.proto文件中,我们将编写message和service,该service将通过 protobuf compiler 生成。如下填写student.proto文件。
syntax = "proto3";

option go_package = "./../pb";

import "google/protobuf/empty.proto";

package pb;

message StudentRequest{
    string name = 1;
    int32 id = 2;
}

service Students{
    rpc RegisterStudent(StudentRequest) returns (google.protobuf.Empty);
}
下表中解释了上面的原始文件的目的。
| Potongan Kode | 解释 |
|---|---|
syntax = "proto3"; |
确定使用的Protobuf版本。在此示例中,使用的版本是版本3 |
option go_package = "./../pb"; |
确定Protobuf编译器生成的Protobuf文件将在何处保存。在此示例中,所有生成的Protobuf文件将存储在pb文件夹中,该文件夹位于.proto文件的位置
|
import "google/protobuf/empty.proto"; |
从其他软件包/文件夹导入触发文件 |
package pb; |
确定Protobuf编译器生成的原始文件的包的名称 |
message StudentRequest{} |
定义将使用的消息/有效负载。成功生成原始文件后,对于Go语言,Protobuf编译器将形成一个名称StudentRequest的结构
|
service Students{} |
定义将被调用/调用的过程/服务。 Protobuf编译器将以service Students{}中定义的方法的形式生成StudentServer和StudentClient接口
|
rpc RegisterStudent(StudentRequest) returns (google.protobuf.Empty); |
定义客户和服务器将使用的方法/合同。 Protobuf编译器将生成RegisterStudent方法,该方法将由StudentServer和StudentClient实施
|
要生成生成的文件,我们需要在上面的命令上 compile 如下:
protoc --go_out=. --go-grpc_out=. *.proto
上述命令是在原始文件所在的目录上运行的。下图显示了成功编译的文件原始。
在Golang实施
然后可以使用GRPC和Protobuf支持的编程语言使用proto文件(grpc支持的编程语言可以由di sini观察到Abiaoqian支持的编程语言,di sini可以看到。 )。
在student_grpc.pb.go文件中,我们将找到以下接口:
type StudentsClient interface {
    RegisterStudent(ctx context.Context, in *StudentRequest, opts ...grpc.CallOption) (*emptypb.Empty, error)
}
...
type StudentsServer interface {
    RegisterStudent(context.Context, *StudentRequest) (*emptypb.Empty, error)
    mustEmbedUnimplementedStudentsServer()
}
StudentsServer和StudentsClient接口是service Students{},RegisterStudent方法是我们创建的proto文件生成的rpc RegisterStudent。我们必须在客户端或服务器上实现接口。在本文中,我们将实施StudentServer。我们在server/main.go文件
中编写此实现
package main

import (
    "context"
    "go-grpc-unary/common/pb"
    "log"
    "net"
    "os"
    "os/signal"
    "syscall"

    "google.golang.org/grpc"
    "google.golang.org/protobuf/types/known/emptypb"
)

type Server struct {
    pb.UnimplementedStudentsServer
}

const PORT = ":9000"

func (s *Server) RegisterStudent(ctx context.Context, in *pb.StudentRequest) (*emptypb.Empty, error) {
    log.Println(in.Name)
    log.Println(in.Id)
    return new(emptypb.Empty), nil
}

func initGrpcServer() {
    l, err := net.Listen("tcp", PORT)
    if err != nil {
        log.Fatalf("unable to create tcp connection at port %v with error %v \n", PORT, err)
    }

    srv := grpc.NewServer()
    pb.RegisterStudentsServer(srv, &Server{})
    srv.Serve(l)
}

func main() {
    done := make(chan os.Signal, 1)
    signal.Notify(done, syscall.SIGINT, syscall.SIGTERM)
    go initGrpcServer()
    <-done
}
使用Postman进行测试
在本文中,我们将使用Postman测试我们创建的端点GRPC。
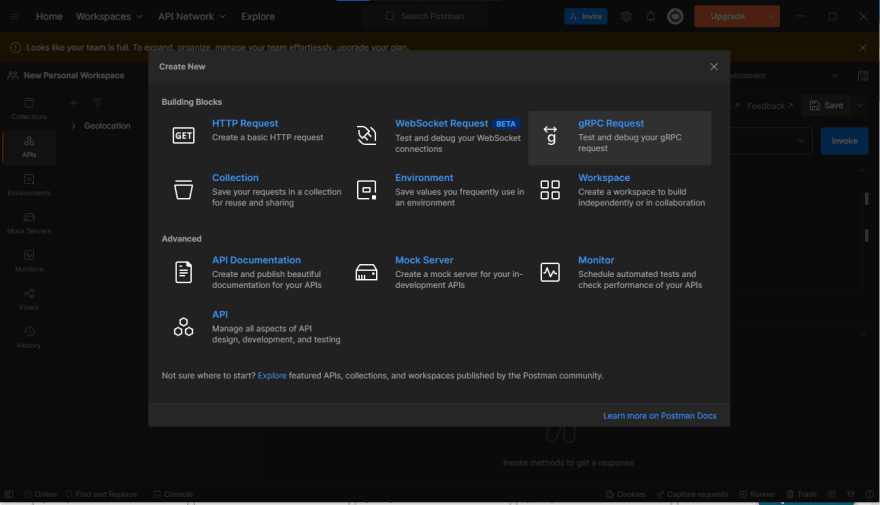
首先,我们需要像图片中的kofi41一样。
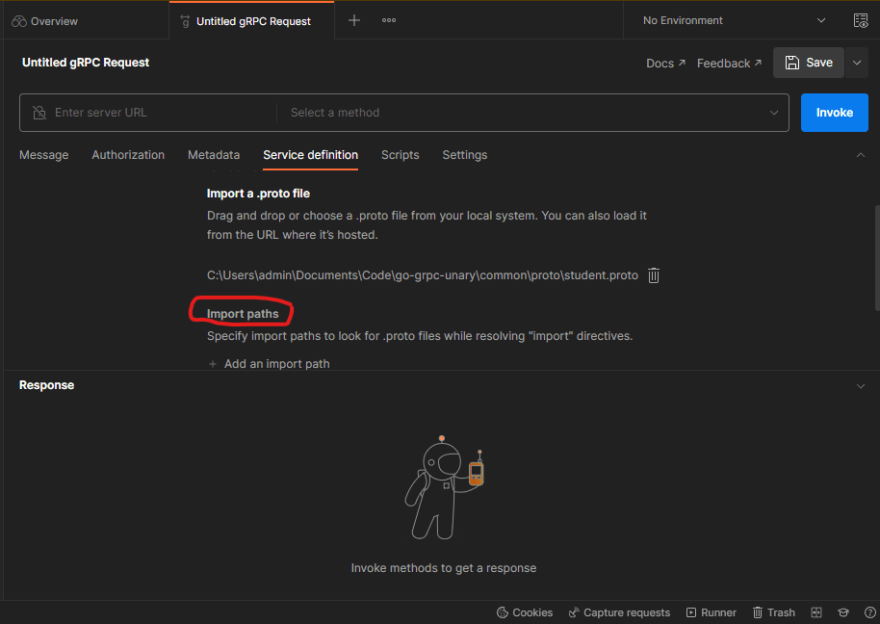
然后,我们导入我们定义的原始文件。注意标有红色的Import paths部分。我们用路径填充该部分,在该路径中,我们在所编写的原始文件中导入其他原始文件。在原始文件中,我们编写import "google/protobuf/empty.proto";,在其中导入empty.proto文件。该文件是位于include/google/protobuf文件夹中的Protobuf的默认文件(请返回到部分下载 buffer协议以查找文件夹的位置)。
然后,选择save without importing完成导入原始文件的过程。
用localhost:9000填写URL服务器。在Select a method部分中,我们可以看到原始文件中定义的GRPC合同/方法,在这种情况下为rpc RegisterStudent。选择该方法,然后填写要使用Generate Example Message发送的数据。
使用go run main.go在目录中,然后在server/main.go目录中运行服务器,然后运行Invoke方法RegisterStudent。如果Status code为0,则意味着服务器成功接收数据。如果我们查看server/main.go的记录,我们将看到从Postman发送的数据。
logging server/main.go

2023/01/27 11:04:43 magna
2023/01/27 11:04:43 -279401480
概括
在本文中,我们了解了什么是GRPC,协议缓冲区,如何创建ProtoBuf文件,编译Protobuf文件,以Go语言实现以及使用Postman进行测试。本文没有讨论许多事情。作者建议朋友阅读有关server streaming,client streaming,bidirectional streaming的信息,以及其他mendefinisikan message di file protobuf的方式
参考
https://cloud.google.com/blog/products/api-management/understanding-grpc-openapi-and-rest-and-when-to-use-them
https://developers.google.com/protocol-buffers/docs/reference/overview
https://grpc.io/docs/


