创建React Native应用程序时,很快就会显而易见,每次进行更改时都会变得非常乏味。再加上您需要在Xcode上存档构建并将其分发到AppStore以进行testflight或AppStore发布。
我在两个平台上使用了两种不同的方法来自动部署,但两者都触发了推向特定分支。
在开发时,我使用dev分支,因为活动分支所有更改均合并为
- 对于Android,我决定选择
GitHub Actions,然后将应用程序推向Firebase App Distribution,并通过电子邮件发送给测试人员的通知 - 对于iOS,
XCode Cloud为我完成了这项工作,该工作将自动测试,并通过推送通知和电子邮件发送给用户通知
让我们正确地
使用GitHub Action和Firebase App Distribution的Android
- 在项目的根部创建一个
.github/workflows文件夹 - 在
.github/workflows中创建一个build.yml文件
- 添加下面的代码。非常自我解释,名称解释了每个动作
name: Build And Deploy App To Firebase Distribution

on:
  push:
    branches:
      - dev

jobs:
  build:
    runs-on: ubuntu-latest
    steps:
      - uses: actions/checkout@v3
      - name: set up JDK 1.8
        uses: actions/setup-java@v3
        with:
          distribution: temurin
          java-version: 11
      - name: Setup Android SDK
        uses: android-actions/setup-android@v2
      - name: Setup Gradle
        uses: gradle/gradle-build-action@v2
      - name: Get yarn cache directory path
        id: yarn-cache-dir-path
        run: echo "::set-output name=dir::$(yarn cache dir)"
      - name: Restore node_modules from cache
        uses: actions/cache@v2
        id: yarn-cache
        with:
          path: ${{ steps.yarn-cache-dir-path.outputs.dir }}
          key: ${{ runner.os }}-yarn-${{ hashFiles('**/yarn.lock') }}
          restore-keys: |
            ${{ runner.os }}-yarn-
      - name: Install dependencies
        run: yarn install
      - name: Make Gradlew Executable
        run: cd android && chmod +x ./gradlew
      - name: build release
        run: cd android && ./gradlew clean && ./gradlew assembleRelease --no-daemon
      - name: Upload artifact to Firebase App Distribution
        uses: wzieba/Firebase-Distribution-Github-Action@v1
        with:
          appId: ${{secrets.FIREBASE_APP_ID}}
          token: ${{secrets.FIREBASE_TOKEN}}
          groups: test-group
          file: android/app/build/outputs/apk/release/app-universal-release.apk
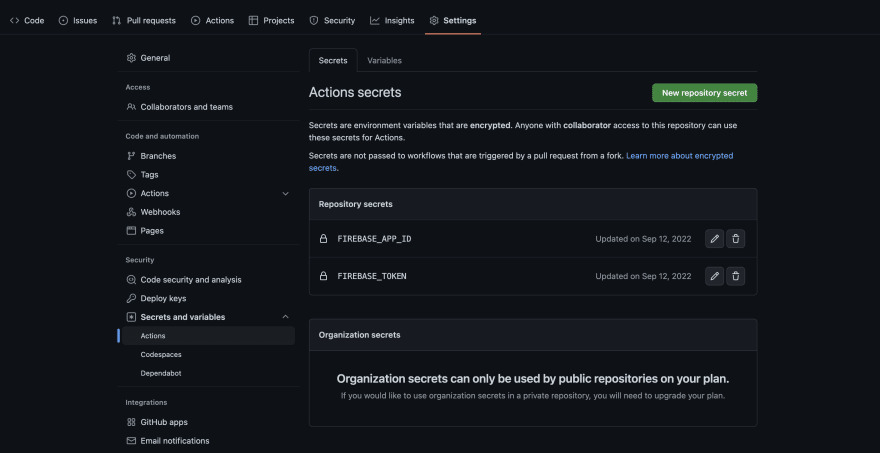
- 您需要指定Firebase_App_ID和Firebase_token在设置Firebase App Distribution 时从firebase中获得
- 一旦完成,就可以推动CICD。
一些调试技巧
- 尝试首先在本地运行
cd android && ./gradlew clean && ./gradlew assembleRelease并确保成功 - GitHub Action事件将指出如果构建失败让您进行调试和修复
iOS使用Xcode和testflight
- 在您的项目的
/ios文件夹中创建一个.ci_scripts文件夹 - 在
.github/workflows中创建一个ci_post_clone.sh文件
- 将此代码粘贴到
ci_post_clone.sh文件中
#!/bin/sh

export HOMEBREW_NO_INSTALL_CLEANUP=TRUE
brew install cocoapods
# have to add node yourself
brew install node@16
# link it to the path
brew link node@16

brew install yarn

# Install dependencies you manage with CocoaPods.
yarn
pod install
# the sed command from RN cant find the file... so we have to run it ourselves
sed -i -e  $'s/ && (__IPHONE_OS_VERSION_MIN_REQUIRED < __IPHONE_10_0)//' /Volumes/workspace/repository/ios/Pods/RCT-Folly/folly/portability/Time.h
可选:将其添加到您的Info.plist文件中,以解决“加密”对话框检查在发布应用程序之前所需的“加密”对话框检查
<key>ITSAppUsesNonExemptEncryption</key>
<false/>
-
推到要用于部署的GitHub分支。在我的情况下,
dev -
启动Xcode,然后转到
Product,然后选择Xcode Cloud -
请按照提示进行操作,然后将Xcode Cloud连接到您的GitHub项目,指定
dev分支或您正在工作的任何分支 -
其余工作将在AppStore Connect接口上完成。稍后将在
上使用这些其他步骤更新本文
让我知道您是否有任何问题。
voila


