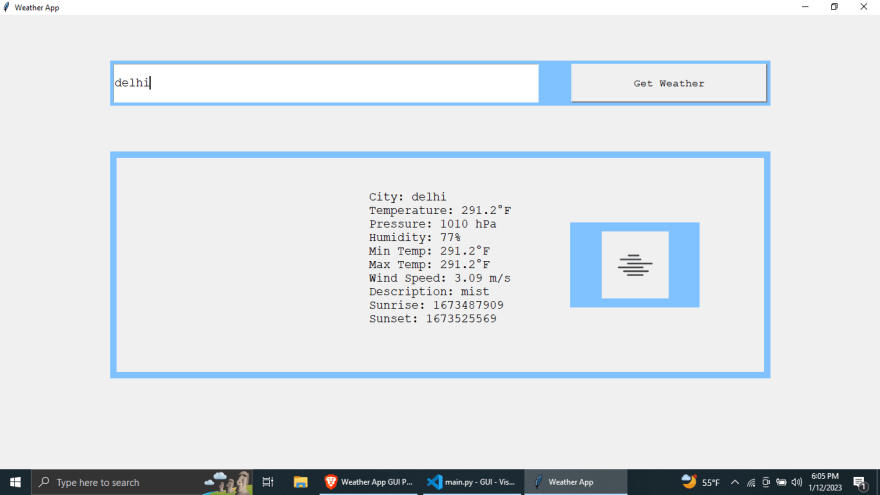
大家好,这篇简短的文章提供了一个示例Python代码,该代码使用TKINTER库为天气应用程序创建图形用户界面(GUI)。该应用程序允许用户从OpenWeatherMap API输入城市名称并检索该城市的天气信息。 GUI包括背景梯度图像,城市名称的文本输入字段以及一个以检索天气信息的按钮。
代码:
import tkinter as tk
from tkinter import messagebox
import requests
from PIL import Image, ImageTk

def get_weather():
    city = city_entry.get()
    api_key = "your api key" #go to openweather
    url = f"https://api.openweathermap.org/data/2.5/weather?q={city}&appid={api_key}"

    # Show loading state
    weather_label.config(text="Loading...")
    icon_label.config(image='')

    response = requests.get(url)
    weather_data = response.json()
    if "message" in weather_data:
        messagebox.showerror("Error", weather_data["message"])
    else:
        weather_text = f"City: {city}\n"
        weather_text += f"Temperature: {weather_data['main']['temp']}°F\n"
        weather_text += f"Pressure: {weather_data['main']['pressure']} hPa\n"
        weather_text += f"Humidity: {weather_data['main']['humidity']}%\n"
        weather_text += f"Min Temp: {weather_data['main']['temp_min']}°F\n"
        weather_text += f"Max Temp: {weather_data['main']['temp_max']}°F\n"
        weather_text += f"Wind Speed: {weather_data['wind']['speed']} m/s\n"
        weather_text += f"Description: {weather_data['weather'][0]['description']}\n"
        weather_text += f"Sunrise: {weather_data['sys']['sunrise']}\n"
        weather_text += f"Sunset: {weather_data['sys']['sunset']}\n"
        weather_label.config(text=weather_text)

        #update icon
        icon_name = weather_data['weather'][0]['icon']
        icon_url = f"http://openweathermap.org/img/wn/{icon_name}@2x.png"
        icon_data = requests.get(icon_url)
        with open("icon.png", "wb") as f:
           f.write(icon_data.content)
        icon_image = ImageTk.PhotoImage(Image.open("icon.png"))
        icon_label.config(image=icon_image)
        icon_label.image = icon_image


root = tk.Tk()
root.title("Weather App")


# Create gradient image
gradient = Image.new("RGBA", (1, root.winfo_height()), "#8EC5FC")
pixels = gradient.load()
for y in range(gradient.size[1]):
    color = int(y / gradient.size[1] * 255), 140, 255
    for x in range(gradient.size[0]):
        pixels[x, y] = color
gradient = gradient.resize((root.winfo_width(), root.winfo_height()))
gradient = ImageTk.PhotoImage(gradient)


#Set gradient image as background
bg_label = tk.Label(root, image=gradient)
bg_label.place(relx=0, rely=0, relheight=1, relwidth=1)

# Frame
frame = tk.Frame(root, bg='#80c1ff', bd=5)
frame.place(relx=0.5, rely=0.1, relwidth=0.75, relheight=0.1, anchor='n')

# Entry
city_entry = tk.Entry(frame, font=("Courier", 14))
city_entry.place(relwidth=0.65, relheight=1)
city_entry.insert(0, "Washington D.C.")

# Get Weather button
get_weather_button = tk.Button(frame, text="Get Weather", font=("Courier", 12), command=get_weather)
get_weather_button.place(relx=0.7, relwidth=0.3, relheight=1)

# Weather label
weather_frame = tk.Frame(root, bg='#80c1ff', bd=10)
weather_frame.place(relx=0.5, rely=0.3, relwidth=0.75, relheight=0.5, anchor='n')
weather_label = tk.Label(weather_frame, font=("Courier", 14), justify='left', bd=5)
weather_label.place(relwidth=1, relheight=1)

# Weather icon
icon_frame = tk.Frame(weather_frame, bg='#80c1ff')
icon_label = tk.Label(icon_frame)
icon_label.place(relx=0.5, rely=0.5, anchor='center')
icon_frame.place(relx=0.8, rely=0.3, relwidth=0.2, relheight=0.4, anchor='n')

root.mainloop()
输出:
代码首先导入必要的库,包括tkinter,MessageBox,请求和PIL。接下来定义了get_weather()函数,当用户单击“ Get Weather”按钮时,该函数被称为。该功能首先从文本输入字段中检索城市名称,并为OpenWeathMap API请求构建URL。然后,它发送请求并以JSON对象的形式检索天气数据。
如果响应包括一个错误消息,则代码显示一个错误消息对话框。否则,它将解析JSON数据以提取天气信息并将其显示为GUI上的标签。该代码还从OpenWeatherMap API检索天气图标并在GUI上显示。
其余代码创建了GUI元素,包括背景梯度图像,帧,输入字段和按钮。最终的天气应用程序为特定城市提供了一个简单易用的界面,可用于检索天气信息。
