介绍 :
嘿,那里ð,在本教程中,我们将学习有关使用光纤Web框架,PostgreSQL DB和Gorm在Golang Rest-apis中实现JWT身份验证的信息。
JWT:
JSON Web令牌(JWT)是基于JSON的开放标准(RFC 7519),用于创建主张一些索赔的访问令牌。例如,服务器可以生成具有“登录为admin”并将其提供给客户端的代币。然后,客户可以使用该令牌来证明其已登录为Admin。令牌由服务器的密钥签名,因此客户端和服务器都可以验证令牌是否合法。这允许服务器信任令牌并授予客户端与该令牌相关的权限。
。JWT通常用作身份验证用户的一种方式。当用户登录到服务器时,服务器会创建一个JWT,该JWT包含有关用户的信息并使用秘密键签名。然后,服务器将令牌发送回客户端,客户端将其存储供将来使用。当客户端要访问受保护的路线或资源时,它将发送JWT与请求一起发送。然后,如果令牌有效,服务器可以验证令牌并授予对受保护路由或资源的访问。
我们正在建立什么:
我们将构建一个Web API供用户登录,注册,查看活动用户并注销。
先决条件ð:
要继续进行教程,首先,您需要安装Golang,Fiber和PostgreSQL。如果您尚未在Fiber Web框架系列上完成以前的教程,则可以在此处看到它们:)
安装:
- Golang
- Go-Fiber:我们将在教程中看到这一点。
- PostgreSQL
- Gorm:我们将在教程中看到这一点。
入门ð:
让我们通过使用以下命令创建主要项目目录JWT-AUTH-API开始。
(ð¥请小心,有时我通过在代码中发表评论来完成解释)
mkdir jwt-auth-api //Creates a 'jwt-auth-api' directory
cd jwt-auth-api //Change directory to 'jwt-auth-api'
现在初始化一个mod文件。 (如果您发布了模块,则必须是通过Go Tools下载模块的路径。这将是您的代码存储库。)
go mod init <repository-name>
在我的情况下,存储库名称为github.com/Siddheshk02/jwt-auth-api。
安装光纤框架运行以下命令:
go get -u github.com/gofiber/fiber/v2
要安装GORM并安装Gorm Postgres驱动程序,请运行以下命令。 :
go get -u gorm.io/gorm
go get -u gorm.io/driver/postgres
初始化ð»:
让我们通过创建一个新的光纤实例来设置服务器。为此,创建一个文件main.go并向其添加以下代码:
package main

import (
    "github.com/Siddheshk02/jwt-auth-api/routes" // importing the routes package
    "github.com/gofiber/fiber/v2"
)

func main() {
    app := fiber.New()

    routes.Setup(app) // A routes package/folder is created with 'Setup' function created.

    app.Listen(":8000")
}
在routes.go中,所有端点都是为获取用户,登录,注册和注销的所有端点。
路线:
在routes.go文件中添加以下代码:
package routes

import (
    "github.com/gofiber/fiber/v2"
)

func Setup(app *fiber.App) {
    api := app.Group("/user")

    api.Get("/get-user", func(c *fiber.Ctx) error {
        return c.SendString("Hello World!!")
    })
}
现在让我们运行并测试get端点的API。
运行GO RUN main.go。
用于测试API,我正在使用POSTMAN您可以使用任何工具。
routes.go看起来像以下代码:
package routes

import (
    "github.com/Siddheshk02/jwt-auth-api/controllers" // importing the routes package
    "github.com/gofiber/fiber/v2"
)

func Setup(app *fiber.App) {
    api := app.Group("/user")

    api.Get("/get-user", controllers.User)

    api.Post("/register", controllers.Register)

    api.Post("/login", controllers.Login)

    api.Post("/logout", controllers.Logout)
}
用户,寄存器,登录和注销是我们将在控制器软件包/文件夹中的controller.go中创建的函数。这些将执行实际任务。
首先,让我们通过寄存器函数尝试一个简单的任务,以下代码添加到寄存器函数中。
(目前,您可以对其他API端点进行评论,即/login,/get-user和/logout)
package controllers

import "github.com/gofiber/fiber/v2"

func Register(c *fiber.Ctx) error {
    var data map[string]string

    if err := c.BodyParser(&data); err != nil {
        return err
    }

    return c.JSON(data)

}
现在,通过传递数据如下图所示的数据测试/register端点。
如果没有错误,则将打印确切的数据。
数据库:
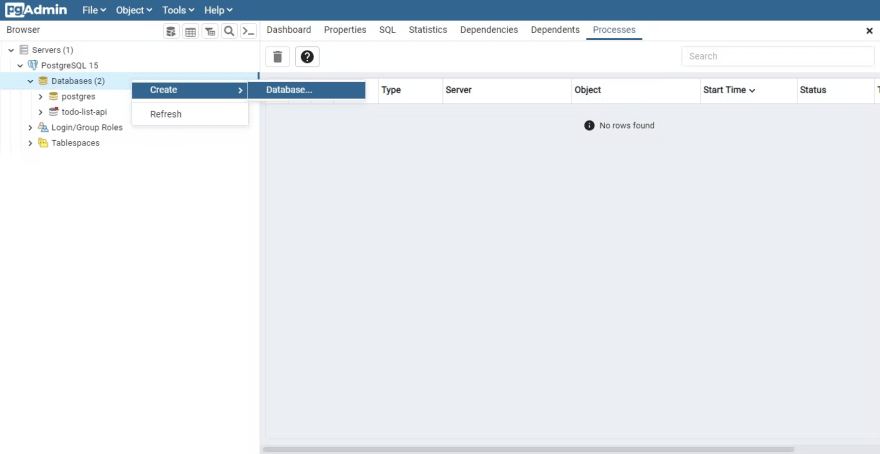
让我们创建数据库并将其命名为jwt-auth-api,创建数据库的步骤是数据库>>创建>>数据库。

创建数据库后,现在制作一个文件夹数据库,我们将在其中制作dbconn.go文件。在此文件中,我们将添加数据库连接和迁移函数。
package database

import (
    "fmt"
    "log"

    "github.com/Siddheshk02/jwt-auth-api/models" // this will be imported after you've created the User Model in the models.go file
    "gorm.io/driver/postgres"
    "gorm.io/gorm"
)

const (
    host     = "localhost"
    port     = 5432
    user     = "postgres"
    password = "<password>" //Enter your password for the DB
    dbname   = "jwt-auth-api"
)

var dsn string = fmt.Sprintf("host=%s port=%d user=%s "+
    "password=%s dbname=%s sslmode=disable TimeZone=Asia/Shanghai",
    host, port, user, password, dbname)

var DB *gorm.DB

func DBconn() {
    db, err := gorm.Open(postgres.Open(dsn), &gorm.Config{})
    if err != nil {
        log.Fatal(err)
    }
    DB = db

    db.AutoMigrate(&models.User{}) // we are going to create a models.go file for the User Model.
}
函数gorm.Open()每当称为新连接池。
db.AutoMigrate()呼叫有助于创建表(如果尚未存在)。数据库迁移通常是随着时间的推移改变数据库结构的原因,这有助于确保数据库结构正确迁移到最新版本。
制作一个文件夹models,其中将创建models.go并在其中更新文件。
package models

import "gorm.io/gorm"

type User struct {
    gorm.Model
    Name     string `json:"name"`
    Email    string `json:"email" gorm:"unique"`
    Password []byte `json:"-"`
}
您可以看到,我们的用户模型将具有名称,电子邮件和密码。在这里,电子邮件将是唯一的。这意味着,一旦我们完成了应用程序并尝试通过相同的电子邮件注册新用户,则该代码将允许我们这样做。最好的部分是,您不必为此编写任何代码。一切都由Gorm处理。
gorm.Model规范在模型中添加了一些默认属性,例如ID,创建的日期,修改日期和已删除日期。
现在,使用以下代码更新main.go文件。
package main

import (
    "github.com/Siddheshk02/jwt-auth-api/database"
    "github.com/Siddheshk02/jwt-auth-api/routes"
    "github.com/gofiber/fiber/v2"
)

func main() {
    database.DBconn()

    app := fiber.New()

    routes.Setup(app)

    app.Listen(":8000")
}
登记 :
让我们根据我们创建的用户模型和数据库表更新controllers.go中的register()函数。
func Register(c *fiber.Ctx) error {
    var data map[string]string

    if err := c.BodyParser(&data); err != nil {
        return err
    }

    password, _ := bcrypt.GenerateFromPassword([]byte(data["password"]), 14) //GenerateFromPassword returns the bcrypt hash of the password at the given cost i.e. (14 in our case).

    user := models.User{
        Name:     data["name"],
        Email:    data["email"],
        Password: password,
    }

    database.DB.Create(&user) //Adds the data to the DB

    return c.JSON(user)

}
现在,测试端点以存储信息。
登录 :
让我们让登录工作。在此取消点击之前,routes.go文件中的登录路线
在登录中,我们将获得与寄存器中相同的数据字符串,我们将检查与数据库输入的电子邮件是否存在。
如果存在,我们将使用内置函数比较密码。
func Login(c *fiber.Ctx) error {
    var data map[string]string

    if err := c.BodyParser(&data); err != nil {
        return err
    }

    var user models.User

    database.DB.Where("email = ?", data["email"]).First(&user) //Check the email is present in the DB

    if user.ID == 0 { //If the ID return is '0' then there is no such email present in the DB
        c.Status(fiber.StatusNotFound)
        return c.JSON(fiber.Map{
            "message": "user not found",
        })
    }

    if err := bcrypt.CompareHashAndPassword(user.Password, []byte(data["password"])); err != nil {
        c.Status(fiber.StatusBadRequest)
        return c.JSON(fiber.Map{
            "message": "incorrect password",
        })
    } // If the email is present in the DB then compare the Passwords and if incorrect password then return error.

    return c.JSON(user) // If Login is Successfully done return the User data.

}
测试登录端点:
为此,我们需要安装一个包。
go get github.com/golang-jwt/jwt
更新Login()功能以下代码,
const SecretKey = "secret"

func Login(c *fiber.Ctx) error {
    var data map[string]string

    if err := c.BodyParser(&data); err != nil {
        return err
    }

    var user models.User

    database.DB.Where("email = ?", data["email"]).First(&user) //Check the email is present in the DB

    if user.ID == 0 { //If the ID return is '0' then there is no such email present in the DB
        c.Status(fiber.StatusNotFound)
        return c.JSON(fiber.Map{
            "message": "user not found",
        })
    }

    if err := bcrypt.CompareHashAndPassword(user.Password, []byte(data["password"])); err != nil {
        c.Status(fiber.StatusBadRequest)
        return c.JSON(fiber.Map{
            "message": "incorrect password",
        })
    } // If the email is present in the DB then compare the Passwords and if incorrect password then return error.

    claims := jwt.NewWithClaims(jwt.SigningMethodHS256, jwt.StandardClaims{
        Issuer:    strconv.Itoa(int(user.ID)), //issuer contains the ID of the user.
        ExpiresAt: time.Now().Add(time.Hour * 24).Unix(), //Adds time to the token i.e. 24 hours.
    })

    token, err := claims.SignedString([]byte(SecretKey))

    if err != nil {
        c.Status(fiber.StatusInternalServerError)
        return c.JSON(fiber.Map{
            "message": "could not login",
        })
    }

    cookie := fiber.Cookie{
        Name:     "jwt",
        Value:    token,
        Expires:  time.Now().Add(time.Hour * 24),
        HTTPOnly: true,
    } //Creates the cookie to be passed.

    c.Cookie(&cookie)

    return c.JSON(fiber.Map{
        "message": "success",
    })
}
newwithClaims 采用两个参数,A 签名方法和索赔。索赔是JWT令牌将包含的实际数据。
jwt.newwithclaims 不会创建新的令牌,您需要调用SignedString功能传递,将其传递为秘密键,以获取实际的JWT令牌。我们将这个令牌存储在cookie中。
现在,对于CORS问题,即(当前端端口在其他端口上运行时,后端在其他端口上运行时出现的问题),我们在main.go文件中使用cors.new()函数。<
更新main.go文件,看起来像以下代码
package main

import (
    "github.com/Siddheshk02/jwt-auth-api/database"
    "github.com/Siddheshk02/jwt-auth-api/routes"
    "github.com/gofiber/fiber/v2"
    "github.com/gofiber/fiber/v2/middleware/cors"
)

func main() {
    database.DBconn()

    app := fiber.New()

    app.Use(cors.New(cors.Config{
        AllowCredentials: true, //Very important while using a HTTPonly Cookie, frontend can easily get and return back the cookie.
    }))

    routes.Setup(app)

    app.Listen(":8000")
}
现在,让我们测试登录端点并查看响应。发送请求,然后单击Cookies(1)部分。
用户:
在向前推进之前,请在routes.go文件中删除Get-user的获取端点,即api.Get("/get-user", controllers.User)。
现在,让我们更新函数User(),以通过使用cookie获取登录用户。
func User(c *fiber.Ctx) error {
    cookie := c.Cookies("jwt")

    token, err := jwt.ParseWithClaims(cookie, &jwt.StandardClaims{}, func(token *jwt.Token) (interface{}, error) {
        return []byte(SecretKey), nil //using the SecretKey which was generated in th Login function
    })

    if err != nil {
        c.Status(fiber.StatusUnauthorized)
        return c.JSON(fiber.Map{
            "message": "unauthenticated",
        })
    }

    claims := token.Claims.(*jwt.StandardClaims)

    var user models.User

    database.DB.Where("id = ?", claims.Issuer).First(&user)

    return c.JSON(user)

}
jwt.ParseWithClaims接受秘密键,它将函数作为第三个参数,您必须返回键。
测试Get-User端点。

在这里,我们可以看到密码。因此,如果您不想显示密码,请更新models.go作为
//Previous : Password []byte `json:"password"`
Password []byte `json:"-"`
再次发送请求,您将不会收到密码。
登出 :
在进行前进之前,请输入routes.go文件中注销的端口端点,即api.Post("/logout", controllers.Logout)。
现在,让我们更新以登录当前用户的函数Logout()。
要登录用户,我们需要删除cookie,但是没有办法删除浏览器中的cookie。因此,我们将创建一个不同的cookie,并在过去设置过期时间。然后我们设置cookie并返回响应。
func Logout(c *fiber.Ctx) error {
    cookie := fiber.Cookie{
        Name:     "jwt",
        Value:    "",
        Expires:  time.Now().Add(-time.Hour), //Sets the expiry time an hour ago in the past.
        HTTPOnly: true,
    }

    c.Cookie(&cookie)

    return c.JSON(fiber.Map{
        "message": "success",
    })

}
现在,测试注销端点。

现在,如果您测试 /get-user端点以查看已登录用户,则将无法看到任何用户。< /p>

因此,没有登录的用户。如果我们再次登录,则在检索用户时将生成另一个cookie。
所以,这就是JWT身份验证在Golang的工作方式。
完整的代码保存在此GitHub存储库中。
结论 :

您已经成功地创建了一个REST-API,并使用JWT身份验证来确保它 -
要获取有关Golang概念,项目等的更多信息,并且在教程上保持最新信息确实关注Siddhesh on Twitter和GitHub。
在此之前继续学习,请继续建造ðð


