是Makuake Advent Calendar 2022的23日。
我们知道,OpenTelemetry是生成和导出遥测数据的可观察性框架。随着越来越多的公司采用微服务和SLI/SLO,我们需要它回答新的,从未见过(和复杂)问题。
在这种情况下,使用异步消息传达的系统的可观察性与系统使用同步Messagin(如http或grpc)进行通信。
。作为一个示例通知系统呢:
- 最终用户发出通知事件后收到通知需要多长时间?
- 错误率是什么访问通知生命周期?
要回答这些问题,我们可能需要昂贵且独特的结构。
相反,在本文中,我将展示一种使用OpenTelemetry的简便方法。
示例案例
所有源代码都在这里:
https://github.com/ymtdzzz/batch-tracing-sample
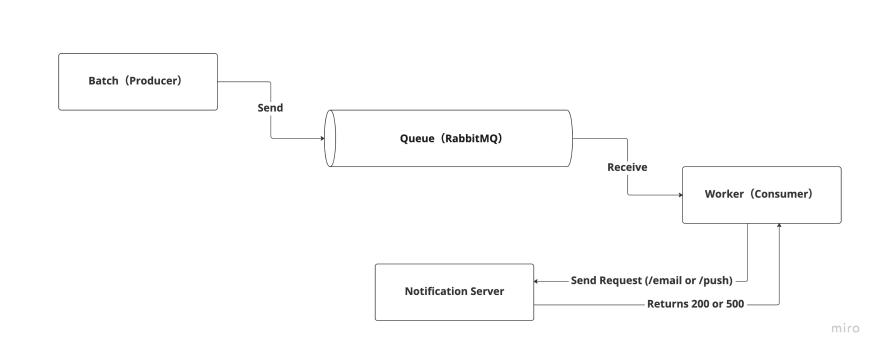
处理流程:
- 将通知内容作为批次中队列(Rabbit MQ)的消息加入
- 一个工人(消费者)异步接收消息,然后将请求发送到通知服务器(/电子邮件或/push)
- 在通知服务器中,它响应200或500
假设每个组件的仪器已经完成,并且HTTP通信也已由net/http auto instrumentation library。
问题
在当前状态下,批处理处理和后续处理(工作)无法追踪。
此外,Golang中似乎没有兔子的乐器库。
https://opentelemetry.io/registry/?s=rabbitmq&component=&language=
我们应该做什么?
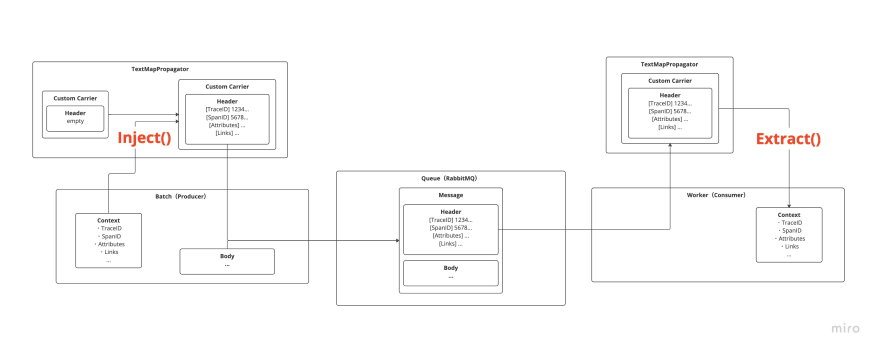
要传播上下文,我们可以使用opentelemetry Propagator进行sync和异步类型的消息!
实施兔子的自定义传播器
什么是繁殖器?
https://opentelemetry.io/docs/reference/specification/context/api-propagators/
传播器API是跨进程传播上下文的接口定义 - 发件人如何将 *s上下文注入消息以及接收器如何从消息中提取 *s。繁殖器的载体负责实际注入和从任何类型的消息中提取。
幸运的是,RabbitMQ允许将key-value格式化为消息(docs),因此我们可以使用TextMapPropagator。
传播器实施
实际上,由于它不是传播器,而是操纵TextMap的载体,因此我们要做的就是实现满足TextMapCarrier接口的结构!
TextMapCarrier接口(doc):
type TextMapCarrier interface {

    // Get returns the value associated with the passed key.
    Get(key string) string

    // Set stores the key-value pair.
    Set(key string, value string)

    // Keys lists the keys stored in this carrier.
    Keys() []string
}
此接口的运营商实现(source code):
type AMQPCarrier struct {
    headers amqp.Table
}

func (c *AMQPCarrier) Get(key string) string {
    return fmt.Sprintf("%s", c.headers[key])
}

func (c *AMQPCarrier) Set(key string, value string) {
    c.headers[key] = value
}

func (c *AMQPCarrier) Keys() []string {
    keys := make([]string, len(c.headers))
    for k := range c.headers {
        keys = append(keys, k)
    }
    return keys
}
amqp.Table只是map[string]interface{}。 Get()实现有点粗糙,但这足够了,例如;)
发件人侧实现
在发件人侧,我们可以将上下文注入标题并发送消息(source code)。
    // Create an empty amqp.Tables
    headers := amqp.NewConnectionProperties()
    // Assign it to custom Carrier
    carrier := internal.NewAMQPCarrier(headers)
    // Inject the context
    otel.GetTextMapPropagator().Inject(ctx, carrier)
    err = ch.PublishWithContext(
        ctx,
        "",
        q.Name,
        false,
        false,
        amqp.Publishing{
            ContentType: "application/octet-stream",
            Body:        msg,
            Headers:     headers, // Assign the context injected headers
        },
    )
    if err != nil {
        panic(err)
    }
    log.Println("Message has been sent")
接收器侧实现
接收器侧是相同的。
        // Assign the received headers to custom Carrier
        carrier := internal.NewAMQPCarrier(d.Headers)
        // Extract the context
        ctx := otel.GetTextMapPropagator().Extract(context.Background(), carrier)
        // Generate child Span with received context as parent Span
        ctx, span := otel.Tracer("notification").Start(ctx, "consume")

        msg, err := internal.DecodeNotificationMessage(d.Body)
        if err != nil {
            panic(err)
        }
        log.Printf("received msg: %v\n", msg)

        internal.CallServer(ctx, &client, msg)

        span.End()
我们都设置了ð
现在,让我们启动应用程序并检查jaeger ui端点(http://localhost:16686/)。
通过连接轨迹,我们现在可以轻松地调查整个通知生命周期中的任何错误。
此外,由于能够测量整个跟踪的持续时间,我们可以分析性能降低的瓶颈,并根据用户体验通知慢速通知。
我希望您从这篇文章中学到新知识,请告诉我,如果您在评论或Twitter中有任何反馈!


