很少有实施自己的身份验证系统的公司。这是因为即使是大型和先进的公司也可以遭受安全攻击的牺牲品。这导致了尴尬的诉讼,在某些情况下,公司的失败。
身份验证系统是在复杂应用程序或服务中作为组件开发的。如果公司正在开发用于提供身份作为服务的身份验证系统,那么花时间和资源是有意义的。但是,如果将其用作复杂应用程序中的组件之一,那么即使是大型和高级公司也尝试使用已经尝试和测试的内容。这种方法不仅节省了时间和金钱,而且将为如此重要的组成部分提供急需的安全性。
开发人员长期以来一直在开发和优化身份验证系统。它仍然是一个需要专门的时间和资源的复杂功能。处理用户数据可能是在任何应用程序(Web或NoT)中获得正确的最复杂零件之一。有很多地方可以出现问题。确保您的应用确实很安全变得非常困难。
不仅登录表单 - >检查用户名/密码 - >设置cookie。它还有很多其他事情要考虑:
cookie安全性,密码要求,在数据库中存储密码,电子邮件vs用户名,限制身价身份验证尝试,验证码,密码重置,2FA,通过管理员配置和whatnot。
。这就是为什么在为Web应用程序设计身份验证系统时,必须遵循最新的最佳实践。更好的是,当您专注于应用程序的核心功能时,您可以让更有经验的人为您做。
这是FACEIO派上用场的地方。在这种情况下,面对更有经验的人会为我们照顾身份验证。
使用FACEIO,您可以利用软件开发中一些最聪明的思想的体验来建立一个经过多年战斗并由行业专家进行战斗的身份验证系统。
faceio是一个面部身份验证框架,可以通过简单的JavaScript片段在网站或Web应用程序上实现。它使用面部识别而不是传统的登录/密码对或OTP代码对用户进行身份验证。它是跨浏览器,云和本地可部署。
我认为,这是向网站或Web应用程序添加无密码身份验证的最简单方法。仅在您的网站上简单地âimplementâfio.js - 您将能够立即验证现有用户,并通过面部识别来注册新用户 - 使用他们喜欢的计算机网络摄像头或智能手机正面摄像头在他们喜欢的浏览器上。
足够的理论,让我向您展示一个关于如何在ReactJS应用中集成和使用面部验证的工作演示。

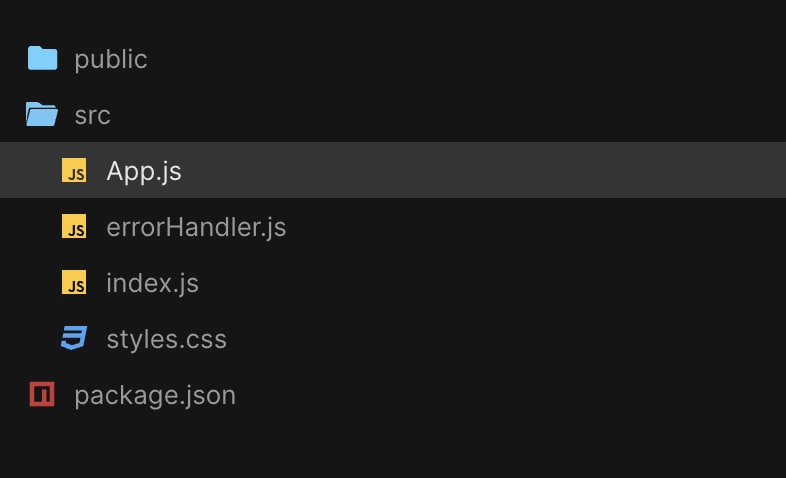
这是我的ReactJS应用程序的文件夹结构,我将用于Faceio Demo。
设置ReactJS项目后集成的第一步是将fio.js cdn集成在public/index.html文件中,如下部分
所示
<!DOCTYPE html>
<html lang="en">
  <head>
    <meta charset="utf-8" />
    <meta
      name="viewport"
      content="width=device-width, initial-scale=1, shrink-to-fit=no"
    />
    <meta name="theme-color" content="#000000" />
    <!--
      manifest.json provides metadata used when your web app is added to the
      homescreen on Android. See https://developers.google.com/web/fundamentals/engage-and-retain/web-app-manifest/
    -->
    <link rel="manifest" href="%PUBLIC_URL%/manifest.json" />
    <link rel="shortcut icon" href="%PUBLIC_URL%/favicon.ico" />
    <!--
      Notice the use of %PUBLIC_URL% in the tags above.
      It will be replaced with the URL of the `public` folder during the build.
      Only files inside the `public` folder can be referenced from the HTML.

      Unlike "/favicon.ico" or "favicon.ico", "%PUBLIC_URL%/favicon.ico" will
      work correctly both with client-side routing and a non-root public URL.
      Learn how to configure a non-root public URL by running `npm run build`.
    -->
    <title>React App</title>
  </head>

  <body>
    <noscript>
      You need to enable JavaScript to run this app.
    </noscript>
    <script src="https://cdn.faceio.net/fio.js"></script>
    <div id="root"></div>
    <!--
      This HTML file is a template.
      If you open it directly in the browser, you will see an empty page.

      You can add webfonts, meta tags, or analytics to this file.
      The build step will place the bundled scripts into the <body> tag.

      To begin the development, run `npm start` or `yarn start`.
      To create a production bundle, use `npm run build` or `yarn build`.
    -->
  </body>
</html>
您可以看到,我已经在index.html文件中的<script></script> tag中添加了facio cdn链接-https://cdn.faceio.net/fio.js
<script src="https://cdn.faceio.net/fio.js"></script>
第二部分比第一部分容易。您只需要调用enrolloll()函数即可签署应用程序的新用户或调用Authenticate()函数即可登录已验证的用户。
我已经在我的app.js文件中完成了此操作。但是您可以在任何文件中自由执行此操作。让您为您添加代码片段以更好地理解。
src/app.js
import React, { useState, useEffect } from "react";
import "./styles.css";
import { handleError } from "./errorHandler";
let faceio;
export default function App() {
  const [faceid, setFaceId] = useState(null);
  const [accountExistString, setAccountExistString] = useState("");
  useEffect(() => {
    faceio = new faceIO("<application-id>");
  }, []);
  useEffect(() => {
    setAccountExistString("");
  }, [faceid]);
  const handleNewUser = async () => {
    try {
      let response = await faceio.enroll({
        locale: "auto"
      });
      setFaceId(response.facialId);
    } catch (error) {
      console.log("error", error);
      handleError(error);
      if (error === 20) {
        setAccountExistString("Your account exists, Please Sign In");
      }
      if (error === 9 || error === 6) {
        setAccountExistString("Something went wrong! Please try again!");
      }
      if (error === 13) {
        window.location.reload();
      }
    }
    console.log("This is done");
  };

  const handleAuthentication = async () => {
    try {
      let response = await faceio.authenticate({
        locale: "auto"
      });
      setFaceId(response.facialId);
    } catch (error) {
      if (error === 20) {
        window.location.reload();
      }
    }
  };

  const handleLogout = async () => {
    window.location.reload();
  };

  return (
    <div className="App">
      {faceid && (
        <>
          <div>
            <img src="./padlock.svg" alt="faceid" height="300" width="200" />
          </div>
          <h1>Face Identity Verified</h1>
          <button className={"mybutton"} onClick={handleLogout}>
            Logout
          </button>
        </>
      )}
      {!faceid && (
        <>
          <h1> Verify Face Identity</h1>
          <img src="./faceid.svg" alt="faceid" height="300" width="200" />
          <button className={"mybutton"} onClick={handleAuthentication}>
            Sign In
          </button>
          <button className={"mybutton"} onClick={handleNewUser}>
            Sign Up
          </button>
          {accountExistString && <h3>{accountExistString}</h3>}
        </>
      )}
    </div>
  );
}
这里有三个重要的事情
- 使用
<application-id>初始化您的faceio应用程序。您通过注册FACEIO获得的应用ID。 - OnClick事件处理以登录并注册按钮。在注册时,我正在调用fio.js的以下enrollOll()函数。在登录时,我正在调用Authenticate()函数以登录已注册用户。我建议您浏览integration文档,以更好地了解fio.js的使用。
- 从fio.js处理错误我正在处理fio.js的所有类型错误。您可以在以下fio.js文档中找到错误代码及其描述。 fio.js error codes。
对于完整的代码,您可以使用https://github.com/sonu0702/faceiodemo.git
克隆我的faceiodemo github repo
这是我在vercel上部署的演示应用程序的预览。
https://csb-kwbgjs-nq8tfdpqc-sonu0702.vercel.app/
FACEIO也照顾了这一点。如果您尝试了我的演示应用程序,您会知道,一旦完成面部识别,您将需要输入PIN。该销钉与面部识别结合使用来验证您。
作为开发人员,我可以说总体面部效果提供了无忧的前端开发经验。前端开发人员不必担心创建形式,处理形式错误以及我们已经处理了这么长时间的所有其他事情。对于后端开发人员,FACEIO提供了有关创建新用户的Webhook事件。这些事件可以聆听并存储以对应用程序的其他API流进行身份。