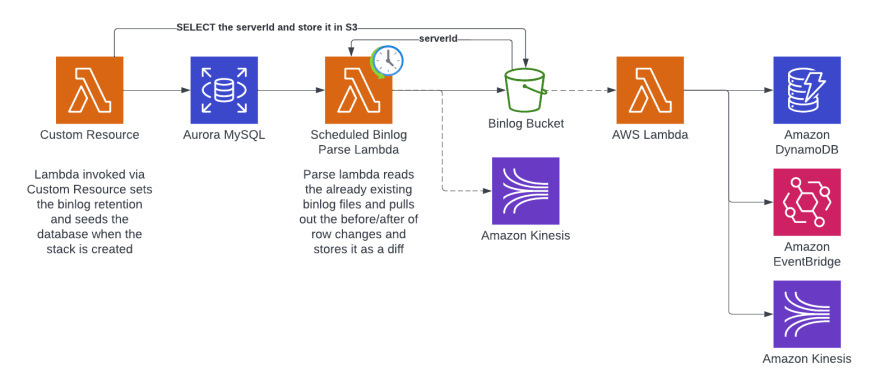
Aurora mysql不提供类似于DynamoDB Streams的更改数据捕获流。在这篇文章中,无论如何,我们都将使用内置的MySQL Binlog文件和计划的Lambda进行解析。我们将将这些数据存储在S3中,其中可以用于触发其他工作流或事件驱动的体系结构。
!¸这是一篇高级文章,期望对CDK(以及在一定程度上)有所了解。如果您需要在CDK上进行速成课程,请查看我的CDK Crash Course for freeCodeCamp.org **如果您对CDK和MySQL感到满意,并且不清楚...随时可以在Twitter @martzcodes **
这是我们的目标体系结构:
我们将使用CDK来提供所有资源。解析后有很多选择。我们将存储到S3上,以便我们可以粉丝 /后处理...但是您可以直接转到Kinesis(或其他任何其他东西)。上面的架构图显示了一些示例。
作为本文的一部分,我们只关注:
- 创建数据库
- 通过自定义资源(Lambda)初始化数据库
- 创建一个lambda来解析binlog
- 将解析的事件存储到S3* 中
如果您正在处理大量数据,请确保发出的事件不会减慢处理。例如,在初始测试中,我将从Binlog Parser-> DynamoDB中进行,但是为每个行进行放置项目增加了很多延迟,并大大减少了我可以处理的记录数量。例如,我只能在15分钟内处理我的一半数据(〜125K行事件)...与所有数据(〜250k行事件)相对于S3,在30秒内ððä
代码:https://github.com/martzcodes/blog-cdk-rds-binlog-streaming
什么是binlog文件?
ðâ binlog是二进制日志的缩写。
MySQL BinLogs是mysql的内置功能(不是特定于aurora/rds)。每当MySQL中发生更改时,都会写入二进制日志文件。当使用“ binlog_format”时,更改事件包括更改的行的前后快照和之后。对于包含多个行更改的数据库事务……它在一个事件中单独存储每行。 BINLOGS也是按时间顺序排列的。一切都按事件的时间订购,而BINLOGS则以相同的顺序流式传输。在背景中,binlog文件具有最大大小(通过配置设置),当达到该大小时,它会创建一个新文件。服务器将保留这些日志,以在数据库中配置的保留期间保留。
Binlogs通常用于复制和数据恢复。我们将使用它们用于流式传输数据事件ð
Binary logging can limit database performance (higher commit latency and lower throughput) because the logging for binlog events is integrated as part of a critical path of transaction commits.
Last year AWS released some cache improvements for binlog so you may want to turn those on as well.。但是,如果您已经打开了Binlog,并且不必担心性能的影响...额外的Binlog消费者应该增加几乎没有开销。
创建数据库
ââistim我们将使用CDK从头开始创建数据库,但这也可以与现有数据库一起使用。要使用现有数据库,您需要确保打开Binlogs并以行格式输出。然后,您需要一个带有SELECT, REPLICATION CLIENT, REPLICATION SLAVE赠款的数据库用户。
数据库簇需要附加的VPC,因此我们的第一步是创建VPC:
const vpc = new Vpc(this, "Vpc");
从那里我们使用该VPC创建数据库群集:
const cluster = new DatabaseCluster(this, "Database", {
  clusterIdentifier: `stream-db`,
  engine: DatabaseClusterEngine.auroraMysql({
    version: AuroraMysqlEngineVersion.VER_2_10_1,
  }),
  defaultDatabaseName: "martzcodes",
  credentials: Credentials.fromGeneratedSecret("clusteradmin"),
  iamAuthentication: true,
  instanceProps: {
    instanceType: InstanceType.of(
      InstanceClass.T3,
      InstanceSize.SMALL
    ),
    vpcSubnets: {
      subnetType: SubnetType.PRIVATE_WITH_EGRESS,
    },
    vpc,
  },
  removalPolicy: RemovalPolicy.DESTROY,
  parameters: {
    binlog_format: "ROW",
  },
});
重要的,与Binlog相关的是,这是我们使用parameters属性将binlog_format设置为ROW。这是我们需要对默认MySQL参数进行的唯一更改,并且可以启用Binlogging。
为了使我们的lambda函数与数据库群集通信,我们需要允许安全组内的主机连接到它。我们可以通过使用allowDefaultPortInternally方法使用群集的连接属性来做到这一点。
cluster.connections.allowDefaultPortInternally();
用自定义资源向数据库播种
初始化数据库时我们需要执行三件事。我们需要:
- 设置Binlog保留政策
- 添加一些示例数据(也将作为Binlog事件存储)
- 将ServerID存储在
serverId.json文件中,以供以后使用
CDK
桶
const binlogBucket = new Bucket(this, `binlog-bucket`, {
  removalPolicy: RemovalPolicy.DESTROY,
  blockPublicAccess: BlockPublicAccess.BLOCK_ALL,
  objectOwnership: ObjectOwnership.BUCKET_OWNER_ENFORCED,
  lifecycleRules: [
    {
      abortIncompleteMultipartUploadAfter: cdk.Duration.days(1),
      expiration: cdk.Duration.days(7),
    },
  ],
  autoDeleteObjects: true
});
我想在这里突出一些事情:
ð¥objectOwnership: ObjectOwnership.BUCKET_OWNER_ENFORCED强加了基于IAM的访问权限和对存储桶中物品的所有权。我强烈建议这样做...它比S3对象“拥有”的“遗产”方式要好得多。它避免了跨学院问题,并且运作非常顺利。在此示例中没有什么交叉账户,但这是我现在经常在我所有的新存储桶中包含的东西,因为旧金人拥有太多了。
- »ïstRelifecycleRules使得桶能够在一定持续时间后到期(可用于检查存储桶大小)。
ð§ãautoDeleteObjects: true...当堆栈被销毁时,如果其中仍然存在对象,则将删除存储桶失败。此设置创建一个自定义资源以自动删除堆栈删除上的存储桶对象。
兰姆达
const tableInitFn = new NodejsFunction(this, `tableInitFn`, {
  entry: `${__dirname}/tableInit.ts`,
  timeout: Duration.minutes(5),
  runtime: Runtime.NODEJS_16_X,
  environment: {
    SECRET_ARN: cluster.secret!.secretArn,
    BUCKET_NAME: binlogBucket.bucketName,
  },
  logRetention: RetentionDays.ONE_DAY,
  vpc,
  securityGroups: cluster.connections.securityGroups,
});
创建lambda是相当标准的。重要的是要注意,我们将lambda放在与数据库相同的VPC中,并且我们正在使用群集的安全组。我们还通过环境属性提供了存储桶名和秘密ARN。这些环境属性在Lambda的process.env环境中可用。
ð pro-tip:使用nodejsfunction时,请确保已将esbuild安装到Package.json文件中。否则,CDK将使用Docker进行打字稿捆绑(慢得多)
最后,我们需要授予集群秘密的读取访问权限(自动创建)并写入对存储桶的访问(服务器ID)。
cluster.secret!.grantRead(tableInitFn);
binlogBucket.grantWrite(tableInitFn);
自定义资源
const tableInitProvider = new Provider(this, `tableInitProvider`, {
  onEventHandler: tableInitFn,
});
const tableInitResource = new CustomResource(this, `tableInitResource`, {
  properties: { Version: "1" },
  serviceToken: tableInitProvider.serviceToken,
});
自定义资源需要一个Provider,该Provider指向要调用的函数。 Provider由CustomResource本身使用。
ð pro-tip:不想让您的定制率在每个部署时运行吗?在CustomResource道具中指定静态属性。通过指定properties: { Version: "1" },CustomResource基本上将对属性进行校验和校验,仅在校验和更改时运行。是否想确保您的CustomResource每次运行?制作不断变化的属性(例如Date.now())
为了确保自定义资源在完成表完成之前不会意外运行,我们可以添加依赖关系。 CDK应该检测到这一点,但是包括明确的依赖性绝对确定:
没有什么坏处
tableInitResource.node.addDependency(cluster);
lambda代码
ð»tableInit.ts lambda的代码在这里:https://github.com/martzcodes/blog-cdk-rds-binlog-streaming/blob/main/lib/tableInit.ts
我们仅希望在首次部署堆栈时运行数据库初始化代码。自定义资源的RequestType传递给了该事件,该事件说明堆栈是正在创建,更新或删除的。我们将从检查RequestType开始,如果不是Create,我们将返回成功(因此我们不会阻止后续部署)。
export const handler = async (
  event: CloudFormationCustomResourceEvent
): Promise<
  | CloudFormationCustomResourceSuccessResponse
  | CloudFormationCustomResourceFailedResponse
> => {
  if (event.RequestType === "Create") {
    // ... our init code will go here
  }
  return { ...event, PhysicalResourceId: "retention", Status: "SUCCESS" };
};
接下来,我们需要运行一些SQL命令到:
- 设置Binlog保留
- 种子数据库
- 选择服务器ID
设置BINLOG保留
早些时候,我们通过将binlog_format设置为ROW来打开Binlog。但是默认情况下,Binlogs并未保留,因此Aurora会清理它们。为了保持足够长的时间进行处理,我们将保留时间设置为24小时。
await connection.query(
  "CALL mysql.rds_set_configuration('binlog retention hours', 24);"
);
播种数据库
现在,我们的Binlog已经打开并保留,让我们创建一个桌子并填充它。这样做还将在Binlog中创建我们可以处理的事件。对于简洁起见,该代码将创建一个名为tasks的表,在单个查询中插入一些行,在单个查询中插入多行。更新一行并删除一行。 The code for this is here.
选择服务器ID(并将其存储在S3中)
最后,我们将选择服务器ID并将其存储在S3中。无法通过CDK参数对服务器ID进行预配置,因此我们将其存储为JSON文件,以便Binlog Parse Lambda稍后可以使用。
const serverId = await connection.query(`SELECT @@server_id`);
const command = new PutObjectCommand({
  Key: "serverId.json",
  Bucket: process.env.BUCKET_NAME,
  Body: JSON.stringify(serverId[0]),
});
await s3.send(command);
您也可以将其存储在参数存储 / DynamoDB表 /多个其他方法中...这很方便,因为Binlog Parse Lambda已经具有S3访问。< / p>
创建Python Lambda以在打字稿存储库中解析Binlog
CDK
对于这一部分架构,我们需要创建一个lambda,并(可选)按计划调用。
兰姆达
const binlogFn = new PythonFunction(this, `pybinlog`, {
  entry: join(__dirname, "binlog"),
  functionName: `pybinlog`,
  runtime: Runtime.PYTHON_3_8,
  environment: {
    SECRET_ARN: cluster.secret!.secretArn,
    BUCKET_NAME: binlogBucket.bucketName,
  },
  memorySize: 4096,
  timeout: Duration.minutes(15),
  vpc,
  securityGroups: cluster.connections.securityGroups,
});
binlogBucket.grantReadWrite(binlogFn);
cluster.secret!.grantRead(binlogFn);
再次,Lambda可以访问集群的VPC和安全组,以及与我们的TableInit Lambda相同的一般设置。主要区别是我们使用的是pythonfunction而不是打字稿。
PythonFunction来自实验CDK 2模块。它使用Docker包装Python代码。通过将其放在带有要求的目录中。TXT文件,它将自动将其安装到包装的Python代码中,然后将其作为lambda的资产上传。
ð - 在实践中,您需要使用SELECT, REPLICATION CLIENT, REPLICATION SLAVE赠款创建数据库用户。然后,您可以使用IAM身份验证来向数据库提出请求。为了轻松,此lambda正在使用相同的管理凭据,我不建议lambda用途。
- ¹我尝试了许多不同的方法来使用打字稿库获取可靠的Binlog流并失败。我尝试了https://github.com/nevill/zongji,mysql2(实际上并未使用ROW格式)并在普通的mysql npm库上进行黑客攻击。 AWS Blog: Streaming Changes in a Database with Amazon Kinesis使用的python模块快得多。
安排Lambda
â!!ï对于我的实际测试,我将手动调用lambda,但是如果您想安排lambda来处理Binlog,则可以这样做:
new Rule(this, `Schedule`, {
  schedule: Schedule.rate(Duration.minutes(15)),
  targets: [new LambdaFunction(binlogFn)]
});
lambda代码
ð我从研究生院以来就没有碰过python,所以如果您可以做出任何改进,请在Twitter @martzcodes上告诉我。
ð»binlog/index.py(python)lambda的代码在这里:https://github.com/martzcodes/blog-cdk-rds-binlog-streaming/blob/main/lib/binlog/index.py
BinLogStreamReader有几个我们需要检索的输入。首先,我们将使用数据库主机/用户名/密码检索集群的秘密,然后我们将获取存储在S3中的ServerID。
skipToTimestamp = None
get_secret_value_response = secretsmanager.get_secret_value(SecretId=os.environ.get('SECRET_ARN'))
secret_string = get_secret_value_response['SecretString']
db = json.loads(secret_string)
connectionSettings = {
  "host": db['host'],
  "port": 3306,
  "user": db['username'],
  "passwd": db['password']
}

get_meta = s3.get_object(Bucket=os.environ.get("BUCKET_NAME"),Key="serverId.json")
server_id = json.loads(get_meta['Body'].read().decode('utf-8'))["@@server_id"]

stream = BinLogStreamReader(
  connection_settings=connectionSettings,
  server_id=int(server_id),
  resume_stream=False,
  only_events=[DeleteRowsEvent, WriteRowsEvent, UpdateRowsEvent], # inserts, updates and deletes
  only_tables=None, # a list with tables to watch
  skip_to_timestamp=skipToTimestamp,
  ignored_tables=None, # a list with tables to NOT watch
  )
接下来,我们将初始化一些数据字段,然后开始通过流循环。 BINLOG事件是特定于表格的,然后在特定的SQL查询中更改了行列表。当查询中更改多行时,它们都具有相同的时间戳。
在随后的运行中,获取此时间戳并使用相同的时间戳过滤排出行会很有用,以确保我们不会重新处理数据。我将在下一部分(额外的lambda代码)中详细介绍。
目前,我们初始化输出字典和我们跟踪的一些通用指标。我们将将这些行事件的较小版本存储为JSON In-Memory,并在最后将它们全部保存到S3。
totalEventCount = 0
errorCount = 0
dataToStore = {}
dataToStoreCount = {}
dataToStoreLastTimestamp = {}
next_timestamp = None
for binlogevent in stream:
  # if skipToTimestamp is enabled this should skip already processed events from the previous run
  if binlogevent.timestamp == skipToTimestamp:
    continue
  if binlogevent.table not in dataToStore:
    dataToStore[binlogevent.table] = []
    dataToStoreCount[binlogevent.table] = 0
    dataToStoreLastTimestamp[binlogevent.table] = 0
  for row in binlogevent.rows:
    # ... row code here ...
我们的最终输出JSON包括更改行的键,架构,表和事件类型(插入,更新,删除),然后仅如果是更新的值,则仅此更改值更改的值。如果要将此事件发射到EventBridge上,则可以根据任何这些字段来创建EventPatterns的规则!
totalEventCount += 1
row_keys = {}
normalized_row = json.loads(json.dumps(row, indent=None, sort_keys=True, default=str, ensure_ascii=False), parse_float=Decimal)
delta = {}
columns_changed = {}
if type(binlogevent).__name__ == "UpdateRowsEvent":
  row_keys = primary_keys(binlogevent.primary_key, normalized_row['after_values'])

  # the binlog includes all values (changed or not)
  # filter down to only the changed values
  after = {}
  before = {}
  for key in normalized_row["after_values"].keys():
    if normalized_row["after_values"][key] != normalized_row["before_values"][key]:
      after[key] = normalized_row["after_values"][key]
      before[key] = normalized_row["before_values"][key]
      columns_changed[key] = True
  # store them as a string in case we want to store them in dynamodb and avoid type mismatches
  delta["after"] = json.dumps(after, indent=None, sort_keys=True, default=str, ensure_ascii=False)
  delta["before"] = json.dumps(before, indent=None, sort_keys=True, default=str, ensure_ascii=False)
else:
  row_keys = primary_keys(binlogevent.primary_key, normalized_row['values'])

event = {
  "keys": row_keys,
  "schema": binlogevent.schema,
  "table": binlogevent.table,
  "type": type(binlogevent).__name__,
}

if type(binlogevent).__name__ == "UpdateRowsEvent":
  event["delta"] = delta
  event["columnsChanged"] = [col for col in columns_changed]

dataToStore[binlogevent.table].append(event)
dataToStoreCount[binlogevent.table] += 1
dataToStoreLastTimestamp[binlogevent.table] = binlogevent.timestamp
next_timestamp = binlogevent.timestamp
处理了所有行后,我们将n+2个文件存储到S3:
if next_timestamp:
  s3.put_object(
    Body=json.dumps({ "lastTimestamps": dataToStoreLastTimestamp, "counts": dataToStoreCount, "tables": dataToStore}, indent=None, sort_keys=True, default=str),
    Bucket=os.environ.get("BUCKET_NAME"),
    Key="binlog-{}.json".format(str(next_timestamp)))
  print("Done with combined file")

  for s3Table in dataToStore.keys():
    s3.put_object(
    Body=json.dumps({ "lastTimestamp": dataToStoreLastTimestamp, "count": dataToStoreCount[s3Table], "events": dataToStore[s3Table]}, indent=None, sort_keys=True, default=str),
    Bucket=os.environ.get("BUCKET_NAME"),
    Key="{}/table-binlog-{}.json".format(s3Table, str(next_timestamp)))
  print("done with individual tables")

  s3.put_object(
  Body=json.dumps({ "timestamp": next_timestamp, "lastTimestamps": dataToStoreLastTimestamp, "counts": dataToStoreCount }, indent=None, sort_keys=True, default=str),
  Bucket=os.environ.get("BUCKET_NAME"),
  Key="meta.json")
  print("Done with meta file")
我们存储:
- 一个“所有”文件,其中包括我们所有表的所有活动。
- n文件(每个表1)仅具有该表的更改。
- 一个具有最后时间戳的元文件
额外的lambda代码
BinLogStreamReader库有一个名为koude29的输入。这使您能够设置最小时间戳从Binlog(S)进行处理。
在随后的运行中,我们可以加载此文件并使用上一个运行中的最后一个时间戳:
if os.environ.get('SKIP_TO_TIMESTAMP_ENABLED') == '1':
  get_meta = s3.get_object(Bucket=os.environ.get("BUCKET_NAME"),Key="meta.json")
  meta_json = json.loads(get_meta['Body'].read().decode('utf-8'))
  skipToTimestamp=int(meta_json['timestamp']) # make sure it's an int and not a decimal
print("skipToTimestamp: {} {}".format(skipToTimestamp, type(skipToTimestamp).__name__))
结果
作为“快乐事故” ...当我设置表INIT功能时,我意外地运行了几次创建额外的数据。部署代码并手动调用解析器lambda后,我们得到了一个看起来像这样的S3存储桶:
serverId.json文件最终看起来像:
{"@@server_id":1831432894}
meta.json文件看起来像:
{
    "counts": {
        "tasks": 28
    },
    "lastTimestamps": {
        "tasks": 1664659652
    },
    "timestamp": 1664659652
}
和tasks/table-binlog-1664659652.json文件看起来像:
{
    "count": 28,
    "events": [
        {
            "keys": {
                "task_id": 17
            },
            "schema": "martzcodes",
            "table": "tasks",
            "type": "DeleteRowsEvent"
        },
        {
            "keys": {
                "task_id": 20
            },
            "schema": "martzcodes",
            "table": "tasks",
            "type": "WriteRowsEvent"
        },
        {
            "columnsChanged": ["title"],
            "delta": {
                "after": "{\"title\": \"Task 2/3\"}",
                "before": "{\"title\": \"Task 2/2\"}"
            },
            "keys": {
                "task_id": 19
            },
            "schema": "martzcodes",
            "table": "tasks",
            "type": "UpdateRowsEvent"
        }
    ],
    "lastTimestamp": {
        "tasks": 1664659652
    }
}
“真实”世界数据
我使用开发数据库种子来尝试一下。它处理了所有> 250k数据库的所有> 250K数据库更改,并将它们存储在S3中的所有表文件和单个表事件文件中(与此处提供的代码非常相似)。这花了不到30秒,并且使用很少的内存(286MB)。我们不一定要关心数据库中所有表的变更数据捕获事件,因此仅在我们关心的表上添加lambda s3触发器非常容易。
BinLogStreamReader库还包括options to only process for certain tables and to ignore certain tables。
ð - 我确实遇到了BinLogStreamReader的问题,试图用一些不喜欢的Unicode字符解析行。应该可以解决这个问题,但这不是我遵循的事情。
回顾
这里有很多机会。我们可以为MySQL创建类似于DynamoDB流的MySQL的流,并使用它驱动事件驱动的架构的整个流。 BinLogStreamReader库具有很大的灵活性,只专注于我们关心的表和进行增量处理的能力。
这需要调整。较低的环境很少与生产环境具有相同的流量。最初的部署可能配置为更频繁地运行并发出CloudWatch指标,以便以后将其缩放。
对于一些非常粗糙的lambda费用计算...我使用了带有4096MB内存(过度杀伤)的lambda。如果我们假设它运行1分钟(超级过高),并且我们每分钟调用一个lambda(也许是现实)...
lambda,有4096MB运行一分钟:$ 0.004002 / INDOKE
每月调用数量:APPX分钟每月:30 x 24 x 60 = 43200
每月费用(lambda Invoke成本x召唤数量/月):$ 172.89/月
可以缩放内存,每分钟都不需要一分钟的时间(尤其是如果您使用skip_to_timestamp(您将是))。在我的种子示例中,它在30秒内处理了250k记录。
ðÖªif(big If)它的缩放线性缩放以适合(理论上)处理30m行每小时会更改的成本模型。
您应该问自己的其他问题:
- X分钟延迟可以接受吗?
- 您对重复的事件有多敏感?
- 您是否已经有其他东西来做其他东西? (就我而言,我们这样做了,所以我们可以从我们现有的设置中摆脱困境,而几乎没有头顶ð)
实施这样的事情时,您还应该考虑什么?

