与mysql结婚
入门
本文将向您展示将飞镖蛙服务器连接到远程MySQL数据库的简单方法。 (您也可以在此处遵循其他类型的数据库的原则)。
最简单的开始方法是安装dart_frog_cli。要安装CLI,请打开终端并键入以下命令:
dart pub global activate dart_frog_cli
记住: - 您需要为每个全局酒吧依赖项添加路径
在这一点上,应该可用DART_FROG。您可以通过在终端中运行dart_frog来验证。
创建一个项目
dart_frog create name_of_your_project
现在,您还有一个要安装MySQL Connection
的软件包
mysql_client: ^0.0.25
记住: - 使用CLI
创建项目时,DART_FROG依赖项将可用步骤1
首先,您必须使用mysql_client创建与我们数据库的SQL连接
import 'package:mysql_client/mysql_client.dart';

/// creating a database connection with MySQL
class MySQLClient {
  /// Returns a singleton
  factory MySQLClient() {
    return _inst;
  }

  MySQLClient._internal() {
    _connect();
  }

  static final MySQLClient _inst = MySQLClient._internal();

  MySQLConnection? _connection;

  // initializes a connection to database
  Future<void> _connect() async {
    _connection = await MySQLConnection.createConnection(
      // "localhost" OR 127.0.0.1
      host: '127.0.0.1',
      // Your MySQL port
      port: 8000,
      // MySQL userName
      userName: 'root',
      // MySQL Database password
      password: '123456789',
      // your database name
      databaseName: 'profiles',
      // false - if your are not using SSL - otherwise it will through an error
      secure: false,
    );
    await _connection?.connect();
  }

  // execute a given query and checks for db connection
  Future<IResultSet> execute(
    String query, {
    Map<String, dynamic>? params,
    bool iterable = false,
  }) async {
    if (_connection == null || _connection?.connected == false) {
      await _connect();
    }

    if (_connection?.connected == false) {
      throw Exception('Could not connect to the database');
    }
    return _connection!.execute(query, params, iterable);
  }
}
第2步
您必须根据字段在数据库内创建一个表模型
/// Model based on you table inside MySQL

// ignore_for_file: public_member_api_docs

/*

Your database model - forExample

you created a database name profiles AND it has a table
called users and users have have rows and column you create
this model based on your fields inside you table


*/

class DatabaseModel {
  const DatabaseModel({
    this.email,
    this.password,
  });

  // fromJSON
  factory DatabaseModel.fromJson(Map<String, dynamic> json) {
    return DatabaseModel(
      email: json['email'] as String,
      password: json['password'] as String,
    );
  }

  // Create an DatabaseModel given a row.assoc() map
  factory DatabaseModel.fromRowAssoc(Map<String, String?> json) {
    return DatabaseModel(
      email: json['email'],
      password: json['password'],
    );
  }

  // toJSON
  Map<String, dynamic> toJson() {
    return {
      'email': email.toString(),
      'password': password.toString(),
    };
  }

  final String? email;
  final String? password;
}
步骤-3
然后,您必须进行查询才能访问我们表中的数据源。
import 'package:frogging/database/model.dart';
import 'package:frogging/database/sql_client.dart';

/// data source form MySQL

class DataSource {
  /// initializing
  const DataSource(
    this.sqlClient,
  );

  // Fetches all table fields from users table in our database
  Future<List<DatabaseModel>> fetchFields() async {
    // sqlQuey
    const sqlQuery = 'SELECT email, password FROM users;';
    // executing our sqlQuery
    final result = await sqlClient.execute(sqlQuery);
    // a list to save our users from the table -
    // i mean whatever as many as user we get from table

    final users = <DatabaseModel>[];
    for (final row in result.rows) {
      users.add(DatabaseModel.fromRowAssoc(row.assoc()));
    }
    // simply returning the whatever the the users
    // we will get from the MySQL database
    return users;
  }

  // accessing the client
  final MySQLClient sqlClient;
}
第4步
我们需要为依赖项注入创建中间件,文件名应以_underscore开头
_yourfilename.dart,也是因为我们在根文件夹外运行服务器,因此我们需要依赖项注入来启动我们的主服务器
import 'package:dart_frog/dart_frog.dart';
import 'package:frogging/database/sql_client.dart';
import 'package:frogging/source/data_source.dart';

/// Middleware ar use for the dependency injection
Handler middleware(Handler handler) {
  // we will call use the handler to handle our request and than
  // we will request a logger which means for each request
  // we will inject our  dependency
  return handler.use(requestLogger()).use(injectionHandler());
}

/// it will get the connection from our sqlClient and based on that
/// it will read the  context of our data source
/// because handler will handle the  each and every request we will make
Middleware injectionHandler() {
  return (handler) {
    return handler.use(
      provider<DataSource>(
        (context) => DataSource(context.read<MySQLClient>()),
      ),
    );
  };
}
//No need to panic we are using provider
步骤-5
您可以创建一个新的端点或使用默认index.dart。我希望此端点能够从数据库中返回所有攀登路线项目。我们需要从我们的数据源调用fetchfields()
import 'package:dart_frog/dart_frog.dart';
import 'package:frogging/source/data_source.dart';

// we will create a request to read our dataSource
Future<Response> onRequest(RequestContext context) async {
  // reading the context of our dataSource
  final dataRepository = context.read<DataSource>();
  // based on that we will await and fetch the fields from our database
  final users = await dataRepository.fetchFields();
  // than we will return the response as JSON
  return Response.json(body: users);
}
步骤-6
创建一个自定义入口点 - 飞镖青蛙支持在您需要对服务器初始化或希望在启动服务器之前执行代码的细粒度控制的情况下创建一个自定义入门点。
要创建一个自定义入口点,只需在项目的根部创建一个main.dart文件,并公开了顶级运行方法。
import 'dart:io';

import 'package:dart_frog/dart_frog.dart';
import 'package:frogging/database/sql_client.dart';

/// initializing our SQL Client
final mysqlClient = MySQLClient();

/*

Handler:-    handle the request
IP:-         default as 127.0.0.1 OR localhost
PORT:-       default 8080

 */

// function to run our HTTP server
Future<HttpServer> run(Handler handler, InternetAddress ip, int port) {
  return serve(handler.use(databaseHandler()), ip, port);
}

// handling the request for our database by reading it's context
Middleware databaseHandler() {
  return (handler) {
    return handler.use(
      provider<MySQLClient>(
        (context) => mysqlClient,
      ),
    );
  };
}
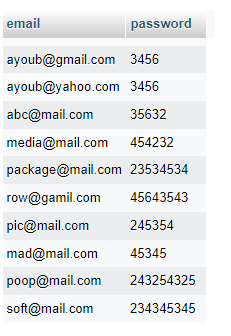
我的数据库结构MySQL内部
配置文件是数据库名称,用户是表
电子邮件和密码是字段 - 基于此,我们创建了我们的数据库模型
命令运行我们的服务器
在您的终端内运行此命令以启动服务器
dart_frog dev
它将显示为
回复
记住
您必须记住的第一件事是,您用于MySQL的端口地址应与用于服务器使用的端口不同。默认服务器端口为8080。在我的情况下,我将8000用于MySQL,用于服务器为8080


